background image


2.  CONNECTIONS AND CONTROLS 

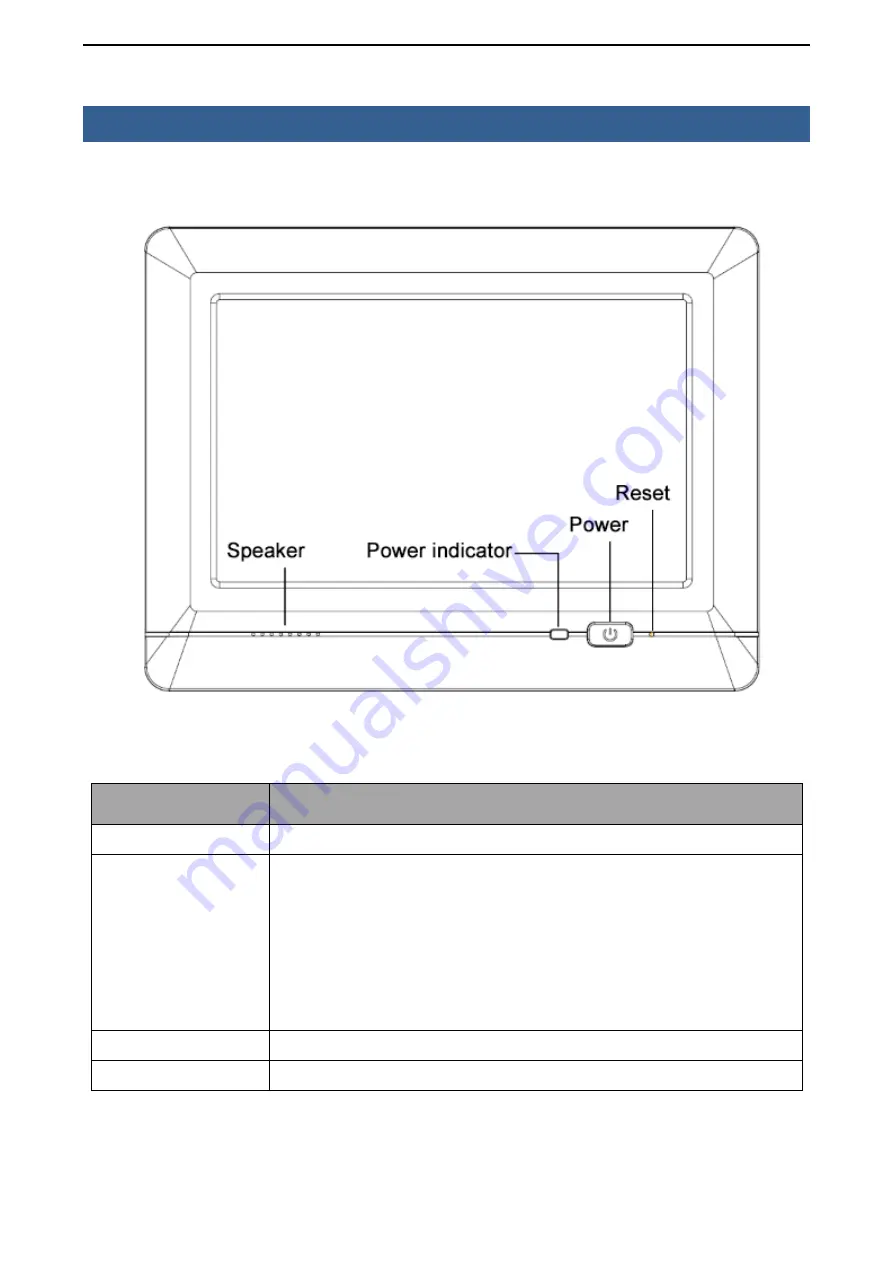
Front Panel 


Buttons


Description 

Speaker 

Speaker


Power indicator


  If  without  battery,  the  indicator  light  is  green  when  power  on;  and  the 

indicator light is off when power off. 

  If  with  battery,  and  the  battery  is  not  fully  charged,  the  light  is  red  when 

power  on;  the  light  is  green  when  battery  fully  charged;  the  light  is  red 

when battery charging after power off; the light is green when battery fully 

charged after power off. 

Power   

Press to turn ON / OFF the monitor. 

Reset


System restart


Содержание GK-7600

Страница 1: ...Industrial control equipment manual Manual Instruction...

Страница 2: ...CAUTIONS 2 Q A 3 1 INTRODUCTION 4 2 CONNECTIONS AND CONTROLS 5 FRONT PANEL 5 REAR PANEL 6 3 SETTING UP 7 TOUCH SCREEN CALIBRATION 7 4 WHOLE INSTALLATION 11 5 DIMENSION 12 6 BATTERY INSTALLATION 12 7 P...

Страница 3: ...The fuselage is external close a power source allocate away mains lead if should be clean quality cloth cleans with tiny wet soft when clean screen in order to not lose trifling soft of cotton please...

Страница 4: ...ivated Delaying or stagnating when pictures switch Please restart the device when above mentioned issues happen Touch screen don t response to clicks correctly Please calibrate the touch screen see mo...

Страница 5: ...7 Linux Debian7 0 operating system With features of rich resources interfaces low consumption and high reliability etc Features Reliable TI 3352 600MHz processor ARM Cortex A8 architecture RAM DDR3 51...

Страница 6: ...and the indicator light is off when power off If with battery and the battery is not fully charged the light is red when power on the light is green when battery fully charged the light is red when b...

Страница 7: ...6 Rear Panel...

Страница 8: ...e touch screen can t respond to your click please run the touch screen calibration program 1 Connect the power and press the power key to open directly enter into the OS of Windows Embedded Compact7 2...

Страница 9: ...8 3 Click Control Panel in the file manager 4 Then click Stylus...

Страница 10: ...te to begin the calibration 7 During calibration keep your finger or touch pen on the cross center of the screen until it moves to another area on the screen Operational tip Press on the center of the...

Страница 11: ...click the screen after calibration Return to Stylus Properities 9 Finish calibration 10 Click to accept new setting and exit the screen calibration 11 Click to reserve original setting and exit the sc...

Страница 12: ...3 Lock the 4 screws semicircle 4 20 up to the holes of iron sheets until the end About VESA Mounting Process for Device Lock the 4 screws semicircle 04 through the holes of iron sheet or wall up to th...

Страница 13: ...12 5 DIMENSION 6 Battery Installation I Battery II Plug power line into socket of battery slot...

Страница 14: ...13 III After plug in and put the battery into slot IV Settle the power line in the slot then finish installation V Serial port switch...

Страница 15: ...on Optional 3G Wi Fi GPS Touch Panel 4 wire resistive Display 7 LED backlight Screen Resolution 800 480 Brightness 300cd Contrast 500 1 Viewing Angle 140 120 H V Power Supply DC 9 36V without battery...

Страница 16: ...15 8 Accessories...

Отзывы: