background image


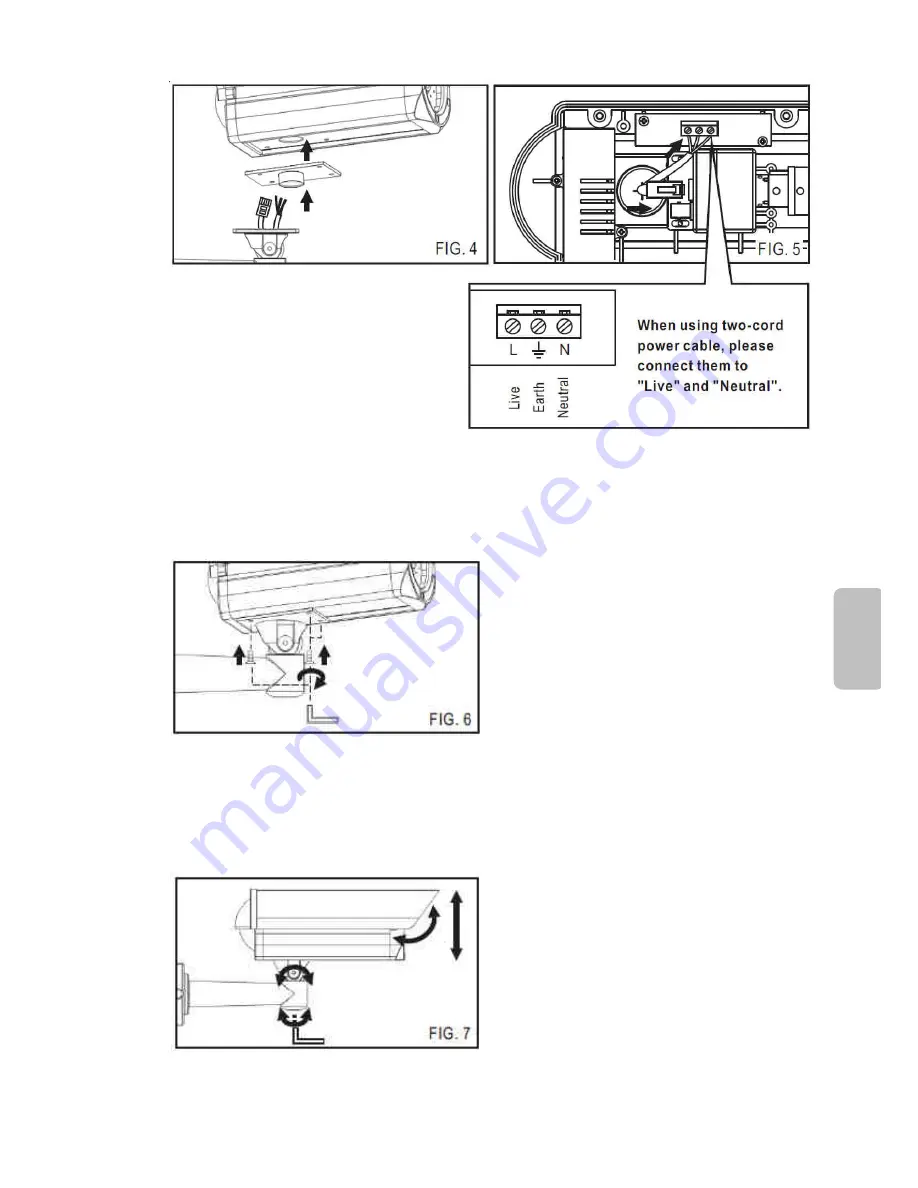
4.  Use os parafusos 1/4”-20UNC fornecidos (2 parafusos de prata) 

para fixar o corpo da câmera ao suporte com uma chave 
hexagonal de fenda (FIG.6). 


5.  Folgue os parafusos de ajuste de giro e inclinação do suporte 

para girar o corpo da câmera para o ângulo desejado e depois 
aperte os parafusos (FIG.7). 


P

o

rt

u

g

u

ê

s


- 53 - 

Содержание IPR424ESX

Страница 1: ...IPR434 438ESX LR7224 7228EX IPR424 428ESX D N 3MP HDVari Focal Infrared IP Camera D N 1080P HDVari Focal Infrared IP Camera D N 1080P HDVari Focal Infrared IP Camera Quick Installation Guide ...

Страница 2: ...or ventilated places Allow 10cm between this unit and its surroundings Do not continue to operate the unit under abnormal conditions such as detection of smoke strange smell or no display on screen while power is turned on Do not touch the power connection with wet hands Do not damage the power cord or leave it under pressure Do not operate this unit near magnet speaker system etc to avoid unneces...

Страница 3: ......

Страница 4: ...Product Overview Sun Shield Top Cover Bottom Chassis Bracket Pan Adjustment Screw Tilt Adjustment Screw Lens Light Sensor English Unit mm 1 ...

Страница 5: ...ll FIG 1 FIG 2 2 Take out the camera body and open the top cover with screw driver FIG 3 3 Put the power cable and network cable through the bracket rubber and then pull the cables through the bottom of camera body FIG 4 Connect the power cable to the terminal and connect the network cable to RJ 45 slot of the camera FIG 5 English 2 ...

Страница 6: ...ews 4 silver ones to fix the camera body on the bracket with hexagon screw driver FIG 6 5 Loose the pan and tilt adjustment screws on the bracket to turn the camera body to the desired angle and then tighten the screws FIG 7 English 3 ...

Страница 7: ...6 Adjust the lens on focus and zoom for recording clear video image After that tighten the screws FIG 8 7 Replace the top cover and tighten the screws FIG 9 FIG 10 System Overview Top View English 4 ...

Страница 8: ... System Architectures For connecting HD IP cameras to the network please follow one of the system architectures 1 Use AC24V or AC100 240V power supply and a network switch to connect to the network 2 Use a PoE 30W network switch to connect to the network 3 Use a PoE 30W power injector and a network switch to connect to the network English 5 ...

Страница 9: ...ia Internet browser 6 Enter the default username admin and password pass to operate NOTE For user convenience restoring the factory default settings will revert to the default IP address 192 168 0 200 Before Accessing IP Cameras Before accessing the IP camera make sure that the camera s RJ 45 network audio and power cables are properly connected To set the IP address consult your network administr...

Страница 10: ...e IPScan software from the installation CD and paste to your computer Alternatively you can execute the IPScan software from the installation CD or download the software from the Merit LILIN website www meritlilin com To change the settings of the IP address subnet mask gateway or HTTP port you can follow the steps below 1 Run the IPScan software 2 Click Refresh All available devices should be lis...

Страница 11: ...nternet browser and follow the steps below 1 Login to the H 264 Full HD IP camera by the default username admin and default password pass 2 Click Basic Mode configuration hyperlink 3 Click Network General hyperlink 4 Change the IP address subnet mask gateway or HTTP port for the IP camera 5 Click Submit to verify the settings English 8 ...

Страница 12: ... controls to Prompt and Run ActiveX control and plug in to Enable You can set this option via Internet Explorer Tools Options Security Settings Once complete you can access the IP camera s live video by entering the default IP address via your Internet browser As the security warning dialog box appears click OK to download the ActiveX directly from the IP camera English 9 ...

Страница 13: ...sic mode settings and see live video while the guest is allowed to see only live video The default usernames and passwords are as follows Administrator Viewer Username admin guest Password pass guest To logon the H 264 FULL HD IP camera please type username and password in logon HTML page and click on Submit button to enter the system English 10 ...

Страница 14: ...Produktübersicht Sonnenschutz Außenabdeckung Gehäuseunterteil Halterung Schwenkeinstellschraube Neigungseinstellschraube Objektiv Lichtsensor Deutsch Einheit mm 11 ...

Страница 15: ...estigen Sie sie an der Wand FIG 1 FIG 2 2 Öffnen Sie das Außengehäuse mit dem Schraubendreher FIG 3 3 Ziehen Sie das Netzkabel und das Netzwerkkabel durch das Halterungsgummi und dann durch den unteren Teil der Kamera FIG 4 Schließen Sie das Netzkabel an den Stromanschluss und das Netzwerkkabel an den RJ 45 Anschluss an FIG 5 Deutsch 12 ...

Страница 16: ...chrauben Vier Silbere Schrauben 1 4 20UNC an der Halterung fest FIG 6 5 Lösen Sie die Schwenk und Neigungseinstellschraube an der Halterung um die Kamera auf den gewünschten Winkel einzustellen Ziehen Sie dann die Schrauben wieder fest FIG 7 Deutsch 13 ...

Страница 17: ...v ein um bei der Aufnahme ein hohe Bildschärfe zu erhalten Ziehen Sie dann die Arretierungsschrauben am Objekt fest FIG 8 7 Setzen Sie die Abdeckung wieder auf und ziehen Sie die Schrauben fest FIG 9 FIG 10 Systemübersicht Ansicht von oben Deutsch 14 ...

Страница 18: ... Systemarchitektur Schließen Sie die HD IP Kameras auf eine der folgenden Arten an das Netzwerk an 1 Verwenden Sie ein Netzteil AC24V oder AC100 240V und ein Netzwerkswitch um die Kamera mit dem Netzwerk zu verbinden 2 Schließen Sie die Kamera über einen PoE Netzwerkswitch an das Netzwerk an 3 Schließen Sie die Kamera über einen PoE Strominjektor und einen Netzwerkswitch an das Netzwerk an Deutsch...

Страница 19: ...ät über den Internetbrowser 6 Geben Sie als Standardbenutzernamen admin und als Passwort pass ein Hinweis Beim Zurücksetzen der Einstellungen auf die Standardwerte wird auch die IP Adresse auf die Standardadresse 192 168 0 200 zurückgesetzt Vor dem Zugriff auf IP Kameras Stellen Sie vor dem Zugriff auf die IP Kamera sicher dass das RJ 45 Netzwerk Audio und Stromkabel der Kamera richtig angeschloss...

Страница 20: ...llations CD auf Ihren lokalen PC oder Sie können die IP Scan Software direkt von der Installations CD ausführen Das IP Scan Programm kann auch von unserer Unternehmenswebseite heruntergeladen werden Um eine IP Adresse Subnetzmaske Gateway oder HTTP Port zu ändern folgen Sie den nachstehenden Schritten 1 Lassen Sie das IP Scan Programm ablaufen 2 Klicken Sie auf Refresh Aktualisieren Alle verfügbar...

Страница 21: ...t Browser ein und folgen Sie den nach stehenden Schritten 1 Melden Sie die H 264 Full HD IP Kamera mit dem Standard Benutzernamen admin und Standardkennwort pass an 2 Klicken Sie auf den Link Basic Mode Basismodus 3 Klicken Sie auf den Link Network General Netzwerk Allgemein 4 Nutzen Sie die Bearbeitungsfelder um Adressen Subnetzmaske Gateway oder HTTP Port zu bearbeiten oder zu ändern 5 Klicken S...

Страница 22: ...forderung und Run ActiveX control and plug in ActiveX Steuerelemente und Plugins ausführen auf Enable Aktivieren Sie können dies unter Internet Explorer Tools Options Security Settings Internet Explorer Extras Internetoptionen Sicherheit einstellen Nach Abschluss können Sie auf das Live Video der IP Kamera durch Eingabe der Standard IP Adresse in Internet Explorer zugreifen Eine Warnmeldung wird a...

Страница 23: ...ie Standareinstellungen von Benutzername und Kennwort sind wie folgt beschriegen Administrator Gast Benutzername admin guest Kennwort pass guest Zur Anmeldung der H 264 FULL HD IP Kamera geben Sie den Benutzernamen und das Kennwort auf der HTML Seite ein und klicken Sie auf Submit Senden Deutsch 20 ...

Страница 24: ...Présentation du produit Pare soleil Couvercle supérieur Châssis inférieur Support Vis de réglage de panoramique Vis de réglage d inclinaison Objectif Capteur de lumière Français Unité mm 21 ...

Страница 25: ...FIG 2 2 Sortez le corps de la caméra et ouvrez le couvercle supérieur avec le tournevis FIG 3 3 Passez le câble d alimentation et le câble réseau à travers le caoutchouc du support puis tirez les câbles à travers le fond du corps de la caméra FIG 4 Branchez le câble d alimentation au bornier et le câble réseau à la prise RJ 45 FIG 5 Français 22 ...

Страница 26: ...en argent pour fixer le corps de la caméra sur le support avec un clé Allen FIG 6 5 Desserrez la vis de réglage d inclinaison et de panoramique sur le support pour tourner le corps de la caméra à l angle désiré et serrez les vis FIG 7 Français 23 ...

Страница 27: ...int et le zoom de l objectif pour enregistrer une image vidéo claire et nette Ensuite serrez les vis FIG 8 7 Replacez le couvercle supérieur et serrez les vis FIG 9 et FIG 10 Présentation du système Vue de dessus Français 24 ...

Страница 28: ... par défaut Architectures du système Pour la connexion des caméras IP HD au réseau veuillez suivre l une des architectures système 1 Utilises l alimentation 24VCA ou 100 240VCA et un commutateur réseau pour établir la connexion au réseau 2 Utilisez un commutateur réseau PoE pour la connexion au réseau 3 Utilisez un injecteur d alimentation PoE et un commutateur réseau pour la connexion au réseau F...

Страница 29: ...ur Internet 6 Entrez le nom d utilisateur admin et mot de passe pass par défaut pour le faire fonctionner Remarque Pour faciliter l utilisation la restauration des paramètres d usine par défaut reviendra à l adresse IP par défaut 192 168 0 200 Avant d accéder aux caméras IP Avant d accéder à la caméra IP assurez vous que les câbles réseau RJ 45 réseau audio et d alimentation de la caméra sont corr...

Страница 30: ...de de l utilitaire IP scan copiez l application IP scan depuis le CD d installation sur votre PC local Vous pouvez également exécuter le logiciel IP scan directement depuis le CD d installation L utilitaire IP scan peut également être téléchargé depuis le site web de notre société Pour changer l adresse IP le masque de sous réseau la passerelle ou le port HTTP veuillez suivre les étapes ci dessous...

Страница 31: ...ns le navigateur Internet et suivez les étapes ci dessous 1 Connectez vous à la caméra IP H 264 Full HD avec le nom d utilisateur par défaut admin et le mot de passe par défaut pass 2 Cliquez sur le lien de configuration Basic Mode Mode de base 3 Cliquez sur le lien hypertexte Network General Réseau Général 4 Dans les cases de modification saisissez ou modifiez les adresses le masque de sous résea...

Страница 32: ...trol and plug in Exécuter le contrôle ActiveX et le plugin sur Enable Activer Vous pouvez définir cela par Internet Explorer Tools Options Security Settings Internet Explorer Outils Options Paramètres de sécurité Après avoir terminé vous pouvez accéder à la vidéo en direct de la caméra IP en insérant l adresse IP par défaut dans votre navigateur Internet Explorer Une boîte de dialogue d avertissem...

Страница 33: ...s zones de noms d utilisateur et de mots de passe sont les suivantes Administrateur Invité Nom d utilisateur admin guest Mot de passe pass guest Pour vous connecter à la caméra IP veuillez saisir le nom d utilisateur et le mot de passe dans la page de connexion HTML et cliquez sur Submit Envoyer Français 30 ...

Страница 34: ...Vista general del producto Protector solar Tapa superior Chasis inferior Soporte Tornillo de ajuste panorámico Tornillo de ajuste de inclinación Lente Detector de luz Español Unidad mm 31 ...

Страница 35: ...FIG 2 2 Saque el cuerpo de la cámara la tapa superior con el destornillador FIG 3 3 Pase el cable de corriente y el cable de red a través de la goma del soporte y tire de los cables a través de la parte inferior del cuerpo de la cámara FIG 4 Conecte el cable de corriente al bloque de terminales y el cable de red a la ranura RJ 45 FIG 5 Español 32 ...

Страница 36: ...un destornillador hexagonal para fijar el cuerpo de la cámara al soporte FIG 6 5 Afloje los tornillos de ajuste de panorámico e inclinación del soporte para girar el cuerpo de la cámara al ángulo deseado y a continuación apriete los tornillos FIG 7 Español 33 ...

Страница 37: ...y el zoom de la lente para grabar imágenes de vídeo nítidas Posteriormente apriete los tornillos FIG 8 7 Coloque la tapa superior y apriete los tornillos FIG 9 et FIG 10 Vista general del sistema Vista superior Español 34 ...

Страница 38: ...Botón predeterminado de carga Arquitecturas del sistema Para la conexión de cámaras HD IP a la red siga una de las arquitecturas del sistema 1 Utilice una fuente de alimentación de 24VCA o AC100 240V y un switch de red para la conexión a la red 2 Utilice un switch de red PoE para la conexión a la red 3 Utilice un inyector PoE y un switch de red para la conexión a la red Español 35 ...

Страница 39: ... a través de un navegador de Internet 6 Introduzca el nombre de usuario por defecto admin y la contraseña pass Nota Para comodidad del usuario el reinicio a la configuración de fábrica devolverá la dirección IP a 192 168 0 200 Antes de acceder a las cámaras IP Antes de acceder a la cámara IP asegúrese de que los cables RJ 45 de red audio y de alimentación de la cámara estén correctamente conectado...

Страница 40: ...ión a su PC local O bien puede ejecutar directamente el software IP scan desde el CD de instalación La utilidad IP scan también puede descargarse desde nuestro sitio web Para cambiar una dirección IP máscara de subred puerta de enlace o puerto HTTP siga los pasos siguientes 1 Ejecute la utilidad IP scan 2 Haga clic en Refresh Actualizar Aparecerán todos los dispositivos disponibles en la lista de ...

Страница 41: ...uientes 1 Inicie sesión en la cámara IP H 264 Full HD con el nombre de usuario predeterminado admin y contraseña pass 2 Haga clic en el hipervínculo de configuración Basic Mode Modo básico 3 Haga clic en el hipervínculo Network General Red General 4 Para editar o modificar direcciones máscara de subred puerta de enlace o puerto HTTP utilice el cuadro de edición 5 Haga clic en Submit Enviar Español...

Страница 42: ...ntar y Run ActiveX control and plug in Ejecutar control y complemento ActiveX a Enable Habilitar Puede ajustar esto en Internet Explorer Tools Options Security Settings Internet Explorer Herramientas Opciones Configuración de seguridad Una vez completado podrá acceder al vídeo en vivo de la cámara IP insertando la dirección IP predeterminada en su navegador de Internet Aparecerá un cuadro de diálo...

Страница 43: ...ado Los nombres y contraseñas de usuario son los siguientes Administrador Observador Nombre de usuario admin guest Contraseña pass guest Para iniciar sesión en la cámara IP escriba el nombre de usuario y la contraseña en la página de inicio de sesión HTML y haga clic en Submit Enviar Español 40 ...

Страница 44: ...Panoramica del prodotto Parasole Coperchio superiore Telaio inferiore Staffa Vite regolazione panoramica Vite regolazione tilt Obiettivo Sensore luminoso Italiano Unità mm 41 ...

Страница 45: ... 2 2 Estrarre il corpo della telecamera e aprire il coperchio superiore con un cacciavite FIG 3 3 Inserire il cavo di alimentazione e il cavo di rete attraverso il gommino della staffa e poi tirare i cavi attraverso la parte inferiore del corpo macchina FIG 4 Collegare il cavo di alimentazione alla morsettiera e il cavo di rete allo slot RJ 45 FIG 5 Italiano 42 ...

Страница 46: ...to per fissare il corpo della telecamera sulla staffa con un cacciavite esagonale FIG 6 5 Allentare le viti di regolazione pan e titl sulla staffa per portare il corpo della telecamera nell angolazione desiderata e poi stringere le viti FIG 7 Italiano 43 ...

Страница 47: ... a fuoco e zoom dell obiettivo per registrare un immagine video nitida Dopodiché serrare le viti FIG 8 7 Riposizionare il coperchio superiore e serrare le viti FIG 9 e FIG 10 Panoramica del sistema Vista Alto Italiano 44 ...

Страница 48: ...ricamento predefiniti Architetture sistema Per collegare le telecamere IP HD alla rete applicare una delle architetture dei sistema 1 Usare una alimentazione AC24V o AC100 240V e uno switch di rete per collegare alla rete 2 Usare uno switch di rete PoE per collegare alla rete 3 Usare un iniettore di alimentazione PoE e uno switch di rete per collegare alla rete Italiano 45 ...

Страница 49: ...mite browser Internet 6 Immettere il nome utente predefinito admin e la password pass per azionare Nota Per comodità dell utente il ripristino delle impostazioni predefinite di fabbrica comporta il ripristino del numero IP predefinito di fabbirca 192 168 0 200 Prima di accedere alle telecamere IP Prima di accedere allaTelecamera IP accertarsi che i cavi di rete RJ 45 audio e di alimentazione siano...

Страница 50: ...azione sul PC locale In alternativa è possibile eseguire il software di scansione IP direttamente dal CD di installazione L utilità di scansione IP può anche essere scaricata dal sito Web della nostra azienda Per modificare un indirizzo IP maschera di sotto rete gateway o porta HTTP procedere come segue 1 Eseguire l utilità di scansione IP 2 Fare clic su Refresh Aggiorna Tutti i dispositivi dispon...

Страница 51: ...edere alla telecamera IP H 264 Full HD utilizzando il nome utente predefinito admin e la password predefinita pass 2 Fare clic sul collegamento ipertestuale di configurazione Basic Mode Modalità base 3 Fare clic sul collegamento ipertestuale Network General Rete generale 4 Per cambiare o modificare gli indirizzi maschera di sotto rete gateway o porta HTTP utilizzare la casella 5 Fare clic su Submi...

Страница 52: ... and plug in Esegui controlli e plug in ActiveX su Enable Attiva Questo può essere impostato Internet Explorer Tools Options Security Settings Internet Explorer Strumenti Opzioni Impostazioni di protezione Una volta fatto è possibile accedere al video in diretta della telecamera IP inserendo l indirizzo IP predefinito nel browser Internet Explorer Appare quindi una finestra di dialogo di avvertenz...

Страница 53: ...atore e guest Le aree nome utente e password sono le seguenti Amministratore Visualizzatore Nome utente admin guest Password pass guest Per eseguire il login dellaTelecamera IP digitare il nome utente e la password nella pagina di login HTML e fare clic su Submit Invia Italiano 50 ...

Страница 54: ...Visão geral do produto Anteparo para sol Tampa superior Chassis inferior Suporte Parafuso de ajuste de rotação Parafuso de ajuste de inclinação Lente Detector de luz Português Unit mm 51 ...

Страница 55: ... 2 2 Tire o corpo da câmera e abra a tampa superior com a chave de fenda FIG 3 3 Coloque o cabo de alimentação e o cabo de rede através da borracha do suporte e depois puxe os cabos através da parte inferior do corpo da câmera FIG 4 Conecte o cabo de alimentação ao bloco terminal e o cabo de rede à ranhura RJ 45 FIG 5 Português 52 ...

Страница 56: ... de prata para fixar o corpo da câmera ao suporte com uma chave hexagonal de fenda FIG 6 5 Folgue os parafusos de ajuste de giro e inclinação do suporte para girar o corpo da câmera para o ângulo desejado e depois aperte os parafusos FIG 7 Português 53 ...

Страница 57: ... lente em foco e zoom para gravar imagens de vídeo claras Depois disso aperte os parafusos FIG 8 7 Substitua a tampa superior e aperte os parafusos FIG 9 e FIG 10 Visão geral do sistema Vista de cima Português 54 ...

Страница 58: ...tão padrão de carga Arquiteturas de sistema Para conectar câmeras HD IP à rede siga uma das seguintes arquiteturas 1 Use uma fonte de alimentação injetor de energia de AC24V ou AC100 240V e um interruptor de rede para conectar à rede 2 Use um interruptor de rede PoE para conectar à rede 3 Use um injetor de energia PoE e um interruptor de rede para conectar à rede Português 55 ...

Страница 59: ...P através do navegador de Internet 6 Introduza o nome de usuário padrão admin e senha pass para operar Observação Para a conveniência do usuário restaurar as configurações padrão de fábrica reverterá para o endereço IP padrão 192 168 0 200 Antes de acessar câmeras IP Antes de acessar a câmera IP certifique se de que rede RJ 45 áudio e cabos de energia da câmera estejam adequadamente conectados Par...

Страница 60: ...ficação de IP do CD de instalação para seu computador Opcionalmente é possível executar o software de verificação de IP diretamente a partir do CD O utilitário de verificação de IP também pode ser baixado no site de nossa empresa Para alterar um endereço IP máscara de sub rede gateway ou porta HTTP siga as etapas abaixo 1 Execute o utilitário de verificação de IP 2 Clique em Atualizar Todos os dis...

Страница 61: ...navegador de Internet e siga as etapas abaixo 1 Conecte se à câmera H 264 Full HD IP usando o nome padrão admin e a senha pass 2 Clique no hyperlink de configuração Modo básico 3 Clique no hyperlink de configuração Rede Geral 4 Para editar ou modificar endereços máscara de sub rede gateway ou porta HTTP use a caixa de edição 5 Clique em Enviar Português 58 ...

Страница 62: ...n ActiveX assinados e Executar controle e plug in ActiveX para Ativar É possível ajustar isso através das opções Internet Explorer Ferramentas Opções Configurações de segurança Depois de concluir é possível acessar o vídeo em tempo real da câmera IP ao inserir o endereço IP padrão em seu navegador Internet Explore Uma caixa de diálogo de aviso de segurança será exibida Clique em OK para baixar o A...

Страница 63: ...inistrador e convidado As áreas de nome de usuário e senha são as seguintes Administrador Visualizador Nome de usuário admin guest Senha pass guest Para se conectar à câmera IP digite o nome de usuário e senha na página de acesso HTML e clique em Enviar Português 60 ...

Страница 64: ...Oбзор изделия Солнцезащитный козырек Верхняя крышка Основание Кронштейн Винт регулировки поворота Винт регулировки наклона Объектив Светочувствительный датчик Русский Ед измерения мм 61 ...

Страница 65: ...ене FIG 1 FIG 2 2 Достаньте корпус камеры и откройте верхнюю крышку с помощью отвертки FIG 3 3 Пропустите кабель питания и сетевой кабель через резиновый уплотнитель кронштейна и введите их в корпус камеры с нижней стороны FIG 4 Подсоедините кабель питания к клеммной колодке и сетевой кабель к разъему RJ 45 FIG 5 Русский 62 ...

Страница 66: ...1 4 20UNC 4 шт серебристого цвета и шестигранного ключа закрепите корпус камеры на кронштейне FIG 6 5 Ослабьте винты регулировки поворота и наклона на кронштейне чтобы повернуть корпус камеры на требуемый угол а затем затяните винты FIG 7 Русский 63 ...

Страница 67: ...тройте фокус и масштаб объектива для записи четкого видеоизображения После этого затяните винты FIG 8 7 Установите на место верхнюю крышку и затяните винты FIG 9 e FIG 10 Oбзор системы Вид сверху Русский 64 ...

Страница 68: ...олчанию Bарианты архитектуры системы Для подключения IP камер HD качества к сети используйте одну из следующих архитектур системы 1 Подключение к сети с помощью источника питания 24 В перем тока или 100 240 В перем тока и сетевого коммутатора 2 Подключение к сети с помощью сетевого коммутатора PoE 3 Подключение к сети с помощью инжектора питания PoE и сетевого коммутатора Русский 65 ...

Страница 69: ...граммы IPScan 5 Запустите IP устройство через веб браузер 6 Введите заданные по умолчанию имя пользователя admin и пароль pass чтобы начать работу Примечание Для удобства пользователей при сбросе настроек IP адрес устанавливается в значение по умолчанию 192 168 0 200 Перед получением доступа к IP камерам Перед получением доступа к IP камере убедитесь в надежности подсоединения кабеля питания аудио...

Страница 70: ...an Utility Для настройки IP адреса с помощью утилиты IP Scan Utility следует скопировать эту утилиту на компьютер с установочного диска Также программу IP Scan Utility можно запускать прямо с установочного диска Утилиту IP Scan Utility можно загрузить с вебсайта нашей компании Для изменения IP адреса шлюза маски подсети или порта HTTP выполните следующие действия 1 Запустите утилиту IP Scan Utilit...

Страница 71: ...00 и выполните следующие действия 1 Получите доступ к IP камере H 264 Full HD с использованием исходного имени пользователя admin и исходного пароля pass 2 Щелкните на ярлыке страницы настроек Basic Mode Основной режим 3 Щелкните на ярлыке Network General Сеть Общие 4 Для редактирования IP адресов маски подсети шлюза или HTTP порта используйте соответствующие поля ввода 5 Нажмите Submit Ввод Русск...

Страница 72: ...rol and plug in Запуск элементов ActiveX и модулей подключения в значение Enable Включить Для настройки этих параметров в Internet Explorer откройте меню Tools Options Security Settings Сервис Свойства обозревателя Безопасность По завершении настройки вы сможете получать доступ к живому изображению IP камеры вводя исходный IP адрес камеры в поле адреса вашего веб браузера Появится предупреждающее ...

Страница 73: ... и административный уровни Ниже приведены имена пользователей и соответствующие пароли Администратор Зритель Имя пользователя admin guest Пароль pass guest Для получения доступа к IP камере введите на странице доступа исходные имя пользователя и пароль и нажмите Submit Ввод Русский 70 ...

Страница 74: ...部件說明及尺寸 遮陽罩 上蓋 底座 腳架 水平方向調整螺絲 垂直方向調整螺絲 鏡頭 光線感應器 繁 體 中 文 繁 體 中 文 繁 體 中 文 繁 體 中 文 單位 mm 71 ...

Страница 75: ...安裝 1 首先取出腳架 把電源線 RJ 45 網路線穿過腳架 並將腳架固 定在牆上 FIG 1 FIG 2 2 接著使用螺絲起子打開攝影機主體的上蓋 FIG 3 3 將電源線 RJ 45 網路線先穿過腳架橡膠 再穿入攝影機主體的 底部 FIG 4 電源線插入電源端子並鎖緊 RJ 45 網路線插入 RJ 45 網路接頭 FIG 5 繁 體 中 文 繁 體 中 文 繁 體 中 文 繁 體 中 文 72 ...

Страница 76: ...4 接著取出所附的 1 4 20UNC 螺絲 銀色 4 顆 使用六角板手將 攝影機主體鎖緊在腳架上 FIG 6 5 轉鬆腳架上的水平及垂直調整螺絲 轉動攝影機主體到所需的攝 影角度後 再將其調整螺絲鎖緊 FIG 7 繁 體 中 文 繁 體 中 文 繁 體 中 文 繁 體 中 文 73 ...

Страница 77: ...6 調整鏡頭的焦距 放大倍數到所需的成像畫面 調整完畢後再將 其螺絲鎖緊 FIG 8 7 將攝影機主體上蓋蓋上並且鎖緊 FIG 9 FIG 10 系統簡介 俯視圖 俯視圖 俯視圖 俯視圖 繁 體 中 文 繁 體 中 文 繁 體 中 文 繁 體 中 文 74 ...

Страница 78: ...置描述 警報輸入輸出 聲音輸入輸出端子 SD Card 插槽 RJ 45 網路接頭 類比影像輸出 BNC 接頭 回復出廠預設值鍵 系統架構 請依據下列其中一種系統架構 連結高畫質網路攝影機和您的網路 1 使用 AC24V 或 AC100 240V 電源和網路交換器連接網路 2 使用配備 PoE 30W 的網路交換器連接網路 3 使用 PoE 30W 供電裝置 Power Injector 和網路交換器連 接網路 繁 體 中 文 繁 體 中 文 繁 體 中 文 繁 體 中 文 75 ...

Страница 79: ...用 IPScan 軟體搜尋此 IP 設備 5 使用網路瀏覽器開啟此 IP 設備 6 輸入預設使用者 admin 名稱及密碼 pass 進行操作 註 註 註 註 為方便使用者起見 回復出廠預設值會回復到預設 IP 位址 192 168 0 200 安裝前準備 在使用 H 264 FULL HD IP 攝影機之前 請先確認攝影機 RJ 45 網路接 頭和電源接頭是否接妥 並請網管人員提供一組未經使用的 IP 位址 出廠預設 IP 位址為 192 168 0 200 使用者可以先行使用該 IP 位址去 更改相關網路設定 繁 體 中 文 繁 體 中 文 繁 體 中 文 繁 體 中 文 76 ...

Страница 80: ...裝該元件 使用 IPScan 軟體工具來設定 IP 位址 欲使用 IPScan 網路設備搜尋軟體 工具來設定 IP 位址 你可以從隨貨 附贈軟體安裝光碟拷貝 IPScan 軟體工具到你的電腦 或直接在安裝光 碟上執行 IPScan 軟體 要更改 IP 位址 子網路遮罩 網路閘道 或 HTTP 連接埠 請參照下列步驟 1 執行 IPScan 軟體工具 2 按 更新表單 鍵 區域網路內的所有設備將顯示在設備清單欄 位 3 用滑鼠點選該設備 4 編輯或修改該設備之 IP 位址 子網路遮罩 網路閘道 Gateway 或 HTTP 連接埠等欄位 5 按 套用 鍵來更改該設定 6 按 更新表單 鍵來驗証該設定 繁 體 中 文 繁 體 中 文 繁 體 中 文 繁 體 中 文 77 ...

Страница 81: ...輸入預設 IP 位址 192 168 0 200 並按照下 列步驟執行 使用 HTML 頁面來更改 IP 位址 1 使用預設使用者名稱及密碼 admin 及 pass 登錄 H 264 FULL HD IP 攝影機 2 按 組態設定 超連結 3 按 網路設定 一般設定 超連結 4 輸入或修改 IP 位址 子網路遮罩 網路閘道 Gateway 或 HTTP 連接埠 5 按 確認 鍵 完成上述修改 繁 體 中 文 繁 體 中 文 繁 體 中 文 繁 體 中 文 78 ...

Страница 82: ...行 控制 台 網際網路選項 安全性 自訂層級 將 下載簽名的 ActiveX 控 制項 設為 提示 並將 執行 ActiveX 控制項與插件 設定為 啟用 在完成上述設定後 您可以利用 H 264 FULL HD IP 攝影機預設的 IP 位 址 透過網際網路瀏覽器在網址列輸入預設的 IP 位址 來存取 H 264 FULL HD IP 攝影機的影像 第一次使用 H 264 FULL HD IP 攝影機時 網際網路瀏覽器將提示下載 ActiveX 控制項與插件 請按下確認鍵 以下載 ActiveX 控制項與插件 繁 體 中 文 繁 體 中 文 繁 體 中 文 繁 體 中 文 79 ...

Страница 83: ... 其中最大的不同在於 管理者可以執行組態設定 而一般使 用者只能夠監看即時影像 欲執行登錄 H 264 FULL HD IP 攝影機時 請在編輯欄位中輸入使用者名稱及密碼 再按 確認 鍵確認登入系 統 出廠預設的使用者名稱和密碼如下 管理者 一般使用者 使用者名稱 admin guest 密碼 pass guest 欲登錄 H 264 FULL HD IP 攝影機 請在登錄頁面 輸入使用者名稱及 密碼並按下確認鍵 繁 體 中 文 繁 體 中 文 繁 體 中 文 繁 體 中 文 80 ...

Страница 84: ... ا ظرة س 345 ا 89 وا وي ط ء A 8 BC ل EF ھ س 3 ب I5 ا ط JK 8A ر J M5 3N ا ط JK 8A ر J MC د ء ا ة ا 111111111 1 23 ر 4 ا 81 ...

Страница 85: ... ل J E XK ا Y Z J م ك C 35 ا ل V _ط 5 ا FIG 1 FIG 2 FIG 3 ك B35 ا دام V C J وي a5 ا ط ء b5 ا c d وا ر F3 E5 ا م Ce رج V أ ل J E و M9 ط 5 ا ل J E XK ا ل EF ھ ل BC أ ل V ت J E5 ا ب C ا م ك C 35 ا ط ط 3 ل V ا و ف ا ة ا 45 RJ FIG 4 FIG 5 111111111 1 23 ر 4 ا 82 ...

Страница 86: ...ggQ3 ا MFgggggggggKd ح gggggRN م gggCe FIG 6 را F3 gggggggE5 Yggg وس ggg9 X3 _ق ggggggC ر 3ggggC35 ا 8ggggggggC دا C5 ا ط J ار م MJ ط و 35 ا MF زاو 5 ا Y5 إ را F3 E5 ا م Ce ر F دو 5 ك C 35 ا 8d M5 3N وا ب I5 ا 8A را J رر FIG 7 8A را J5 ا 111111111 1 23 ر 4 ا 83 ...

Страница 87: ... FJE 5 وا ز FE ر 5 ا Y MC د a5 ا ط JK ا M K وا و F د Fd ورة R ل FeC 5 FIG 8 ا ر FJE 5 ر FbR 5 ا 8A را J5 ا ط J وار وي a5 ا ط ء b5 ا دال J C ا FIG 9 FIG 10 ز 89 ا ظرة ا د ل ز 89 ون ف A و ا رج 111111111 1 23 ر 4 ا 84 ...

Страница 88: ... و 3 RJ 45 س J 9 و F د FB5 ا رج V س JI3 ل F3 5 8K را dm ا زر 5 ا م ظ ا طط ا م ا ت ا أ ع ا ات 1 م ا ط اد إ ة و 24 أو دد ر 100 240 ح و دد ر 1 MEJ4 ح B3 دم V C ا PoE MEJ45 J ل FR و 5 2 ل Fb4 ل R و 3 دم V C ا PoE 5 MEJ4 ح B3 و MEJ45 J ل FR و 3 111111111 1 23 ر 4 ا 85 ...

Страница 89: ...ت ا دة ا دي م ان IP ا ا 192 168 0 200 ات إ ل ا IP ا إ ل ا IP 8 U RJ 45 ت وا ا ا B 1 ا ت V و ان 9 8 F IP و GS رة ا M ا ا ل ان 9 IP ات R ا ا IP ھ 192 168 0 200 ام ا 8 S 1 8 ان 9 IP ا ا ا 8 7HO 1 ــــــﺎت ـ ﻣﺘطﻠﺑ ــــــﺎت ـ ﻣﺘطﻠﺑ ــــــﺎت ـ ﻣﺘطﻠﺑ ــــــﺎت ـ ﻣﺘطﻠﺑ اﻟــــﺑﺮاﻣﺞ اﻟــــﺑﺮاﻣﺞ اﻟــــﺑﺮاﻣﺞ اﻟــــﺑﺮاﻣﺞ P I F Merit LILIN Universal ActiveX ر W ا 5 وا ض F ً 1 JPEG أو H 264 9 دة 6 ا R ا ة ول Z ل ...

Страница 90: ...ً أو ا ص ا IP ة ا I ا أ 8 ـ ة 9 S ا QS ا أداة 8 IP 8 ان 9 و IP أو ا ا أو 9 ا ا ع أو HTTP ا ه I أد ات ا ـ ة 9 S ا QS ا أداة B IP 1 ق HI ا Refresh N O ة 5 Z ا c R ة ا ة 5 Z ا د B 2 5 Z ا c 8 ز 56 ا 9 K ا ة 3 أو ا ا أو 9 ا ا ع أو 51 F أو 8 و F ا O HTTP 4 ا م ا ق HI ا Apply 7 ادات 9 ا 8 5 ق HI ا Refresh N O ادات 9 ا 8 7HO 1 6 111111111 1 23 ر 4 ا 87 ...

Страница 91: ... أد ات ا وا I I ا Q R ا ل K ا 6S B H 264 IP م S ا B ا ام دة 6 ا 9 1 R ا ا admin ل dS ا ا ور ا 1 و pass ور ا ر ق HI ا 8 R F ا ط Basic Mode R Z ا ا 2 R F ا ط ا ر ق HI ا Network General م 9 3 أو ا ا أو 9 ا ا ع أو 51 F أو 8 و F ا O HTTP 4 O ا م ا ق HI ا Submit ل إر 5 111111111 1 23 ر 4 ا 88 ...

Страница 92: ...eX A ا 19 Prompt N و Run ActiveX c ontrol and plug in R B O ا ActiveX A وا 19 Enable 8 7 ط 89 M ذ 8 F M Internet Explorer Tools Options Security Settings Internet Explorer أدوات رات K ن Z ا ادات 9 إ ا ا إ ل ا M M ذ ل ا 9 و ا IP ان 9 ل K إد ل VK 8 IP Q R R ا ا Internet explorer M ص ا O ار 5 ف ن Z ا ق HI ا OK 7 ا ActiveX ا 8 ة IP ل K ا 6S 111111111 1 23 ر 4 ا 89 ...

Страница 93: ...T 3 دم I ا ق 26 و ت 2 و I دة د 9 و 6S إ ل K ا ا IP ل K ا 6S O R ور ا 1 و م S ا B ا W ا HTML ق HI وا Submit ل إر ور ا ت 1 و 8 S ا ء أ R1 و ل dS رض 9 م S ا B ا admin guest ور 1 pass guest 111111111 1 23 ر 4 ا 90 66 LR7228CSM 1 ...

Страница 94: ...66 LR7228CSM ...

Отзывы: