background image

4.  System Operation   

There are 3 different types of DVR control modes: USB mouse, remote control 
and front panel.   


USB Mouse Operation 
1.  Quick Menu: Left click the mouse and select “Quick Menu” 
2.  Left click the mouse button under the main menu to click on sub-select 

menu. 

3.  Left click the mouse under the select menu to click on sub-menu.   
4.  Utilize mouse to make changes on setting section. 
5.  Please refer to Display Setup for PTZ (Pan-Tilt-Zoom) Setup.   


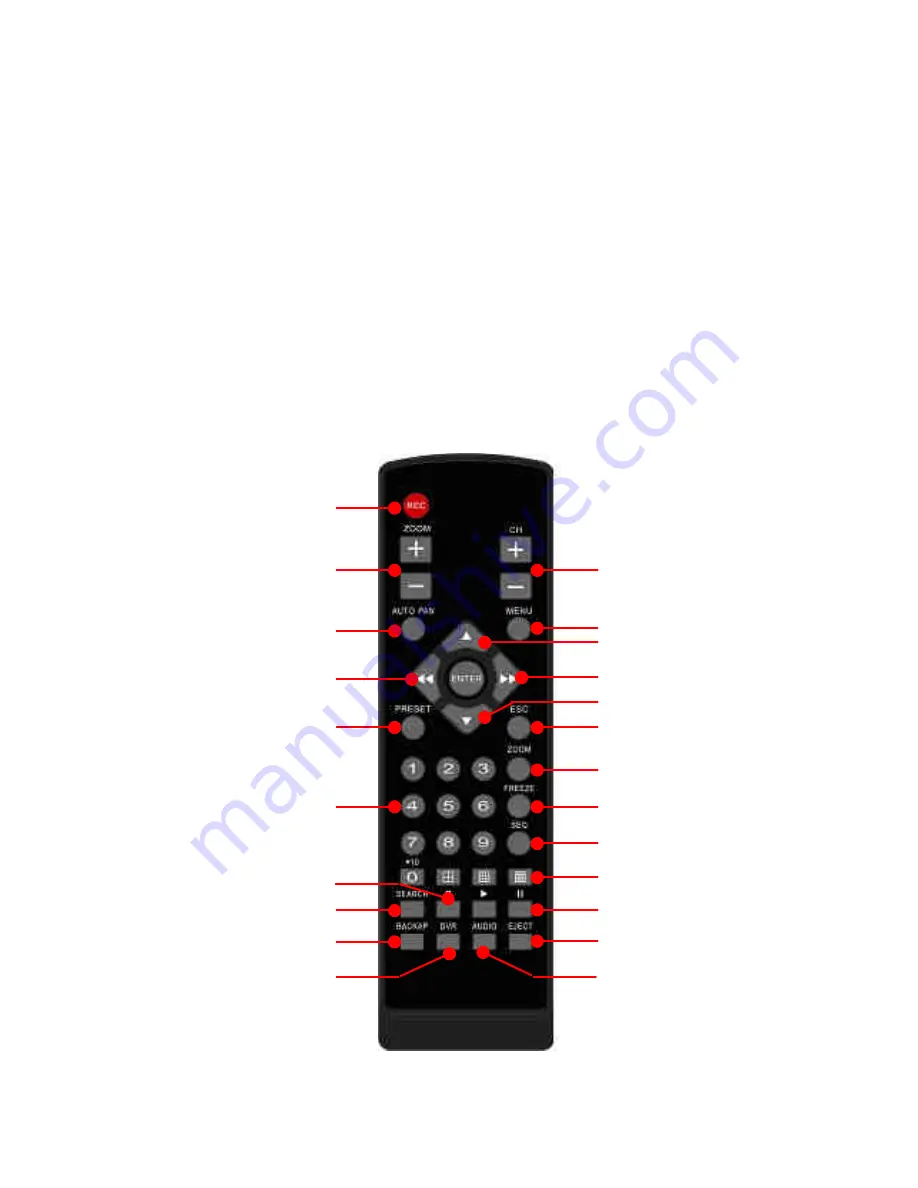
Remote Control Operation 
Remote Control and front panel operation are identical in functions; please 
refer to Front Panel and the detailed reference table as shown below: 


Record

Zoom in/out

Auto  Pan

Left Selection/ Fast Rewind

PTZ Control(PTZ)

Not  used

0~9  Numerical  keys

DVR Control

Previous/Next single channel 

Setup Menu 

Right Selection/ Fast Forward 

Escape/ exit/ stop buzzer 

Zoom in 

Screen frozen 

Auto Switching 

4/9/16 split screen display 

Not used 

Audio/ Mute 

Stop/ Playback/ Pause 

Down Selection 

Up Selection 

Video  Backup

Stop  Record

Содержание DVR204B

Страница 1: ...INSTRUCTION MANUAL E DVR204B 208B 216B 4 8 16CH DIGITAL VIDEO RECORDER ...

Страница 2: ... to accidents Please use individual power instead of shared electrical outlets with other electrical equipment as this could result in damage or accident Do not attempt to service this DVR by yourself as it may expose you to dangerous voltage or other hazards Please refer all service to the qualified servicing distributor Do not open the covers or insert any object into DVR CAUTION Do not place th...

Страница 3: ...Recording Mode Manual Event Motion Alarm Filing Display Mode Time Event Motion Alarm Search Mode 1 4 1 4 6 9 1 4 9 13 16 Mode Enlarge 8 times PIP Change Channel Cycle Languages Chinese English Multi language Playback Speed Times 2 4 8 16 32 64 SATA SATAⅡ HDD 1 x HDDs Max 3TB 2 x HDDs Max 3TB 2 x HDDs Max 3TB USB Backup USB2 0 Flash Memory Stick Network Backup Support Network Connection TCP IP DHCP...

Страница 4: ... right of the selection setting in the menu Enter Pressthe Enter button to confirm the setup or go into sub menu USB 2 0 Port USB backup or firmware update There are a front and a back USB that can be used one ata time Power Indicator LED The LED will light on when power on REC Indicator LED The LED will light on when recording Alarm Indicator LED The LED will light on when Alarm Trigger or Motion...

Страница 5: ...deo In 4 8 16CH Video Input BNC 3 Video Out 1CH Video Output BNC 4 Audio Out 1CH Audio Output RCA 5 Audio In 4CH Audio Input 6 DC12V Power Input 7 VGA PC Monitor Output 8 LAN RJ 45 Network Connection 9 RS 485 For Speed Dome Use 4CH DVR 8CH DVR 16CH DVR ...

Страница 6: ...ease refer to Display Setup for PTZ Pan Tilt Zoom Setup Remote Control Operation Remote Control and front panel operation are identical in functions please refer to Front Panel and the detailed reference table as shown below Record Zoom in out Auto Pan Left Selection Fast Rewind PTZ Control PTZ Not used 0 9 Numerical keys DVR Control Previous Next single channel Setup Menu Right Selection Fast For...

Страница 7: ...om in out ESC Return to the previous menu ENTER Proceed into action FF Fast Forward Each press increases the speed to the next level There are six speeds 2x 4X 8X 16X 32X and 64X STOP Stop playback RF Rewind Fast Each press increases the speed to the next level There are six speeds 2x 4X 8X 16X 32X and 64X FREEZE Turn on off to pause the screen SPLIT Split into screens SEQ Auto Sequence ZOOM IN Zo...

Страница 8: ...address 192 168 0 100 Default gateway 192 168 0 1 Enter main menu Live monitor mode and right click your mouse select to enter into main menu or click on MENU button to enter Format harddisk 1 Select HardDisk Setup under Main Menu mode 2 Choose H D Formated setup ...

Страница 9: ... 3 Select the hard disk you would want to format and proceed formatting by click START button 4 Complete formatting Record Setup resolution rate image quality and image quantity 1 Record Setup ...

Страница 10: ... 2 Setup on resolution rate image quality and image quantity Record Setup Sequence Setup 1 Sequence recording schedule setup ...

Страница 11: ...g in full time 24 7 nonstop and apply to all cameras with the same rule by select All Same 3 Setup was being succefully completed Screen central will show recording red light indicates recordings are currently in session ...

Страница 12: ...llence mode as well as reminder icons Right click the mouse you may enter into LIVE mode to manage different features ICON DESCRIPTION Main Menu Resting the cursor on this icon will bring up the following nine menu icons System Disk Information Version IP MAC and HDD capacity Zoom In Out Zoom AUX1 8 Signal screen only PTZ Control PTZ signal screen only Sound Control SEQ sequence PIP Picture in Pic...

Страница 13: ... on the screen after right clicked your mouse under Remote mode ICON DESCRIPTION Remote Snapshot Pictures taken oncamera and image storage Pre archived folder My Documents Folder DVRData Snapshot Select Archive Folder Select the folder tostore the photo and video Switch off to full screen display Image quality switch HQ High Quality LQ Low Quality Remote Recording record and store Pre archived fol...

Страница 14: ...to trusted Website Switch to the PLAYBACK Mode by pressing PLAY button under the LIVE mode The control panel will appear on far rigt down on the screen the control panel can be controlled via mouse cursur ICON DESCRIPTION Snapshot turn the current screeninto the Image and storein USB device the Image will be stored in computer on Remotemode Rewind Fast Each press increases the speed to the next le...

Страница 15: ... HDD not being detected Lock is on need to enter code number in order to unlock Network is connected Recoding in full screen theicon appears when the one of the cameras is recording Event occurred Appear on alarm lost channel and motion detected Recording Icon color turned red represents cameras are now recording Live audio is on Live Audiois off OSD On screen Display Relay off Relay on Showing ho...

Страница 16: ...appear on the right down corner of the screen ICON DESCRIPTION Via Set funtion cameras will point by point to patrol the environment fully Click on SET icon and hit Enter button to proceed this action Pre set number N 1 255 Move toPre set number N Delete Pre set number Automatically patrol Zoom in Zoom out Iris on Iris off Focus on Focus off 66 DVR204BCSE 1 ...

Страница 17: ...MERIT LILIN ENT CO LTD http www meritlilin com 66 DVR204BCSE ...

Отзывы: