background image


28 


Press ▲/▼ to select 

an item. 


Press 

MENU

 to 

return to the parent 
menu. 

4.2 

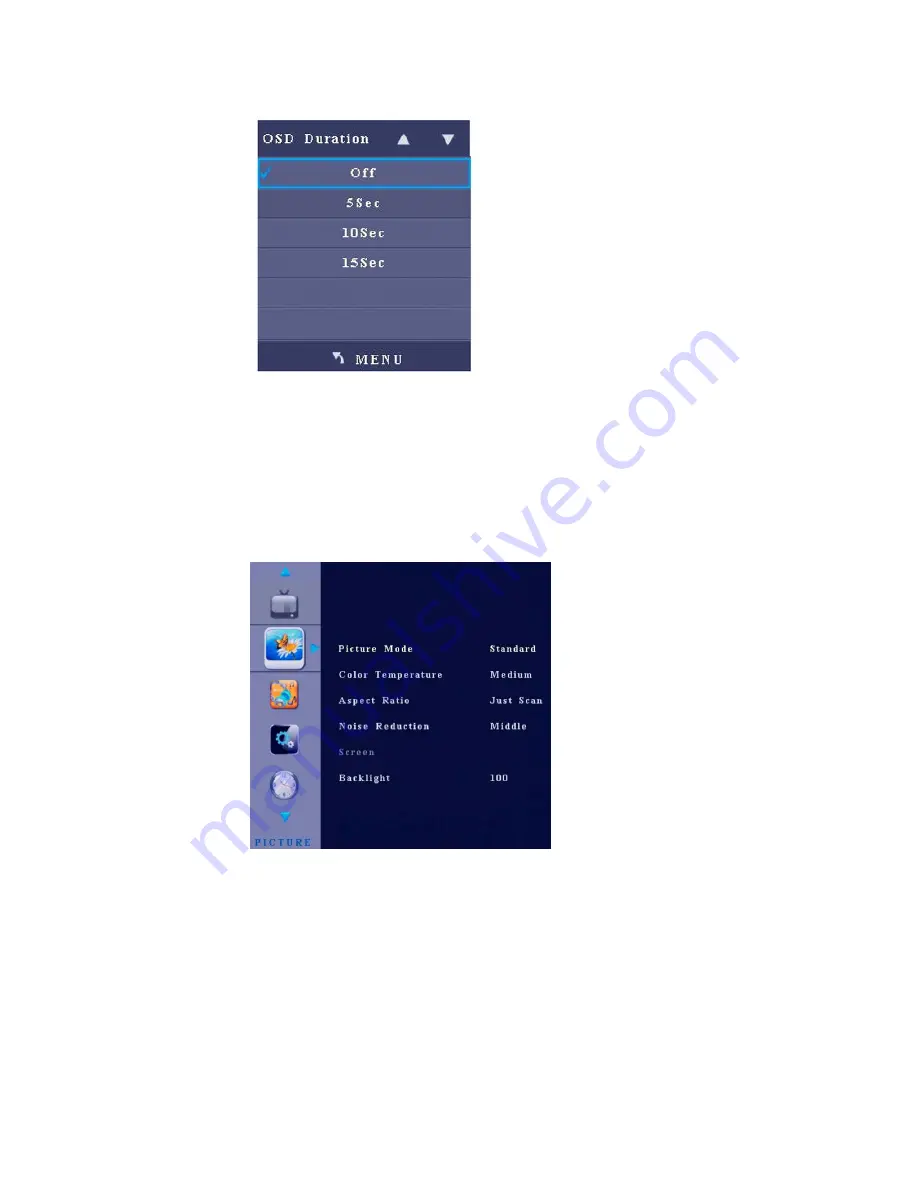
Picture 

After you enter the

 PICTURE

 menu, the interface shows options including 

Picture Mode

Color Temperature

Aspect Ratio

Noise Reduction

Screen

, and 

Backlight

. Press 

▲/▼ to select an item and 

OK

 to enter the sub-menu. 


Picture Mode 

After you enter the 

Picture Mode 

sub-menu, the interface shows options including 

Contrast

Brightness

Color

Sharpness

, and 

Tint

. Press ◄/► to choose 

Standard

 – 

Mild

 – 

User

 – 

Dynamic

 image.   


Содержание TouchDisplay

Страница 1: ...eractive Multi Touch Display User Manual Please properly keep the manual for further reference This is the general user manual for all interactive panels Therefore it may be different from the actual...

Страница 2: ...e instructions may cause harmful interference to radio communications However there is no guarantee that interference will not occur in a particular installation If this equipment does cause harmful i...

Страница 3: ...r 14 3 Basic Operation 18 3 1 Power on 18 3 2 Power off 19 3 3 Software Installation 19 3 4 Software Uninstall 20 3 5 Software Calibration 20 3 6 Calibration Method for Windows 7 21 3 7 OPS Installati...

Страница 4: ...2 11 Maintenance Tips 52 12 Clean the Infrared Tube 53 13 Technical Parameters 54...

Страница 5: ...ontact professional staff for solutions Pay attention to the children when they are close to the product Do not damage the power cable Do not damage change wind bend heat or drag the power cable forci...

Страница 6: ...er for liquid a vase flowerpot cosmetics or liquid medicine on the top of the product If any water or liquid is spilled on the product short circuit may occur and cause fire or electric shock Do not t...

Страница 7: ...oduct when you use a radio The product design to prevent radio interference complies with the international EMI standard However the interference still exists and causes noise in the radio If noise oc...

Страница 8: ...weight of the display When the mounting surface is a wall or ceiling of a building the wall must be built with solid bricks concrete or materials of equal intensity If you need to mount the display on...

Страница 9: ...7 See CAS 132 2006...

Страница 10: ...functions that coincide with users preference Adopting infrared array scanning and sensing technology HID drive free plug and play Outstanding display edit functions supporting instant edit Multiple...

Страница 11: ...9 2 1 Outer Appearance indicates optional...

Страница 12: ...erminal 1 which is used to connect to a PC HDMI 1 The input terminal 1 for high definition signal which is used with the Touch Port 1 to operate PC in the way of touch control MIC The external microph...

Страница 13: ...ignal source Eco Switch among three modes energy saving automatic and standard HDMI Switch over to HDMI signal source VGA Switch over to VGA signal source VOL Decrease volume VOL Increase volume PC Po...

Страница 14: ...nel 1 Name Function Description Audio out The terminal for external loudspeaker boxes or headphones Media 2 External multimedia USB port 2 which can be used to connect with a U disk or a hard disk 2 4...

Страница 15: ...efinition signal which is used with the Touch port 2 to operate a PC in the way of touch control VGA IN The VGA port for an external PC which is used with the Touch port 2 to operate the PC in the way...

Страница 16: ...nction Description R Video Video input terminal L Left audio input terminal R Right audio input terminal 2 5 Remote Controller Items Functions Description Power on or standby Mute Menu or return to pa...

Страница 17: ...ion button Adjust volume Select channel Previous media file Next media file Rewind Play Fast forward Auto adjust window under PC signal source Switch to PC input signal Switch to HDMI input signal Swi...

Страница 18: ...16 WARNING To avoid probable faults please read the following instructions and use the remote controller properly...

Страница 19: ...beat the remote controller Do not spill water or other liquid on the remote controller Do not put the remote controller on wet items Do not expose the remote controller under sunlight or put it near...

Страница 20: ...n Step 1 Power the interactive panel with 100V 240V 50Hz 60Hz AC power supply Step 2 Turn on the rocker switch at the bottom of the interactive panel next to the power port to enable power supply In t...

Страница 21: ...dby status for all in one models only Power off Turn off the rocker switch at the bottom of the interactive panel next to the power port or pull out the power plug to switch off the interactive panel...

Страница 22: ...tware installation disk into the computer Step 3 Double click the follow the instructions and complete the installation of the touch LCD display software Step 4 The computer needs to restart so as to...

Страница 23: ...m of the panel to show the following image Step 3 Select 9 Points and click Calibrate Step 4 Use the pen to click and hold the center of the flickering cross Do not release it until the flickering cro...

Страница 24: ...w Step 4 Use the pen to click and hold the center of the flickering cross Do not release it until the flickering cross moves to the next calibration point Complete the calibration process as instructe...

Страница 25: ...d on the actual interface 3 7 OPS Installation Insert the OPS into the slot and fasten it with two M4 screws respectively on the top and bottom Both the standard OPS and non standard OPS are supported...

Страница 26: ...priority sequence is PC HDMI1 HDMI2 HDMI3 OPC PC Component AV The panel has signal source memory Therefore the panel automatically selects the signal source of last use after it is switched on Only w...

Страница 27: ...nter the sub menu Press EXIT to quit the menu 4 1 Time Enter the TIME menu to display items including Clock Off Time On Time Sleep Timer Auto Sleep and OSD Duration Press to select an item and press O...

Страница 28: ...Sat Sun Sunday and Off Press to select an item Press to adjust the value of the selected item Press MENU to return to the parent menu Press EXIT to quit the menu On Time After you enter the On Time su...

Страница 29: ...ess MENU to return to the parent menu Press EXIT to quit the menu Auto Sleep After you enter the Auto Sleep sub menu the interface shows On and Off options Press to select an item Press MENU to return...

Страница 30: ...ions including Picture Mode Color Temperature Aspect Ratio Noise Reduction Screen and Backlight Press to select an item and OK to enter the sub menu Picture Mode After you enter the Picture Mode sub m...

Страница 31: ...r Cold Press to select an item Press to adjust the value of the selected item Press MENU to return to the parent menu Press EXIT to quit the menu Aspect Ratio After you enter the Aspect Ratio sub menu...

Страница 32: ...tions including Off Low Middle High and Default Press to select an item Press MENU to return to the parent menu Press EXIT to quit the menu Screen After you enter the Screen sub menu the interface sho...

Страница 33: ...quit the menu Note In the ECO and Auto mode the Backlight option is in grey and cannot be adjusted 4 3 Sound After you enter the SOUND menu the interface shows options including Sound Mode Balance Aut...

Страница 34: ...ust the value Press MENU to return to the parent menu Press EXIT to quit the menu Auto Volume After you enter the Auto Volume sub menu the interface shows On and Off options Press to select an item Pr...

Страница 35: ...enter the SPDIF MODE sub menu the interface shows options including PCM and Auto Press to select an item Press MENU to return to the parent menu Press EXIT to quit the menu EQ After you enter the EQ...

Страница 36: ...NU to return to the parent menu Press EXIT to quit the menu Listen Without Display Press to switch to Listen Without Display Off option Press OK and the screen turns black Press any button on the remo...

Страница 37: ...Default Signal Search PowerKey Turn On PC and Key Lock Press to select an item and OK to enter the sub menu OSD Languages After you enter the OSD Language sub menu the interface shows options includi...

Страница 38: ...Press to reset it and to quit Signal Search After you enter the Signal Search sub menu press to select the signal search item Press OK to enable or disable signal search When it is On it will automat...

Страница 39: ...l sources does not show OPS PC Key Lock After you enter the OPTION menu press to select Key Lock Press OK to enable or disable Key Lock When Key Lock is On the function is enabled When Key Lock is Off...

Страница 40: ...er you enter the multi media signal source the interface shows options including PHOTO MUSIC MOVIE and TEXT The color of the USB icon indicates if USB is detected Blue means USB is detected Grey means...

Страница 41: ...SB is detected press OK to show content in the flash disk Photo After you enter PHOTO option press to select images to be displayed Press OK to select or de select an image Press II to start or stop d...

Страница 42: ...ckwise Rotation Zoom In Zoon Out and Move Press I to display the previous image and I to display the next image Press to change the fast reverse speed and to change the fast forward speed Press EXIT t...

Страница 43: ...d Previous Next Stop All Playlist Information and Jump To Press I to play the previous song and I to play the next one Press to change the fast reverse speed and to change the fast forward speed Press...

Страница 44: ...s OK to use the function The functions include Play Pause Fast Reverse Fast Forward Previous Next Stop All Playlist Information Zoom In Zoon Out Zoom Down Zoom Mode and Move Press EXIT to quit playing...

Страница 45: ...AY to show the operation function menu Press to select a function and press OK to use the function The functions include Previous Page Next Page Previous Next Stop Music Off and Playlist Press EXIT to...

Страница 46: ...klight Under the Power Save mode the display will darken Under the Auto Backlight mode the display will automatically adjust the backlight according to the intensity of light from the environment When...

Страница 47: ...codes Function Controlling codes Power on 7F 08 99 A2 B3 C4 02 FF 01 00 CF Power off 7F 08 99 A2 B3 C4 02 FF 01 01 CF Mute 7F 08 99 A2 B3 C4 02 FF 01 02 CF Sound mode 7F 08 99 A2 B3 C4 02 FF 01 05 CF...

Страница 48: ...B3 C4 02 FF 01 21 CF 2 7F 08 99 A2 B3 C4 02 FF 01 22 CF 3 7F 08 99 A2 B3 C4 02 FF 01 23 CF 4 7F 08 99 A2 B3 C4 02 FF 01 24 CF 5 7F 08 99 A2 B3 C4 02 FF 01 25 CF 6 7F 08 99 A2 B3 C4 02 FF 01 26 CF 7 7...

Страница 49: ...640x480 75 37 5 75 N N 4 VESA 800x600 56 35 1 56 P P 5 VESA 800x600 60 37 9 60 P P 6 VESA 800x600 72 48 1 72 P P 7 VESA 800x600 75 46 9 75 P P 8 VESA 1024x768 60 48 4 60 N N 9 VESA 1024x768 70 56 5 7...

Страница 50: ...ormats Extension Photo Progressive JPEG Baseline JPEG Non Interlaced Interlaced jpg jpeg bmp png Movie MPEG1 MPEG2 MPEG4 H 264 RV8 RV9 RV10 RV8 LBR MJPEG DivX Xvid avi mpg dat vob mov mkv rm rmvb mp4...

Страница 51: ...ed properly Press AUTO on the remote controller to show the full screen and use the pen provided with the panel to perform positioning again The cursor of the pen is unstable when the pen is used The...

Страница 52: ...ter than 60 degrees Do not touch the display with your sleeve or wrist Not sound and image Check whether the power plug is inserted into the power socket and whether the panel is powered on Check whet...

Страница 53: ...powered on Check whether the PC is connected correctly to the interactive panel The following symptoms are not faults A very few of constantly bright or dark pixels such as tiny red blue green or dark...

Страница 54: ...ined by dust cut off the power and then clean the panel using a dried cloth with a little of warm water Use a clean soft cloth to clean the LCD of the panel Do not frequently switch on and off the pro...

Страница 55: ...ared net covering on the screen surface When a user touches the screen fingers or other opaque objects block the infrared rays that cross the touch point which helps the controller detect the coordina...

Страница 56: ...wer consumption 0 5W Audio output Loudspeaker power output 15 W 2 Touch screen material Tempered glass Sensing method Infrared Technical feature HID drive free Touch point Multi touch Writing method F...

Страница 57: ...ify the user manual without prior notice If you discover any unclear presentation mistake or omission in this manual please contact us immediately Hitevision is not liable for any loss or damage if yo...

Отзывы: