Lightspeed TOPCAT Скачать руководство пользователя страница 2

1

4

3

2

2

1

AUDIO IN

AUDIO OUT

REGISTER

USB POWER

5V/1.5A

TONE

TREBLE

BASS

STANDARD REGISTRATION

FLEXMIKE REGISTRATION (MEDIA CONNECTOR IN PLACE)

(particularly valuable when Topcat is mounted in the ceiling or on the wall)

For users adding a second Flexmike or replacing a lost or malfunctioning Flexmike.
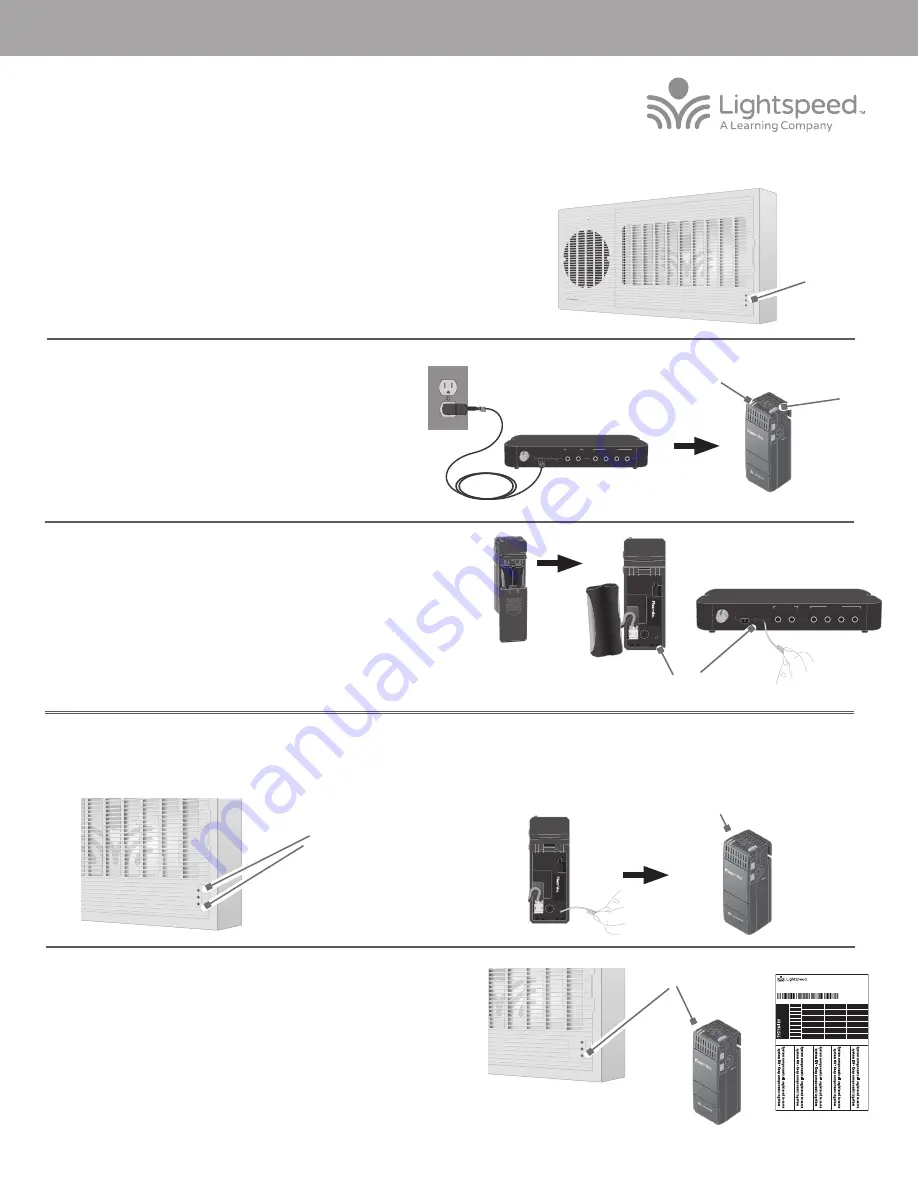
1.  Start with the Topcat plugged in and powered on. To verify it is powered on, 

there will be a blue power light on the front of the Topcat.

2.  If replacing a Flexmike, make sure the malfunctioning unit is powered off.

3.  Ensure that the Media Connector is powered on and has a 

solid blue light (“Ready”).

4.  Power on the new Flexmike. Both microphone 1 and 2 

blue lights should start blinking. 

(For the purpose of these 

instructions, it is assumed that the #1 Flexmike is the functioning 
Flexmike and we are registering the #2 Flexmike.)

9.  After several seconds, the 2 light on the Topcat will turn solid and the 2 light on 

Flexmike will remain blinking, then turn solid.

10.  The registration is complete. You can begin speaking into the new Flexmike to 

verify there is audio.

11.  Place system ID number (attached to the Topcat Daily Use Guide) on the new 

Flexmike.

NOTE:

 if at any point, the Topcat or Flexmike lights begin blinking rapidly, that 

indicates a registration error. Turn the new Flexmike off and repeat steps 4-9.

5.  Open the new Flexmike battery compartment and pull the battery out (leaving 

it plugged in) to reveal the registration button.

6.  Using a paperclip with the end straightened out

, press and hold the 

registration button for 3 seconds on the back of the Media Connector.

7.  This triggers registration in the Topcat and its 1 and 2 amber lights will begin blinking.
8.  Briefly press the registration button on the new or replacement Flexmike. The 1 and 2 blue lights will start blinking alternately.

Topcat 

Access

Blinking lights

Power On

Blinking lights

(NEW Flexmike)

Topcat 

Access

Solid lights

SYS

TEM ID#

SYS

TEM ID#

SYS

TEM ID#

SYS

TEM ID#

SYS

TEM ID#

RETAIN EXTRA LABELS IN THE EVENT A COMPONENT IS REPLACED OR ADDED. 

Ma

tch components

to this system ID#

Apply to system components to indicate which parts are registered 

as a system.  Keep registered items together when storing away.

Registration ID Labels

00-01

00-01

00-01

00-01

00-01

00-01

00-01

00-01

00-01

00-01

00-01

00-01

00-01

00-01

00-01

00-01

00-01

00-01

00-01

00-01

00-01

00-01

00-01

00-01

00-01

00-01

00-01

00-01

00-01

00-01

00-01

00-01

00-01

00-01

334-0162-02-00-01

10101

Blinking lights

Topcat 

Access

Solid light

1

4

3

2

2

1

AUDIO IN

AUDIO OUT

REGISTER

USB POWER

5V/1.5A

TONE

TREBLE

BASS

 Registration 

Buttons

TOPCAT ACCESS REGISTRATION GUIDE   

Содержание TOPCAT

Страница 1: ...nd pull the battery out leaving it plugged in to reveal the registration button 5 Use another registered functional component existing Flexmike Sharemike or Media Connector to trigger the registration...

Страница 2: ...lights begin blinking rapidly that indicates a registration error Turn the new Flexmike off and repeat steps 4 9 5 Open the new Flexmike battery compartment and pull the battery out leaving it plugge...

Страница 3: ...htened out briefly press the registration button on the inside of the Topcat The 1 and 2 lights will begin blinking on the Topcat 9 The registration is complete You can begin speaking into the new Fle...

Страница 4: ...rn the new Sharemike off and repeat steps 4 9 Power On Solid light Existing Flexmike 6 Use another registered functional component existing Flexmike Sharemike or Media Connector to trigger the registr...

Страница 5: ...paperclip with the end straightened out press and hold the registration button inside the registered Flexmike for 3 seconds The 1 and 2 amber lights will begin blinking on the Topcat 7 Briefly press...

Страница 6: ...e You can now plug any audio source into the Activate to verify there is audio 9 Place system ID number attached to the Topcat Quickstart Guide on the new Activate NOTE if at any point the Topcat or A...

Страница 7: ...Mic 2 button to add replace the Flexmike 8 Follow the instructions within the app to register the new Flexmike 9 When the Flexmike is registered you will see the Mic 1 or Mic 2 icon appear on the scre...

Страница 8: ...EM ID SYSTEM ID SYSTEM ID SYSTEM ID SYSTEM ID RETAIN EXTRA LABELS IN THE EVENT A COMPONENT IS REPLACED OR ADDED Match components to this system ID Apply to system components to indicate which parts ar...

Страница 9: ...7 The registration is complete Using the app select the new pod and begin speaking into the Flexmike to check for audio 8 Place system ID number attached to the Topcat Quickstart Guide on the new Pod...

Страница 10: ...rompt you to Pair with the remote Press the pair button to complete the process the app will take you through a tutorial on how to use the vaious functions 14 When using the app we recommend always le...

Страница 11: ...the Flexmike will have just one light blinking 1 or 2 depending on which microphone is being replaced and then turn solid 10 The registration is complete Press the center button on the remote and beg...

Страница 12: ...the Sharemike will turn solid 10 The registration is complete Press the center button on the remote and begin speaking into the Sharemike to verify there is audio 11 Place system ID number attached to...

Страница 13: ...ion is complete Using the remote select the new pod and begin speaking into the Flexmike to check for audio 10 Once verified apply the appropriate pod number sticker on top of the unit for easy identi...

Отзывы: