LifeWalker Mobility Products Upwalker Скачать руководство пользователя страница 11


11


wheel (Fig F2). Before attempting to adjust the brakes, ensure that the 

parking brake is disengaged (see "How to Use Parking Brakes" page 10).
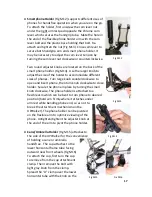


Brake is Too Loose  

Use fingers or pliers to turn the barrel 

adjuster nut counterclockwise a half 

rotation (Fig F3). Try the brake. If this does 

not correct the problem, repeat turning the 

barrel adjuster nut a half rotation at a time 

until the brake functions as expected. Then 

turn the larger locking nut clockwise using 

fingers or a 10 mm or 13/32 wrench until it 

presses tightly against the housing to prevent the barrel adjuster nut from 

loosening. 


Brake is Too Tight 

Use fingers or a 10 mm or 13/32 wrench to turn the larger locking nut 

counterclockwise until loosened. Then use fingers or pliers to turn barrel 

adjuster nut clockwise a half rotation (Fig F3) and try the brake. If this does 

not correct the problem, repeat turning the barrel adjuster nut a half 

rotation at a time until the brake functions as expected. Then turn the 

locking nut clockwise until it presses tightly against the housing to prevent 

the barrel adjuster nut from loosening.


Resetting the Brakes  

NOTE: DO NOT ATTEMPT TO PERFORM THIS TASK IF 

YOU ARE NOT MECHANICALLY INCLINED. 


If you cannot achieve the desired adjustment by 

means of the above, you may use a 4 mm or 5/32” 

Allen wrench to reset the brake using the brake 

cable nut attached to the brake pad at each rear 

wheel (Fig F4). First loosen the nut by turning Allen 

wrench counterclockwise. Once loosened, you may 

pull the brake cable out of the nut to tighten the 

brake, or push the brake cable into the nut to loosen the brake.  After 

achieving desired cable length, tighten the nut by turning clockwise. You 

may have to repeat adjustment a few times to get it right. 


If you are not comfortable with adjusting your brakes please consult a local 

Durable Medical Equipment dealer or contact LifeWalker Customer Service 

Fig F3 

Fig F4 

Содержание Upwalker

Страница 1: ...User Guide Designed by LifeWalker Mobility Products San Diego California...

Страница 2: ...ght 7 Setting Handgrip Angle 8 Setting Length of Handgrip Arm 9 How to Use Parking Brakes 10 How to Adjust Brakes 10 Positioning the Seat 12 Using Sit to Stand Assist Handles 12 Locking and Unlocking...

Страница 3: ...t adjustments to make sure they are secure DO NOT use with rear wheels in unlocked position DO NOT ride the UPWalker with all your weight on the armrests or lean disproportionately on one of the armre...

Страница 4: ...Set handgrip orientation to your desired angle refer to Setting Handgrip Angle on page 8 8 Set handgrip extension to your desired length or leave in current position if comfortable refer to Setting L...

Страница 5: ...Height Adjustment Tube Backrest Support Beverage Holder Parking Hand Brake Height Adjustment Memory Stop Sit to Stand Assist Handles Personal Item Bag Moveable Seat Eight Inch Rubber Wheels for indoo...

Страница 6: ...ig A3 4 Continue opening the UPWalker by pushing slightly inward simultaneously on the sit to stand assist handles to align and connect seat rails with frame Fig A4 5 To complete opening of the UPWalk...

Страница 7: ...automatically engage the tab s pin in the tube hole You will hear a click when the tab is engaged Avoid pinching your fingers between the armrest and the top of the height adjustment tube while raisin...

Страница 8: ...to be moved again unless a different armrest height is required C Setting Handgrip Angle 1 To set the handgrip at the desired angle open the chrome cam lever under the armrest pad and swivel the handg...

Страница 9: ...th should fit most users 2 Should the user want to shorten the reach from the armrest pads to the handgrips first release the chrome cam lever under the armrest pad Fig D1 3 Swivel the handgrip arm in...

Страница 10: ...es back toward you 3 It is strongly recommended that the parking brakes be set in the locked position when the user is sitting down in the UPWalker or standing from a seated position and when the user...

Страница 11: ...roblem repeat turning the barrel adjuster nut a half rotation at a time until the brake functions as expected Then turn the locking nut clockwise until it presses tightly against the housing to preven...

Страница 12: ...gs facing the rear Sitting on the seat with the armrests in their raised position is often preferred 3 Use the sit to stand assist handles as needed when sitting and standing Fig G3 H Using Sit to Sta...

Страница 13: ...ear wheels Fig I3 and pivot the wheels inward Push wheel lock tabs down to closed position after turning wheels under the UPWalker J Closing the UPWalker 1 Lower the armrests to the lowest setting see...

Страница 14: ...Walker if the brakes are not working correctly 2 If handgrips are loose do not use the UPWalker 3 Periodically inspect the wheels for tightness wear and damage Before use make sure that the wheels are...

Страница 15: ...e opposite side Velcro Fig M4 The UPWalker logo is designed to be on the front side of the bag facing away from you when using the UPWalker Beverage Holder Fig M5 can be attached to either one of the...

Страница 16: ...andgrip tubes at the base of each handgrip Secure support straps using the Velcro material at the ends of the straps Fig M9 Note that the shopping bag has convenient handles to transport your purchase...

Страница 17: ...wise to open and insert phone then turn knob clockwise to close holder Secure the phone in place by turning the small knob clockwise The phone holder is attached to a flexible arm which can be bent to...

Страница 18: ...ith other accessories there is a U clamp which must be spread open so as to place the clamp on the handgrip tube with the light on the outside and holes for bolt on the inside Unscrew and remove the b...

Страница 19: ...ible to normal wear and tear and subject to periodic replacement are warrantied for six 6 months During these warranty periods our warranties cover all parts labor and shipping for repairing the UPWal...

Страница 20: ...defect or problem requiring service DO NOT return any products to LifeWalker Mobility Products without our prior authorization If you purchased your UPWalker from an authorized LifeWalker Mobility Pr...

Отзывы: