background image

6

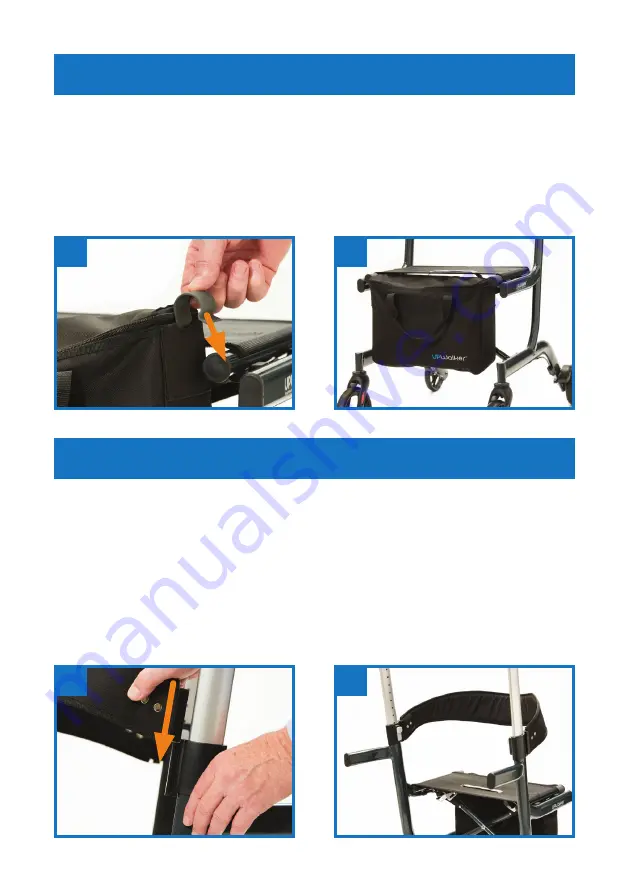
The personal item bag has plastic clips which go over the seat rail 

extension on the front end of the walker (located at front end of 

the seat).  With the UPWalker logo side of the bag facing toward 

the front, slide the clips over the right and left seat rail extensions 

(Figures 6-7).

With the logo side of the backrest upright and facing the front 

of the UPWalker Lite, slide the T-slot on the end of the backrest 

onto the respective mating T-ridge on the front of the frame 

under the armrests (Figure 8). Repeat for the other end of the 

backrest. Check to confirm that the T-slots and T-ridges are fully 

engaged on both ends of the backrest. Backrest may be left on 

the UPWalker Lite or removed when not in use (Figure 9).

Attaching / Removing the Personal Item Bag 

Attaching / Removing the Backrest

7

6

9

8

Содержание UPWalker Lite i100

Страница 1: ...1 USER GUIDE MODEL i100 REV 3 19 UPWalker Lite is produced by LifeWalker a leader in upright mobility...

Страница 2: ...secure Periodically check all screws and fasteners and retighten if necessary DO NOT ride the UPWalker Lite when seated or when standing with all your weight on the armrests do not lean disproportion...

Страница 3: ...and brake 3 Armrest pad 4 Height adjustment tube 5 Height adjustment lock 6 Sit to stand handles 7 Rear wheel 8 Brake adjustment knob 9 Front wheel 10 Seat 11 Seat rail 12 Backrest 13 Personal item ba...

Страница 4: ...Standing behind the unit hold each sit to stand assist handle and move outward in opposite directions to open frame Figure 2 Complete the process by pushing downward on the seat until the seat rails...

Страница 5: ...is at the desired height release the height adjustment tab to lock the armrest in place You will hear a click when the tab is engaged The armrests should be set at a height that is high enough that y...

Страница 6: ...de of the backrest upright and facing the front of the UPWalker Lite slide the T slot on the end of the backrest onto the respective mating T ridge on the front of the frame under the armrests Figure...

Страница 7: ...e sure rubber sleeve remains inside the U Figure 10 Slide the bolt on beverage holder through the hole on U with beverage holder positioned on the outside and the knob on the inside of the UPWalker Fi...

Страница 8: ...ghten the brakes if too loose locate the gray screw knob under the frame near the rear wheel Figure 14 Press the knob downwards and turn to the left counterclockwise a half rotation at a time until de...

Страница 9: ...s to turn barrel adjuster nut clockwise a half at a time until the brake functions as expected Then turn the locking nut clockwise until it presses tightly against the housing to prevent the barrel ad...

Страница 10: ...sed or lowered position depending on your preference To stand up from the UPWalker Lite bend forward to where your nose is over your toes and push down not backward on the sit to stand assist handles...

Страница 11: ...when purchased from LifeWalker Mobility Products or an authorized LifeWalker Mobility Products dealer Accessories and non durable components such as wheels brakes seat handgrips and armrests which ar...

Страница 12: ...uiring service DO NOT return any products to LifeWalker Mobility Products without our prior authorization If you purchased your UPWalker Lite from an authorized LifeWalker Mobility Products dealer ple...

Отзывы: