LifeView FlyTV Express M5 MST-T2 A2 Скачать руководство пользователя страница 14

Installation 

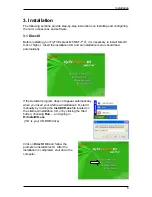
3.4 Installation of LifeView MVP 

 
Install the LifeView MVP software by 
clicking on 

LifeView MVP Setup

.  Just 

follow the prompts to install the software. 


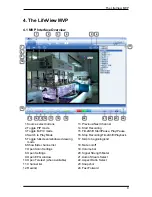
3.5 Setting up your inputs 

 
When loading the MVP for the first 
time, the 

Device Configure

 window 

will appear.  Indicate what source you 
have connected to each input; select 
DVB-T for a digital antenna or Analog 
TV for an analog TV antenna/cable. 
 

Note:

 You cannot have an analog 

source on RF1 if you are using 
S-Video, and you cannot have an 
analog source on RF2 if you are using 
composite video(AV-In). 
 
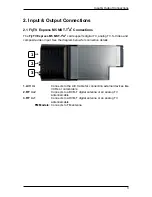
If you want to watch analog TV with S-Video, connect your Analog TV source to RF2.  
If you want to watch analog TV with composite video (AV In), connect your Analog TV 
source to RF1. 
 
Also, if you select FM Radio, you cannot have Analog TV on RF2 or any analog inputs 
selected (S-Video and/or composite video). 
 

Содержание FlyTV Express M5 MST-T2 A2

Страница 1: ...FlyTV Express M5 MST T2A2 User Manual Animation Technologies Inc www lifeview com Ver 1 0...

Страница 2: ......

Страница 3: ...party for any consequential incidental direct indirect special punitive or other damages including without limitation damages for loss of profits interruptions loss of information pecuniary loss etc...

Страница 4: ......

Страница 5: ...input 10 4 3 Scanning for TV Channels DVB T TV 10 4 4 Scanning for channels Analog TV 12 4 5 Scanning for FM stations FM Models 13 4 6 Channel list 14 4 7 Volume controls 14 4 8 Signal Strength Meter...

Страница 6: ......

Страница 7: ...xclusive MST technology The FlyTV Express M5 MST T2 A2 provides you with a high quality TV viewing experience with true stereo sound 1 2 Features Dual DVB T Silicon Tuners Dual Analog TV Silicon Tuner...

Страница 8: ...ave reception problems first try to move or reorient the antenna Otherwise you may need to use a stronger antenna for better reception 1 4 System Requirements To successfully use the FlyTV Express M5...

Страница 9: ...Video and composite video input See the diagram below for connection details 1 A V in Connects to the A V Cable for connecting external devices like VCRs or camcorders 2 RF in 2 Connects to a DVB T d...

Страница 10: ...channel for S Video source 6 Audio L Black Connects to left audio channel for S Video source 7 Composite White Connects to composite video source 8 Audio R White Connects to right audio channel for co...

Страница 11: ...lation CD and an installation menu should load automatically If the Autostart program does not appear automatically when you insert your LifeView Installation CD start it manually by running the Insta...

Страница 12: ...FlyTV Express M5 MST T2 A2 s RF inputs You can use a house antenna or the included portable antenna for digital TV reception and you can use a house antenna cable TV line or another source for your an...

Страница 13: ...place the Installation CD into your CD ROM drive Select Install from a list or specific location Advanced and click Next Now select Search for the best driver in these locations make sure Search remo...

Страница 14: ...ct DVB T for a digital antenna or Analog TV for an analog TV antenna cable Note You cannot have an analog source on RF1 if you are using S Video and you cannot have an analog source on RF2 if you are...

Страница 15: ...15 TimeShift Start Pause Play Pause 4 Switch to Play Mode 16 Stop Recording TimeShift Playback 5 Toggle fullscreen windowed viewing mode 17 Skip to beginning end 6 Show hide channel list 18 Mute on o...

Страница 16: ...on Scan You can also click on the Scan button on the left side of the screen Switch to DVB T TV Switch to Analog TV Switch to S Video Switch to composite video AV In Switch to FM Radio for FM models...

Страница 17: ...rvice Name Frequency Network Provider Transponder ID and Audio type by clicking on the button at the top of each column Click on the Service Name of a channel to rename it Scrolling to the right you c...

Страница 18: ...TV Standard directly by using the dropdown boxes You can change the Input Type to designate whether you use an antenna Air or cable TV Cable You can edit your channel list by using the checkboxes next...

Страница 19: ...g Stop You can also manually enter a frequency by clicking on Set to tune to that frequency and then clicking on Add to add the frequency to your station list Clicking on Previous or Next will autosca...

Страница 20: ...appear 4 7 Volume controls At the bottom of the interface is the volume bar Click on the bar to set the volume to that level or press the I or J arrow keys to decrease or increase the volume Click on...

Страница 21: ...stream will be marked with a z Simply click on an audio stream to select it You can also switch between available audio streams by pressing the A key on the keyboard 4 10 Aspect Ratio Select This but...

Страница 22: ...picture via the so called vertical blanking interval of the picture signal Surfing through the pages is conveniently easy thanks to the preloaded text tables Use the arrow buttons on the software int...

Страница 23: ...button to open the EPG window Click on Update to update the EPG information Date start time duration and program name will appear in the table Selecting an entry will show extended information about t...

Страница 24: ...lt T Open Close the MVP application BackSpace Recall Previous Channel M Mute on off A Switch between available audio streams Channel Up Channel Down Volume Up Volume Down Enter NumPad Enter Enter Conf...

Страница 25: ...streams simultaneously See the following table for possible combinations Note You cannot have Analog TV on RF1 and S Video showing at the same time and you cannot have Analog TV on RF2 and composite...

Страница 26: ...is your currently selected source All channel changes and volume adjustments will affect this source only Click on the source select buttons to change to a different source You can also double click...

Страница 27: ...left is the currently selected source or top left for PIP of 4 sources All channel changes and volume adjustments will affect this source only Click on the source select buttons to change to a differe...

Страница 28: ...rd the exact MPEG 2 Audio and Video signal you receive You cannot change channels while recording Recorded files will be saved to the working directory which can be specified in Directory Settings You...

Страница 29: ...yback right where you left it When TimeShifting When Paused You will see a green bar at the bottom of the screen with a slider that shows your current position You can rewind or fast forward by using...

Страница 30: ...m the right side of the screen Click One time if this is a one time only recording To make a weekly recording click on the days you want the program to record on Select the Source you want to record f...

Страница 31: ...6 5 Play Mode You can see the files you have already recorded by clicking on Play on the left side of the interface Here you can select the file you wish to view on the right and it will display in th...

Страница 32: ...s at the size entered as the File split size This is useful if you want to save long recordings in more manageable files For example setting the file split size to 650 MB would make the files easy to...

Страница 33: ...r currently selected input you can adjust the following settings 7 2 1 Display Settings Output Size Here you can specify the display size of the analogue source Data Format Here you can choose the dat...

Страница 34: ...For example setting the file split size to 650 MB would make the files easy to burn to CDs Always on top You can also choose to always have the MVP window on top of other applications by checking Alwa...

Страница 35: ...TV settings Select your country and TV standard to get proper reception in your area You can also select whether to receive Mono or Stereo for the currently selected channel and what Language you wis...

Страница 36: ...esolve any problems with your FlyTV Express M5 MST T2 A2 and still require assistance contact us by e mail at support lifeview com tw You can also see our technical support page on our website at www...

Страница 37: ......

Отзывы: