background image


16

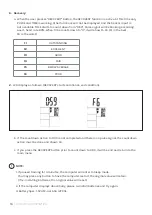
F1

OUTSTANDING

F2

EXCELLENT

F3

GOOD

F4

FAIR

F5

BELOW AVERAGE

F6

POOR

6.


Recovery:

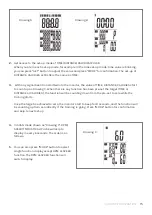
a.  When the user presses "RECOVERY" button, the RECOVERY function is active. At this time only
     PULSE and TIME is working, other functions will not be displayed, and the Sensor Input is 
     not available. TIME starts to count down from "0:60", Pulse signal will be blinking according 
     user’s heart rate BPM. When Time counts down to "0", it will show F1~F6. (F1 is the best, 
     F6 is the worst)

b.  If the countdown action to 0:00 is not completed and there is no pulse signal, the countdown  


    action must be done and shown F6.

c.  If you press the RECOVERY button prior to count down to 0:00, it will be end and return to the 
     main menu.

1. If paused training for 4 minutes, the computer will enter to Sleep mode.
   You may press any button to have the computer restart, the original value will retain. 
   (If re- installing batteries, the original value will reset.)

2. If the computer displays abnormally, please re-install batteries and try again.

3. Battery Spec: 1.5V UM-4 or AAA (2PCS).

NOTE:

2.

  LCD display as follows: (RECOVERY start condition & end condition).

|  COMPUTER OPERATION

Содержание SM-410

Страница 1: ...ls are available through our website at www lifespanfitness com au Read all instructions carefully before using this product Retain this owner s manual for future reference IMPORTANT All nuts and bolt...

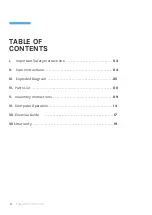
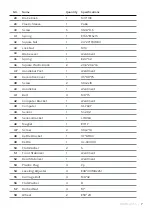
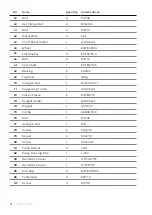
Страница 2: ...TENTS I Important Safety Instructions 03 II Care Instructions 04 III Exploded Diagram 05 IV Parts List 06 V Assembly Instructions 09 VI Computer Operation 14 VII Exercise Guide 17 VIII Warranty 19 TAB...

Страница 3: ...ssive exercise can damage your health Stop exercising if you experience any of the following symptoms pain tightness in your chest irregular heartbeat and extreme shortness of breath lightheadedness d...

Страница 4: ...er periods of usage Be careful not to damage plastic or metal parts of the machine with heavy or sharp objects The machine can be kept clean by wiping it down using dry cloth Batteries are to be insta...

Страница 5: ...9 58 15 15 58 59 53 56 77 15 39 84 60 61 62 70 74 75 72 69 68 66 65 64 62 63 61 60 14 67 72 65 66 73 68 46 71 4 15 14 15 14 13 11 11 12 54 51 54 55 10 8 7 6 5 39 78 80 79 39 9R 18 5 6 31 33 34 36 35 3...

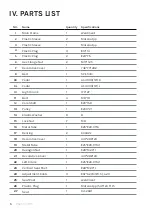
Страница 6: ...1 9 16 L 10 Right Crank 1 170 27 11 Bolt 4 M8 18 12 Core Shaft 1 20 158 13 Pulley 1 200 21 14 Elastic Washer 8 8 15 Lock Nut 7 M8 16 Metal Tube 1 25 20 05 6 17 Bearing 2 6004Zz 18 Decorative Cover 1 4...

Страница 7: ...nt 38 Decorative Cover 1 115 89 75 39 Screw 2 St4 2x19 40 Handlebar 1 Weldment 41 Bolt 4 M8 15 42 Computer Bracket 1 Weldment 43 Computer 1 St 7607 44 Sensor 1 Sr 202 45 Sensor Bracket 1 Ltf8163 46 Ma...

Страница 8: ...heel 1 18Kg 70 Hexagon Nut 1 M12x1 25 H 7 71 Supporting Frame 1 Weldment 72 Plastic Sleeve 2 18 10 10 73 Magnet Holder 1 Weldment 74 Magnet 7 30 15 10 75 Circlip 1 Gb894 1 10 76 Bolt 1 M8 45 77 Hexago...

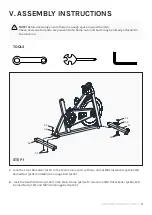
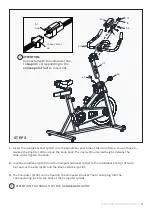
Страница 9: ...2 Lock the Rear Stabilizer pt 52 to the Main Frame pt 1 with two sets of 8 Flat Washer pt 56 M8 Domed Nut pt 57 and M8 42 Carriage Bolt pt 55 ASSEMBLY INSTRUCTIONS TOOLS NOTE Before assembly ensure th...

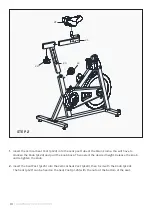
Страница 10: ...and pull the knob back Then select the desired height Release the knob and retighten the knob 2 Insert the Seat Post pt 25 into the Vertical Seat Post pt 23 then fix it with the Knob pt 24 The Seat pt...

Страница 11: ...40 and the Computer Bracket pt 42 to the Handlebar Post pt 37 with four sets of the Bolt pt 41 and the Elastic Washer pt 14 3 The Computer pt 43 can be fixed on the Computer Bracket The A1 B1 plug int...

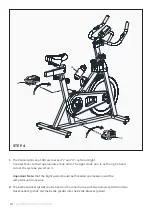
Страница 12: ...rank arm is on the right hand side of the cycle as you sit on it Important Note that the Right pedal should be threaded on clockwise and the Left pedal anticlockwise 2 The Kettle Bracket pt 48 can be...

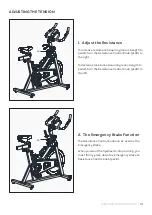
Страница 13: ...to the right To decrease resistance requiring less strength to pedal turn the Resistance Control Knob pt 28 to the left The Resistance Control Knob can be used as the Emergency Brake When you want the...

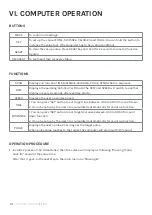
Страница 14: ...onds after exercise starts SPEED Displays the user s exercise speed TIME 1 You can press SET button to set target time between 0 00 to 99 00 for count down 2 It can be set up by the user or accumulate...

Страница 15: ...t the target TIME or DISTANCE or CALORIES the function will be counting down from the pre set to zero while the training starts Once the target is achieved to zero the monitor start to beep for 8 seco...

Страница 16: ...If the countdown action to 0 00 is not completed and there is no pulse signal the countdown action must be done and shown F6 c If you press the RECOVERY button prior to count down to 0 00 it will be...

Страница 17: ...eart and lungs and how efficient they are in delivering oxygen via your blood to your muscles is an important factor to your fitness Your muscles use this oxygen to provide enough energy for daily act...

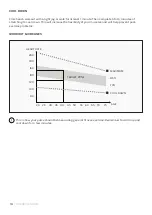
Страница 18: ...ease the flexibility of your muscles and will help prevent post exercise problems WORKOUT GUIDELINES This is how your pulse should behave during general fitness exercise Remember to warm up and cool d...

Страница 19: ...itled to have the goods repaired or replaced if the goods fail to be of acceptable quality and the failure does not amount to a major failure Full details of your consumer rights may be found at www c...

Страница 20: ...WWW LIFESPANFITNESS COM AU...

Отзывы: