LifeSpan BOOMER XT Скачать руководство пользователя страница 15


10

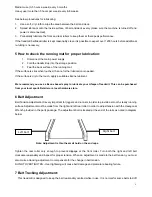
running with no one on it. After a few minutes of use, the belt should have a 

tendenc

lt continues to move toward one side, adjustments are necessary. 

The pro

justing the belt using the 6 mm Hexagonal Wrenches, it 

s. Over adjusting the belt can cause damage to the mat. 

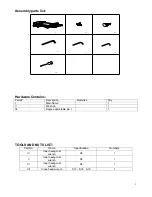
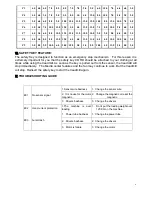
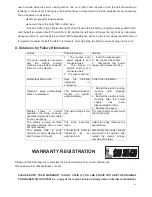
8. Solutions for Failure Elimination 

near one side while the belt is 

y to centre itself. If during use, the be

cedures are as below: 

 first set speed at lowest position. 

 second check the belt shifts to which side. 

If the belt shifts to right, tighten the right bolt and loosen the left bolt by using 6mm Hexagonal Wrench, 

until the belt is centered itself; If belt shifts to left, tighten the left bolt and loosen the right bolt by using 6m
Hexagonal Wrench, until the belt is centered. When ad
is important to adjust the belt in half turn increment

ossible Reason   

Failure   

P

Solution   


The power supply is connected 

and  the  electric  running 

machine  has  started,  however, 

there is no any display.   

electric  motor  is  not 

Re-connect the socket.   

3

Disconnect  the  power 

supply and replace the fuse.   


1

The  socket  and 

power  supply  is  not 

connected well.   

2

The  socket  of 

connected well.   

3

The fuse is burned. 

1

Insert the socket again.   

2

All displays fail to work.   

eys  are  installed 

K

improperly 

in 

emergency.   

Perfect the installation.   


Operation  stops  automatically 

and E1 is displayed.   

The  self-maintenance 

function  of  system 

works suddenly.   

2

ing 

wer 

 5min.   

3

Replace the sensor.   


1

Restart the electric running 

machine  after  pressing 

‘STOP’.   

Restart the electric runn

machine  after  the  po

supply 

has 

been 

disconnected for

Display  shows  a  normal 


The input voltage is too  The  input  power  should  meet 

operation,  the  strap,  however, 

operates improperly and suffers 

from a cacophony. 

low.   

the requirement.   

The  electric  running  machine 

operates  normally  with  no  load 

but halts midway.   

The  strap  becomes 

loose.   

Adjust  the  strap  following  the 

specification.   

The  display  fails  to  work 

normally or cannot display at all, 

and the keys don’t work.   

The electronic meter is 

influenced

by 

an 

external fa or.   

upply 

and  switch  off  switches,  and 

restart  the  electric  running 

machine 5min later.    


ct

Disconnect  the  power  s

WARRANTY REGISTRATION 

Please visit the following link to complete the product warranty form online. Please visit 
htt

PLEASE  NOTE:  YOUR  WARRANTY  IS  ONLY  VALID  IF  YOU  CAN  PROVE  YOU  ARE  THE  ORIGINAL 

PURCHASER ON THIS ITEM (i.e. a copy of the receipt, invoice, delivery date or internet confirmation).


p://warrantyform.lifespanfitness.com.au/ 

Содержание BOOMER XT

Страница 1: ...se DO NOT USE THE SAME OUTLET WITH OTHER HIGH POWER HOUSEHOLD APPLIANCE like air conditioning etc Please choose an outlet exclusively for the machine and make sure the fuse is 10A 0 Product may vary s...

Страница 2: ...peed due to an electronics failure please be sure to put your hands on the both uprights firstly and then step on the ride rail to avoid the damage by moving running belt 10 Always attach the safety k...

Страница 3: ...moving This unit starts at a very low speed Simply standing on the belt during slow acceleration is proper before you have learned to operate this machine z Always hold on to handrail while making co...

Страница 4: ......

Страница 5: ...olt ST3 5 30 2 47 Adjustable pin 5 1 12 2 11 Trunk line2 1 48 Transformer 1 12 Inner hexagonal pan headed bolt M10 20 4 49 Control board 1 13 washer D10 4 14 Flat washer D10 2 50 Magnetic ring 25 15 1...

Страница 6: ...t M8 40 1 30 Inner hexagonal bolt M6 60 S5 3 65 Hollow bush 1 31 Front roller 1 66 Tube combination 1 32 Running belt 2494 400 1 6 1 67 Degree adjustable pin M16 1 33 Inner hexagonal sunk headed bolt...

Страница 7: ...Remarks Qty I Main frame 1 II M8 knob 1 III Degree adjustable pin t 1 TOOLS AND NUTS LIST Part No Name Specification Numbers IV Inner hexagonal wrench S6 1 V Inner hexagonal wrench S5 1 VI Inner hexa...

Страница 8: ...2 Do not attempt to assemble the treadmill until the assembly instructions are followed and the uprights are attached to the treadmill Failure to follow this can result in damage to the treadmill 3 Yo...

Страница 9: ...the preset programs it will start moving from the last speed and the windows TIME DIST PULSE CALROES will begin to count up PROGRAM a When pressing program key you can choose the auto program from P1...

Страница 10: ...rison of different exercise sessions which cannot be used for medical purposes Programmable Operations When is standby status press the PROGRAM button to choose automatic program from P1 to P9 You can...

Страница 11: ...xtremely important for you that the safety key CORD should be attached to your clothing at all times while using the treadmill As soon as the key is pulled out from the sensor the treadmill will stop...

Страница 12: ...ure the power cord is not underneath the treadmill or in any other area where it can become pinched or cut Check the tension and alignment of the running belt Make sure that the treadmill belt will no...

Страница 13: ...LEASE EMAIL US AT lifespanfitness hotmail com 2 General Cleaning z Use a soft damp cloth to wipe the edge of the belt and the area between the belt edge and frame A mild soap and water solution along...

Страница 14: ...lubricating Use a soft dry cloth to wi 2 Spread lubricant onto the inside surface of belt and deck evenly make sure the machine is turned power is disconnected 3 Periodically lubricat If re lubing is...

Страница 15: ...ll 3 The fuse is burned 1 Insert the socket again 2 All displays fail to work eys are installed K improperly in emergency Perfect the installation Operation stops automatically and E1 is displayed The...

Отзывы: