

Sensor Kit Contents
Sensor
Magnet
Magnet Tape
Magnet Spacer
Bracket
Bracket Tape
Bracket Spacer
Bracket And Magnet Installation For
Doors
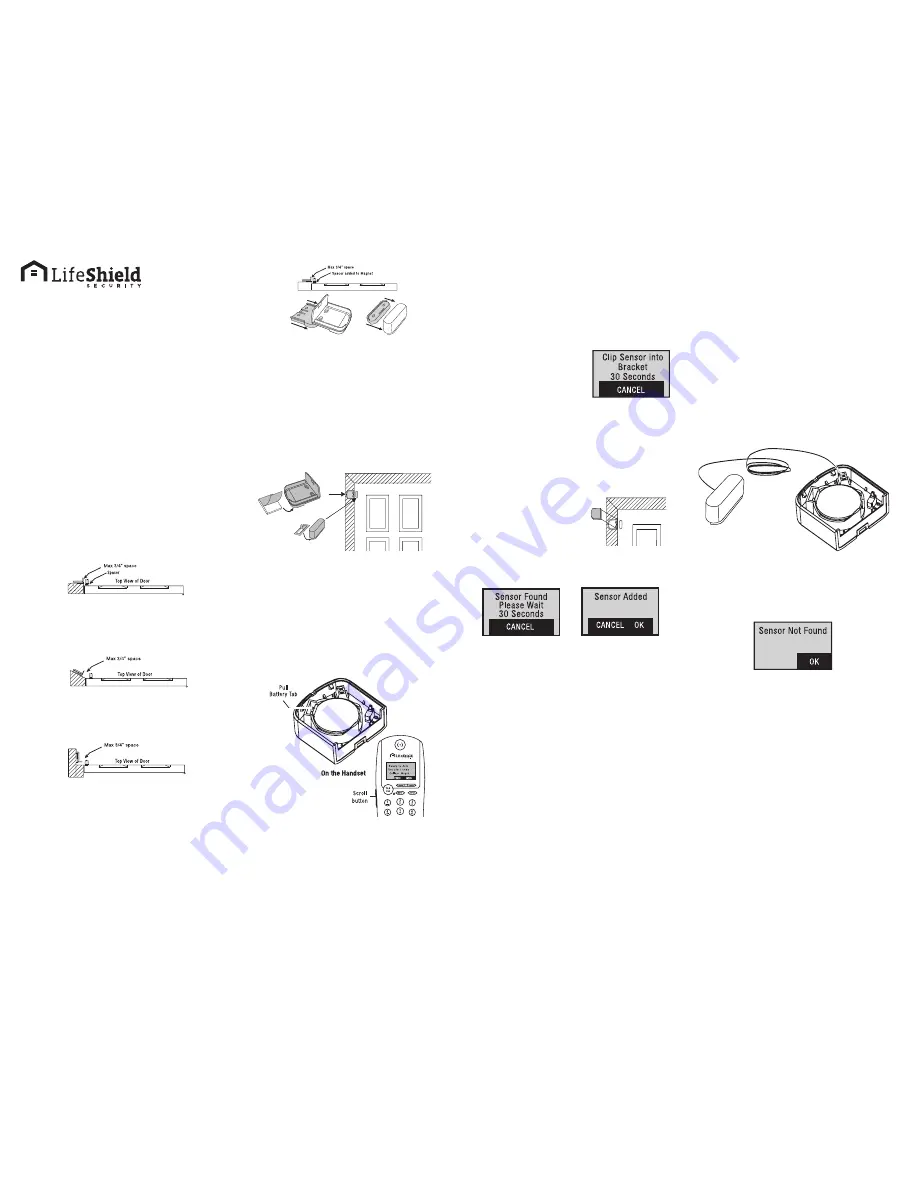
Determine Bracket and Magnet Location
The
Bracket
and
Magnet
should be positioned on
interior side of door within 3/4” of each other.
NOTE: INSTALL SENSORS ONE AT A TIME FOLLOWING
THE STEPS IN THE EXACT ORDER.
Various mounting positions that will work for attaching
Sensors
to doors:
Door frame is higher than door. To bring
Bracket
in
alignment, slide spacer onto the
Magnet
.
Bracket
on angled door frame and
Magnet
on door.
Place
Bracket
at 90º angle to
Magnet
on door.
Add
Spacers (If Needed)
If
Bracket
and
Magnet
do not align within 3/4”, add
Spacers to either the
Bracket
or
Magnet
to make them
level.
Example: Spacer added to
Magnet
to close the gap
between the
Bracket
and
Magnet
to within 3/4”.
Spacers slide on Brackets and Magnets.
NOTE: THE MAXIMUM DISTANCE BETWEEN THE BRACKET
AND MAGNET SHOULD BE NO MORE THAN 3/4”.
1. Attach double-sided tape to the bottom of the
Magnet
.
2. Attach M
agnet
to the door.
3. Attach double-sided tape to the bottom of the
Bracket
.
4. Attach the
Bracket
to the door frame.
NOTE: THE MAXIMUM DISTANCE BETWEEN THE BRACKET AND
MAGNET SHOULD BE NO MORE THAN 3/4”.
Install The Sensor
Once the
Bracket
and
Magnet
are attached to the door
or window,
Sensors
may be installed. You will need to
have the
Handset
with you to install the
Sensor.
Remove the battery tab from the Sensor
Enter the Security Menu
Before clipping the
Sensor
into the
Bracket
; Press
MENU on your
Handse
t or
Console
.
1. Scroll to the
Security Setup
and press SELECT.
2. Enter Code and press SELECT (for an initial
installation the default code is 1234).
3. Scroll to
Sensors
and press SELECT.
4. Scroll to
<Add New>
and press SELECT.
5. Scroll to the type of
Sensor
(Open/Close) and
press SELECT
6. Wait 5 seconds before clipping the
Sensor
into
the
Bracket
. You will then have 30 seconds to
complete the installation. The display shows the
time remaining.
NOTE:
DO NOT CLIP THE
SENSOR
INTO THE
BRACKET
UNTIL THE
BRACKET
AND
MAGNET
ARE INSTALLED ON
THE DOOR OR WINDOW.
NOTE: Insufficient Mounting Space:
If your door frame
does not provide enough room for mounting the
Bracket
,
you may need to use a
Sensor Extension
.
Metal Doors and Windows:
If your are mounting a
Magnet
to a metal door or metal window, install a
Spacer under the
Magnet
to maintain performance.
7. Clip the
Sensor
into the
Bracket.
The
Handset
will beep when the system finds the
Sensor
. This may take a few seconds.
8. Press OK
9. Edit Sensor Name (Optional)
You may change the name now or at a later time.
• To change the
Sensor
Name, press the DELETE
key to remove the default name.
• Using the keys on your
Handset
keypad, type in
the desired name. Press OK when complete.
10.
Sensor
Placement: Scroll to
Door
or
Window
.
Press OK.
11. Alarm Type: Scroll to
Stay & Away
,
Away Only
,
or
Convenience
. Press OK.
Stay and Away means the
Sensor
will be monitored
in both Armed Stay and Armed Away modes (i.e. an
exterior door). Away Only means the
Sensor
will be
monitored only in Armed Away mode (i.e. an interior
door). Convenience means the
Sensor
is only used for
text messaging (like a liquor cabinet).
12. Sensor Extension: Scroll to
Sensor Only
,
Extension
, or
Both
. Press OK.
NOTE:
If your window frame does not provide enough
room for mounting the
Bracket
, you may need to use a
Sensor Extension
. See the
Sensor Extension
Section in
the User Guide.
For standard
Sensor
installation with the
Magnet
next to
the
Sensor
, select “
Sensor Only
.” A
Sensor Extender
is
only required if space does not permit the
Sensor
to be
placed next to the
Magnet
. In this case, use the
Sensor
Extension
pictured below. You may also use the
Sensor
to monitor two windows by selecting
Both
. In this case,
the
Sensor
monitors both a
Magnet
next to the
Sensor
and another
Magnet
next to the
Sensor Extension
.
Sensor Extension
Sensor Not Found/Sensor Not Added
If your system cannot detect a
Sensor
that you are trying
to add, the
Handset
or
Consol
will display:
If this occurs, follow the steps below:
1.
Isolate Sensor
: Remove the
Sensor
from the
Bracket
and add a different
Sensor
to the same
Bracket
. You can obtain more troubleshooting
instructions in the Troubleshooting Section of the
User Guide.
If additional
Sensors
do not work, proceed to Step 3.
2.
Re-Position the Sensor & Bracket
: Reset the
Sensor
(as shown above) then move the
Bracket
and
Magnet
to a new location (perhaps just a few
inches) up, down or along the door window frame
and retry.
3.
Move Grid Controller
: Move one of your
Grid
Controllers
(
Console
,
Base
or
Grid Extender
)
closer to this
Sensor
mounting location. The most
practical type of
Grid Controller
to re position is
most likely the
Grid Extender
.


