lifelong FitPro LLTM09 Скачать руководство пользователя страница 3

MARKING OF PRODUCT:

3

4

TABLE OF CONTENTS:

1. .About the product 

2. Marking of Product

3. Main Parameters and Parts List

4. Precautions Before Use

5. Installation Instructions

6. Operating Instructions

7. Device Maintenance

8. Running belt adjustments

9. Do’s and Don’ts

10. Troubleshoot Chart 

11. Terms and Conditions

12. Warranty

Lifelong Fit Pro combines power and elegance to take your fitness journey to the 

next level. It is the perfect machine for losing weight or increasing endurance.
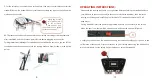
ABOUT THE PRODUCT:

Console

Motor Cover

Knob

Side Rail

End

Running Belt

Safety key is in red 

color, please find it in 

the accessory bag and 

put it on the area with 

the yellow sticker on 

the display.

Содержание FitPro LLTM09

Страница 1: ...keted by Lifelong Online Retail Private Limited For queries and complaints please contact customercare lifelongindia com www lifelongindiaonline com FITPRO TREADMILL LLTM09 Built for Endurance Built f...

Страница 2: ...which is why we have crafted a diverse range of innovative products across a spectrum of categories Home Kitchen Grooming Fitness Lifestyle and Smart Home to better help you We then deliver them at t...

Страница 3: ...ents 9 Do s and Don ts 10 Troubleshoot Chart 11 Terms and Conditions 12 Warranty Lifelong Fit Pro combines power and elegance to take your fitness journey to the next level It is the perfect machine f...

Страница 4: ...her than disassembling it at your own discretion If you feel any pain or discomfort please consult your physician Do not use the machine when the power cord is damaged or the power plug pin is loose o...

Страница 5: ...hexagon wrench and screw M6 12 to lock and fix the base two screws for each side 3 Hold left right columns use 6 hexagon wrench and screw M8 25 to lock the console frame on the columns Tighten all sc...

Страница 6: ...g the treadmill to prevent accidents Put the safety key back when not using the treadmill 5 Put the safety key in the area shown in the picture then press the start button to start the treadmill Notic...

Страница 7: ...l starts press 3 6 9 buttons to change the speed directly 3 Console instructions Overlay Speed display Displays the current running speed value Time display Displays the time of manual mode and the co...

Страница 8: ...oil bottle spray the silicone oil on the sides of running board as shown in the following figure RUNNING BELT ADJUSTMENTS When you use the treadmill for a long time the running belt or the multi wedge...

Страница 9: ...belt into the state that it could be flipped by 80 Step 3 Finally lock the motor base and re install the motor cover DOS AND DON TS Do not use the machine in the status of a shell break in or break o...

Страница 10: ...the current to be over 6A for more than 3 seconds Possible Cause Overloading leads to excessive current and the system stops out of self pro tection or some part is stuck causing the motor to stop Ad...

Страница 11: ...excluded to the fullest extent permitted by the lass 6 Lifelong total liability for damages relating to or arising out of the purchase or use of the product regardless of the type or cause of such dam...

Отзывы: