


4
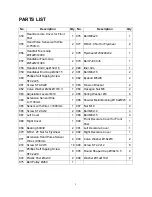
PARTS LIST
No. Description Qty No.
Description Qty
001 Main Frame 80x40x2
1 027 Tension Cable L=1600mm
1
002L Left Foot Bar 40x25x1.5
1 028 Cap S13
2
002R Right Foot Bar 40x20x1.5
1 029 Screw ST4.2x25
6
003L Left Handrail Arm Ø32x1.5
1 030L Foot Bar Cover-A
2
003R Right Handrail Arm Ø32x1.5
1 030R Foot Bar Cover-B
2
004L Left Handrail Ø32x1.5
1 031 Big Washer Ø6
2
004R Right Handrail Ø32x1.5
1 032 Bolt Ø10x45
2
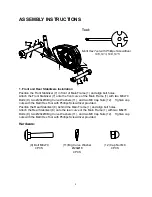
005 Front
Post
Ø60x1.5
1 033 Left Foot Pedal 395x150x65
1
006 Handlebar
Ø25x1.5
1 034 Right
Foot Pedal 395x150x65
1
007 Front Stabilizer Ø60x1.5
1 035 Rear Left Stabilizer End Cap Ø60
1
008 Rear Stabilizer Ø60x1.5
1 036
Rear Right Stabilizer End Cap
Ø60
1
009 Bolt M8x70
4 037 Crank Cover Ø40
2
010L Front Left Stabilizer End Cap Ø60
1 038 Bolt M8x15
8
010R
Front Right Stabilizer End Cap
Ø60
1 039
Powder Metal Bushing
Ø14.2xØ10.2x10
4
011 Big Curve Washer Ø20xØ8
10 040 Bolt M8x20
4
012 Cap Nut M8
4 041 Spring Washer Ø8
8
013 Crank 40x20x3
2 042 D Shaped Washer Ø38x3
4
014 Round Plastic Disk Ø328
2 043 Rubber Cover
2
015 Bolt
M5x5
3 044 Bolt
M6x35
4
016
Powder Metal Bushing
Ø38xØ32xØ19x14
8 045 Curve Washer Ø6
4
017 Clip Ø17
2 046 Big Washer Ø8
2
018 Bearing
6002Z
2 047 Bolt
M6x10
1
019 Bolt M8x10
1 048 Plastic Bushing Ø32xØ16x5xØ50
2
020 U-Shape Bracket
2 049L Left Handrail Arm Cover-B
1
021 Nylon Nut M8
2 049R Right Handrail Arm Cover-B
1
022 Washer Ø16xØ8x1.5
2 050L Left Handrail Arm Cover-A
1
023 Bolt M8x50
2 050R Right Handrail Arm Cover-A
1
024 Nylon Nut M6
14 051 Tension Control Knob L=780mm
1
025 Washer
Ø6
7 052 Screw
ST4.2x20
4
026 Bolt
M6x40
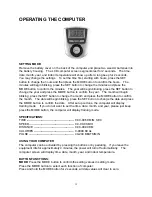
6 053 Computer
(HR1589B)
1
Содержание 93772 KNIGHT
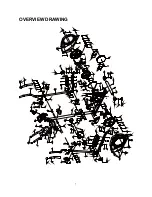
Страница 8: ...7 OVERVIEW DRAWING...


