background image

T5 TREADMILL 

OWNER’S MANUAL

M051-00K59-0011 REV A

Содержание T5

Страница 1: ...T5 TREADMILL OWNER S MANUAL M051 00K59 0011 REV A ...

Страница 2: ......

Страница 3: ...h CET Austria LIFE FITNESS Austria Vertriebs G m b H Dückegasse 7 9 3 36 1220 Vienna AUSTRIA Telephone 43 1 61 57 198 Fax 43 1 61 57 198 20 Service Email kundendienst lifefitness com Marketing Sales Email kundenberatung lifefitness com Operating Hours 08 30 16 30 h MEZ Spain LIFE FITNESS IBERIA C Frederic Mompou 5 1º1ª 08960 Sant Just Desvern Barcelona SPAIN Telephone 34 93 672 4660 Fax 34 93 672 ...

Страница 4: ...Calibration 18 4 Set Up 19 5 Activity Zone and Heart Rate Sensor Overview 20 6 FlexDeck Select Feature 21 7 Service and Technical Data 22 7 1 Troubleshooting 22 7 2 Preventive Maintenance Tips 24 7 3 How to Adjust and Tension the Striding Belt 25 7 4 Using and Testing the Safety Stop Pull Cord 26 7 5 How to Obtain Product Service 26 8 T5 Treadmill Specifications 27 9 Warranty Information 28 ...

Страница 5: ...ption which can be determined by turning the equipment off and on the user is encouraged to try to correct the interference by one or more of the following measures Re orient or relocate the receiving antenna Increase the separation between the equipment and the receiver Connect the equipment into an outlet on a circuit different from that to which the receiver is connected Consult the dealer or a...

Страница 6: ...ecommends seeing a physician for a complete medical exam before undertaking an exercise program particularly if the user has a family history of high blood pressure or heart disease is over the age of 45 smokes has high cholesterol is obese or has not exercised regularly in the past year If at any time while exercising the user experiences faintness dizziness pain or shortness of breath he or she ...

Страница 7: ...al plug or if it has been dropped damaged or even partially immersed in water Contact Life Fitness Customer Support Services Position this product so the power cord plug is accessible to the user Keep the power cord away from heated surfaces Do not pull the equipment by the power cord or use the cord as a handle Do not run the power cord on the floor under or along the side of the treadmill If the...

Страница 8: ...g the user should grab the handrails and place his her feet on the side platforms The handrails may be held to enhance sta bility as needed but are not for continuous use Never walk or jog backwards on the treadmill Immobilize the treadmill so the motors will not run when the unit is not in use To do this press and hold both the SPEED DOWN ARROW and the STOP key on the activity zone Use this unit ...

Страница 9: ...au niveau de l interrupteur d alimentation puis retirer la fiche de la prise électrique Ne jamais faire fonctionner un produit Life Fitness dont la fiche ou le cordon d alimentation est endommagé ni aucun appareil qui serait tombé ou aurait été endommagé ou même partiellement plongé dans l eau Appeler le service clientèle de Life Fitness Placer ce produit de manière à ce que l utilisateur puisse a...

Страница 10: ...nt le branchement et l utilisation de l appareil Ne jamais monter sur le tapis roulant et ne jamais en descendre pendant qu il tourne Utiliser les rampes latérale safin de ne pas perdre l équilibre En cas d urgence par exemple en cas de trébuchement ou de faux pas saisir les rampes latérales et placer les pieds sur les plates formes latérales Les rampes latérales peuvent servir à ré tablir son équ...

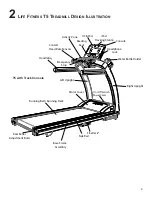
Страница 11: ...ght Upright Left Upright Water Bottle Holder Console iPod Docking Station Headphone Jack Contact Heart Rate Sensors Side Rail Base Frame Assembly Handlebar Activity Zone On Off Switch Power Cord Reading Rack Emergency Stop USB Port Rear Roller Adjustment Bolts FlexDeck T5 with Track Console ...

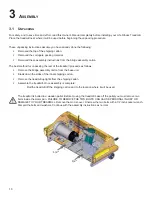
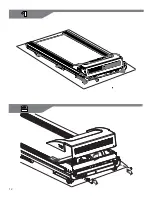
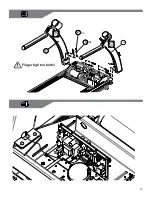
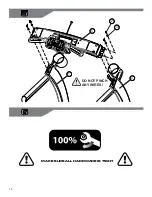
Страница 12: ...admill proceeds as follows Remove the bridge assembly carton from the base unit Break down the sides of the inner shipping carton Remove the treadmill uprights from the shipping carton Assemble the treadmill Once assembly is complete Roll the treadmill off the shipping carton and to the location where it will be used The treadmill is bolted to a wooden pallet Before moving the treadmill base off t...

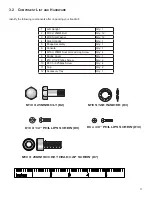
Страница 13: ...asher Qty 12 4 Right Upright Qty 1 5 Bridge Assembly Qty 1 6 Console Qty 1 7 M10 X 25MM Socket Head Cap Screw Qty 4 8 Bridge Cover Qty 1 9 10 X 1 2 Phillips Screw Qty 2 10 6 X 3 8 Phillips Screw Qty 4 11 Cup Qty 2 12 Accessory Tray Qty 1 M10 X 25MM BOLT 2 M10 STAR WASHER 3 10 X 1 2 PHILLIPS SCREW 9 6 x 3 8 PHILLIPS SCREW 10 M10 X 25MM SOCKET HEAD CAP SCREW 7 ...

Страница 14: ...12 1 2 A A A ...

Страница 15: ...13 3 4 1 L 2 3 1 2 3 8x 8x 4 R L Finger tighten bolts ...

Страница 16: ...14 5 6 1 4 5 2 3 MAKE SURE ALL HARDWARE IS TIGHT DO NOT PINCH ANY WIRES ...

Страница 17: ...15 7 8 7 4x 6 ...

Страница 18: ...16 9 10 8 9 10 4x 2x Tuck any excess cable inside console DO NOT PINCH ANY WIRES ...

Страница 19: ...17 11 12 11 12 C C 100 ...

Страница 20: ...ress enter to select CALIBRATION or CALIB 6 Press the START key located on the activity zone to begin calibration 7 Your treadmill will now automatically cycle through a series of tests including speed and incline adjustments in order to complete calibration 8 When successfully completed the console will display PASS If there was an error during calibration the console will display FAIL If a failu...

Страница 21: ...ues Do not modify the plug provided with this product If it will not fit an electrical outlet have a proper outlet installed by a qualified electrician TURNING THE UNIT ON To turn the treadmill on locate the ON OFF power switch at the front of the treadmill near the power cord and switch it to ON HOW TO STABILIZE THE LIFE FITNESS TREADMILL After placing the unit where it will be used check its sta...

Страница 22: ... the desired new value then holding down the button the new value will be assigned to until the treadmill beeps I Walk Jog Run Changes the belt s speed immediately to a preset value Initially these buttons are set to change the speed to 2 mph 3 kph Walk 4 mph 6 kph Jog and 6 mph 9 6 kph Run However the user can set these buttons to new values by first changing the belt s speed to the desired new v...

Страница 23: ...ition to providing users with the ability to customize the cushioning to their preferences The FlexDeck Select feature has three different settings Standard Firm and Hard The Standard FlexDeck setting provides the most cushioning giving a feeling similar to running outdoors on grass or soil The Firm FlexDeck setting provides additional shock absorbers to increase the firmness of the deck during fo...

Страница 24: ...ng still occurs adjust the levelers under the stationary frame until the shaking decreases See How to Stabilize the Life Fitness Treadmill The contact heart rate sensors are not reading my heart rate correctly Be sure to grasp the sensors firmly and keep hands still If heart rate seems sub stantially higher or lower than expected remove hands from sensors until heart rate disappears Life Fitness r...

Страница 25: ... The battery is a CR2032 3V A heart rate reading is initially detect ed and functioning normally but then is lost Use of personal electronic devices such as cell phones and portable MP3 play ers causes external noise interference Equipment is in close proximity to other sources of noise such as audio video equipment fans two way radios and high voltage high current power line Remove the source of ...

Страница 26: ...no time should cleaner be applied directly to any part of the equipment spray the cleaner on a soft cloth and then wipe the unit Inspect the exterior parts for wear and check that user assembly bolts are still tight Yearly You will receive a message LUBRICATE WALKING BELT on the console that reminds you to relubricate the belt after a fixed number of usage hours The procedure to lubricate the walk...

Страница 27: ...lso be used to clean the display and all exterior surfaces Use a soft cotton cloth only Apply the cleaner to the cotton cloth before cleaning DO NOT use ammonia or acid based cleaners DO NOT use abrasive cleaners DO NOT use paper towels DO NOT apply cleaners directly to the equip ment surfaces 7 3 HOW TO ADJUST AND TENSION THE STRIDING BELT Do not move the treadmill or place hands under the treadm...

Страница 28: ... STOP key stop the treadmill 2 Turn the belt tensioning bolts clockwise a quarter turn per side to tension the belt Do not exceed one full turn four quarter turns per side 3 Set the treadmill at 2 0 mph 3 2 kph and get on to make sure the belt no longer slips Also check the striding belt s tracking If the striding belt drifts to the left or right see Tracking Centering an Existing or New Striding ...

Страница 29: ...ulti ply Deck Flex Deck cushioning not reversible Handrails Ergo Crossbar with side handrails Accessory tray Standard designed into system Warranty 10 years motor 5 years parts 3 years console 1 year labor and lifetime on frame and springs Physical Dimensions Length 79 5 inches 202 centimeters Width 34 5 inches 88 centimeters Height 57 5 inches 146 centimeters Weight 243 pounds 110 kilograms Shipp...

Страница 30: ...of purchase of any defect within 10 days after discovery of the defect if instructed return any defective part for replacement or if necessary the entire Product for repair LIFE FITNESS reserves the right to decide whether or not a product is to be returned for repair PRODUCT REGISTRATION Register at www lifefitness com home product registration html Our receipt assures that your name address and ...

Отзывы: