


7
Lifecycle 3500, 4500, 5500 Series Exercise Bikes
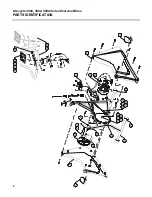
How To...INSTALL THE NEW CRANK BEARING/NUT ASSEMBLIES
Step 10
Slide the right CRANK BEARING/NUT ASSEMBLY over the
CRANK ARM. Using the 32mm crank arm wrench, install the
BEARING CRANK NUT ASSEMBLY until it seats against the
SPROCKET.
Tighten to 20-30 FT. LB. seating torque.
Step 11
Using a clean rag, wipe all accummulated dirt and residue from
the CRANK TUBE.
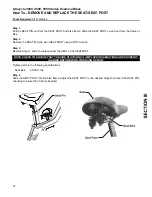
Step 12
(Figure 5)
Guide the CRANK ARM through the CRANK TUBE by tilting it
from a horizontal position to a vertical position until it has been
completely inserted from the right side of the the bike to the left
side.
Step 13
Slide the left side REVERSE THREADED CRANK
BEARING/NUT ASSEMBLY over the CRANK ARM and align
into position. Begin to thread the CRANK BEARING/NUT
ASSEMBLY and follow this three step procedure using a torque
wrench:
•
Tighten to 9-12 FT. LB. seating torque
•
Back off the BEARING CRANK NUT to a loosened state
•
Retorque to 4 FT. LB.
±
10%
Step 14
(Figure 6)
Slide
the
new TAB LOCK WASHER
over the CRANK ARM with the
bent tab facing toward the bike FRAME. Slide the key of the TAB
LOCK WASHER through the notch and into position against the
CRANK BEARING/NUT ASSEMBLY. Align the flat of the bent TAB
against the flat of the NUT as shown in the diagram.
Step 15
Slide
the
REVERSE
THREADED LOCK NUT over the CRANK ARM, thread it into
position and with the 32mm crank arm wrench,
tighten the
REVERSE THREADED LOCK NUT to 4 FT. LB.
±
10%
against
the TAB LOCK WASHER.
Remember, this NUT is REVERSE
THREADED.
Bend the straight tab of the TAB LOCK WASHER
so the flat of the TAB is against the flat of the LOCK NUT, then
bend the inner tab of the TAB LOCKWASHER until it is flush
against the flat of the inner CRANK BEARING NUT.
Step 16
(Figure 7)
Using a 5/32” hex key wrench, loosely install the
two new SPLIT
LOCKWASHERS
,
two new BEARING CLAMP BOLTS
and the
four
new BEARING CLAMPS
against the bike frame to secure
the outer races of the CRANK BEARING/NUT ASSEMBLIES in place.
Tighten the two new BEARING CLAMP
BOLTS to 4-5 FT. LB. seating torque.
NOTE: THE BEARING CLAMP BOLTS ARE TREATED WITH A SPECIAL EPOXY
AND MUST BE USED ONLY ONCE.
Step 17
Re-install the DRIVE BELT (or CHAIN), the SHROUD and replace the PEDALS onto the exercise bike.
The installation is now complete.
Содержание Lifecycle 3500 Series
Страница 1: ...Lifecycle 3500 4500 5500 Series Exercise Bikes Customer Support Services SERVICE MANUAL ...
Страница 19: ...15 Lifecyle 3500 4500 5500 Series Exercise Bikes NOTES ...
Страница 20: ...16 Lifecyle 3500 4500 5500 Series Exercise Bikes NOTES ...
Страница 24: ...4 Lifecycle 3500 4500 5500 Series Exercise Bikes NOTES ...
Страница 40: ...16 Lifecycle 3500 4500 5500 Series Exercise Bikes NOTES ...
Страница 41: ...17 Lifecycle 3500 4500 5500 Series Exercise Bikes NOTES ...
Страница 43: ...2 Lifecycle 3500 4500 5500 Series Exercise Bikes PARTS IDENTIFICATION ...
Страница 44: ...3 Lifecycle 3500 4500 5500 Series Exercise Bikes NOTES ...
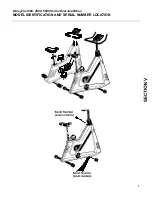
Страница 45: ...1 Lifecycle 3500 4500 5500 Series Exercise Bikes MODEL IDENTIFICATION AND SERIAL NUMBER LOCATION ...
Страница 47: ...3 Lifecycle 3500 4500 5500 Series Exercise Bikes PREVENTIVE MAINTENANCE Continued ...
Страница 48: ...4 Lifecycle 3500 4500 5500 Series Exercise Bikes WIRING BLOCK DIAGRAM ...
Страница 51: ...7 Lifecycle 3500 4500 5500 Series Exercise Bikes NOTES ...
Страница 52: ...8 Lifecycle 3500 4500 5500 Series Exercise Bikes NOTES ...


