background image

DL-HDM44A-H2 Installation Guide

19

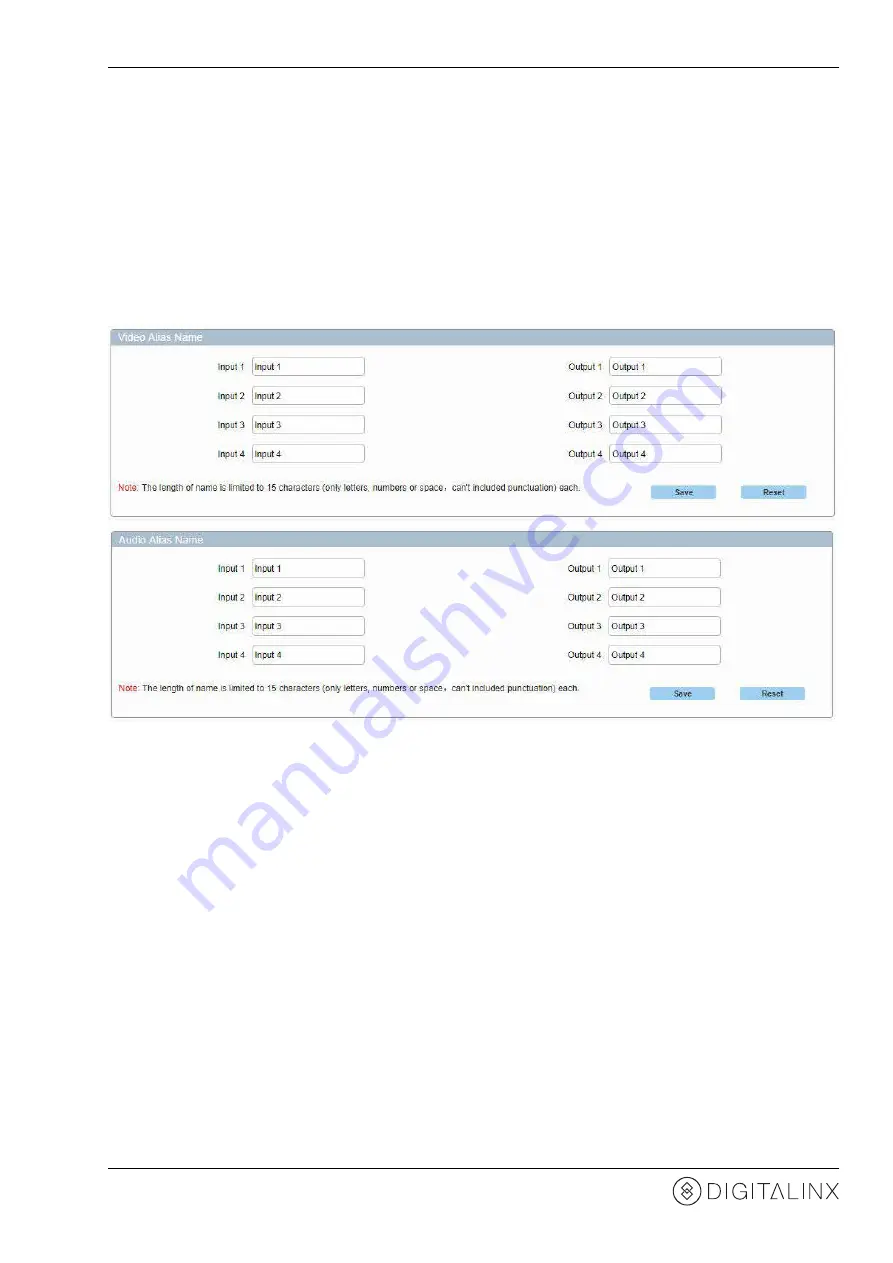
Changing the Audio and Video Alias Names

To adjust the alias names for the audio and video inputs and outputs in the matrix control, enter the desired 

alias name for each in the 

Video Alias Name

 and 

Audio Alias Name

 menus, then click 

SAVE

 to apply the changes 

or 

RESET

 to reset he fields to factory default. 

Note: 

The  character  length  for  each  alias  is  limited  to  15  characters;  only  letters,  numbers  and  spaces  are 

allowed. No punctuation supported. 

Содержание DIGITALINX DL-HDM44A-H2

Страница 1: ...Rev 190419 Phone 719 260 0061 Toll Free 800 530 8998 Fax 719 260 0075 DL HDM44A H2 Owners Manual 11675 Ridgeline Drive Colorado Springs CO 80921 ...

Страница 2: ...PPARATUS Use the mains plug to disconnect the apparatus from the mains THE MAINS PLUG OF THE POWER CORD MUST REMAIN READILY ACCESSIBLE Do not defeat the safety purpose polarized or grounding type plug A polarized plug has two blades with one wider than the other A grounding type plug has two blades and a third grounding prong The wide blade or the third prong is provided for your safety If the pro...

Страница 3: ...ol 11 Connecting to Web Control Interface 11 Audio Video Switching 12 Saving and Loading Presets 13 Changing System Status 13 API Log 13 Admin Settings 14 Adjusting EDID Settings 14 Adjusting HDCP Support 18 Viewing HDCP Input and Output Status 18 Changing the Audio and Video Alias Names 19 Changing Preset Names 20 Changing Network Address Settings 20 Changing Password for Matrix Control and Admin...

Страница 4: ...r web control interface Built in re clocking circuitry ensures the switcher is backwards compatible with sources with older HDMI version chip sets The DL HDM44A H2 can be controlled via front panel buttons front panel IR external IR remote IR RS232 and Ethernet The matrix includes a simple IR remote control to allow IR switching The matrix also features a full command set for RS232 and Ethernet co...

Страница 5: ...R remote 3 INPUT 1 4 Input 1 4 selection buttons 4 OUTPUT 1 4 Output 1 8 selection buttons 5 CLEAR Clear button clears the selection operation 6 TAKE Take button implements input selection 7 STORE Store button stores the matrix routes to preset 8 RECALL Recall button loads the matrix routes from preset 9 POWER SWITCH Power switch for on off control of matrix ...

Страница 6: ...T 3 5mm IR input port for connection to IR extension cable 5 EDID EDID switch for EDID management 6 FIRMWARE USB port firmware updates 7 LAN RJ45 port for LAN connection to network or control system for telnet control 8 RS232 DB9 port for connection to control system for serial control 9 AUDIO OUT Audio de embedded outputs for 1 4 phoenix for analog 2 channel audio and RCA for digital S PDIF multi...

Страница 7: ...ires one rack unit 1 RU of space It is recommended that you leave an empty rack space above and below the DL HDM44A H2 for additional cooling Connect Sources Connect Displays Connect the source devices to HDMI inputs using HDMI cables that are less than or equal to 1 5 meters in length for 4k60 signals For source devices that are further away it is highly recommended to install a Digitalinx DL HD7...

Страница 8: ...rix power supply included and switch on power located on the front panel Check that the front panel LED screen is on to indicate the matrix is ready for use Applying Power Switching Capabilities Switch between sources and displays using the matrix front panel buttons IR remote control serial RS232 or LAN To set a route using the front panel of the DL HDM44A H2 press the desired Input button Source...

Страница 9: ...eb browser interface The TCP IP port requires a standard straight through Category 5 or greater cable with the TIA EIA 568B crimp pattern for optimal operation The default settings for the TCP IP port are IP address 192 168 0 178 TIA EIA 568B Orange White Orange Green White Blue Blue White Green Brown White Brown Pin 1 Pin 2 Pin 3 Pin 4 Pin 5 Pin 6 Pin 7 Pin 8 1 8 Connect the Ethernet cable betwee...

Страница 10: ...dress within the same network range such as 192 168 0 42 2 Connect the network crossover cable to the computer and to the TCP IP port on the DL HDM44A H2 Web Browser Control The DL HDM44A H2 includes a web portal to allow control of the matrix via a standard web browser The IP address is the same address that is used for TCP IP control TIA EIA 568A Green White Green Orange White Blue Blue White Or...

Страница 11: ... and type in IP address of the DL HDM44A H2 The default IP address is 192 168 0 178 Be sure the computer you are using to connect to the DL HDM44A H2 is in the same IP range The matrix login screen will appear The default password is admin Matrix Control Connecting to Web Control Interface ...

Страница 12: ...itch the video route check the desired output button corresponding to the desired input All Checking the ALL button corresponding to the input will route the input signal to ALL outputs By default the audio switching routes follows video in order to change this option in the matrix control so audio can be routed independently change the Independent switch mode underneath the audio switch matrix to...

Страница 13: ... in the Presets section into preset location 1 2 or 3 To recall the preset check the LOAD button In the Matrix Control section the switchers on and off state can be controlled Check the STANDBY button to put the device in a OFF state check the WAKE button to put the switcher into an ON state The Matrix Control section features an API log that shows system commands and responses Changing System Sta...

Страница 14: ...ck on the ENTER button in the EDID Setting menu to access the settings Note In the EDID Settings menu the EDID settings for each HDMI input will not be able to be adjusted if the EDID dip switches are set to a predefined EDID setting In order to change the EDID settings for the inputs in the web GUI control interface all three EDID dipswitches on the back of the DL HDM44A H2 must be changed to the...

Страница 15: ...EDID table from a display connected to an output select the desired HDMI output in the OUTPUT drop down menu then click READ It is important to be sure that the display you are reading EDID from is connected to the selected output If this is the case an error message will occur letting the user know the device is not connected Once a display has been connected to the desired output click TRY AGAIN...

Страница 16: ...r To display the EDID table click on DISPLAY in the EDID READ window The EDID table will be displayed as followed To save the custom EDID table file onto your computer click the SAVE AS button in the EDID READ window this will prompt you to save the EDID file bin onto a local storage drive on your computer to be used in the EDID Write option in the EDID Settings menu See pg 17 for EDID Write instr...

Страница 17: ...z video with 6 channel audio with HDR capability Fix 4K 30Hz 2ch audio WITH HDR Choosing this option gives you up to 4K 30Hz video with 2 channel audio with HDR capability Fix 4K 30Hz 8Bit Only 2CH Audio without HDR Choosing this option gives you up to 4K 30Hz video 8 bit deep color only with 2 channel audio this does not support HDR 1080p 60Hz 2 0ch audio Choosing this option gives you up to 1080...

Страница 18: ...te the current support settings click REFRESH NOTE Encrypted video content will NOT pass on an input where the HDCP support has been turned off To view the current HDCP version status on each input and output click the REFRESH button in the HDCP Input Status and HDCP Output Status menus In the example below HDCP 2 2 encrypted content is being transmitted from HDMI input 1 to all outputs The status...

Страница 19: ...utputs in the matrix control enter the desired alias name for each in the Video Alias Name and Audio Alias Name menus then click SAVE to apply the changes or RESET to reset he fields to factory default Note The character length for each alias is limited to 15 characters only letters numbers and spaces are allowed No punctuation supported ...

Страница 20: ...y by a DHCP server By default the static IP address is 192 168 0 178 and the subnet mask is 255 255 0 0 and the default gateway is 192 168 0 1 To change the static address information enter the desired IP address Subnet Mask and Default Gateway address in the NETWORK menu and click APPLY To change the static IP address to a DHCP given address check the DHCP box and click APPLY The password for the...

Страница 21: ...he user interface To upload a custom image for the web user interface click BROWSE in the Custom WEB UI LOGO menu to locate an image file on a computer then click APPLY NOTE PNG formatted images are only allowed for custom logos with less than or equal to 512 x 62 pixels To set the DL HDM44A H2 to factory default or to reboot the unit click RESET TO DEFAULTS or REBOOT in the Factory Default and Re...

Страница 22: ...DMI input according to the lowest resolution EDID setting for that display so ALL displays connected to the DL HDM44A H2 can receive content The Easy Edid feature analyzes EDID on all outputs on every dynamic switch if lowest common denominator EDID is the same no changes will be made to the source resolution However if the lowest common denominator EDID settings is found to be a higher resolution...

Страница 23: ...remote which performs routing functions available on the front panel of the matrix When using the remote control locally i e pointed directly at the matrix the previous next buttons are used to scroll between the input sources connected to the matrix for each individual output display ...

Страница 24: ...P IN i p i 01 04 p on off Command SET HDCP IN 01 on CR LF Response HDCP IN 01 on CR LF Query HDCP status of a source input i GET HDCPV IN i i 01 04 Command GET HDCPV IN 01 CR LF Response HDCPV IN 01 14 CR LF 14 HDCP 1 4 22 HDCP 2 2 off Non HDCP Query HDCP support status of matrix input port i GET HDCP IN i i 01 04 Command GET HDCP IN 01 CR LF Response HDCP IN 01 on CR LF Query HDCP version of an i...

Страница 25: ...utput port o route GET o o 01 04 Command GET 02 CR LF Response 02 01 CR LF Set an input i route to all outputs SET i ALL CR LF i 01 04 Command SET 02 ALL CR LF Response 02 01 CR LF 02 02 CR LF 02 03 CR LF 02 04 CR LF Query routing status of all inputs to all outputs GET ALL CR LF Command GET ALL CR LF Response 01 01 CR LF 02 02 CR LF 03 03 CR LF 04 04 CR LF Matrix Routing Commands ...

Страница 26: ...LF Response AUDIOSW_M independent CR LF Set audio input i to audio output o route SET AUDIOSW i o i 01 04 o 01 04 ALL Command SET AUDIOSW 01 02 CR LF Response AUDIOSW hdmiin1 audioout2 CR LF Query audio route for output o GET AUDIOMP o o 01 04 ALL Command GET AUDIOMP 02 CR LF Response AUDIOMP hdmiin1 audioout2 CR LF Audio Routing Commands NOTE By default the audio de embedded outputs follow the vi...

Страница 27: ...1 CR LF AUDIOMP hdmi1 audioout2 CR LF AUDIOMP hdmi1 audioout3 CR LF AUDIOMP hdmi1 audioout4 CR LF Restores the matrix to factory defaults RST Command RST CR LF Response RESTORING FACTORY DEFAULTS CR LF System Reboot REBOOT Command REBOOT CR LF Response Reboot the device CR LF Switch to Standby Mode STANDBY Command STANDBY CR LF Response STANDBY CR LF Switch to Wake Mode WAKE Command WAKE CR LF Res...

Страница 28: ... 1 DTS 5 1 Device Control Parameters IR Carrier Frequency Range 38kHz at 5 volts Ethernet 100BaseT RS232 Baud Rate 9600 baud Chassis and Environmental Enclosure Painted Aluminum Dimensions H x W x D 43 5 mm x 440 mm x 300 mm 1 71 in x 17 32 in x 11 81 in 1 RU Shipping Weight 4 22kg 9 30 lbs Operating Temperature 0 to 45 C 32 to 113 F Operating Humidity 10 to 90 Non condensing Storage Temperature 2...

Страница 29: ...ur purchase Please contact us with your questions and comments 11675 Ridgeline Drive Colorado Springs Colorado 80921 USA Phone 719 260 0061 Fax 719 260 0075 Toll Free 800 530 8998 www libav com Digitalinx is a brand of ...

Отзывы: