LHFD C1910169 Скачать руководство пользователя страница 9

07

Step 5/Paso 5

Step 6/Paso 6

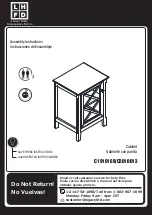
Connect bottom (5) and gable left (2) with 2 bolts (C), then tighten with wrench (L). Attach 
back rail (7) to gable left (2).

Conecte el Tablero inferior (5) al Tablero izquierdo (2) con 2 Tornillos hexagonales (C) ,cerrarlos bien con la Llave
 Allen (L). Inserte la Barra posterior (7).

Insert 2 wood dowels (A) into the holes on the edge of gable right (3).

Inserte 2 Pernos maderas (A) en el Tablero derecho (3).

A x 2

A

C x 2

L

C

L

L

EGACY 

H

OME

F

URNISHINGS & 

D

ECOR

Содержание C1910169

Страница 1: ...or call customer service for help rst Envie correo electr nico o llame al servicio para obtener ayuda primero 1 214 758 1098 Toll free 1 883 907 1099 Monday Friday 9am 4pm CST customer legacyhfd com...

Страница 2: ...e information go to www P65Warnings ca gov furniture Este producto puede exponerlo a sustancias qu m icas incluyendo el formaldeh do el cual es conocido en el estado de California como causante de c n...

Страница 3: ...ezas sujeciones y materiales 3 Monte el mueble sobre la caja para evitar da arlo 4 Limpie la superficie del mueble utilizando solamente un plumero o un pa o h medo no use productos de limpieza abrasiv...

Страница 4: ...Screw 7 8 30mm Perno madera 7 8 20mm Perno madera M6 30 mm Tornillo hexagonal Perno 3 12 mm Tornillo 1 Door stop Tope de puerta H 12 4 14 mm Screw I J 1 K 1 M4 30 mm Bolt 4 14 mm Tornillo Tirador M4...

Страница 5: ...mbly check to ensure all parts are present Screws are actual size El uso del tornillo incorrecto puede provocar da os al producto Antes de iniciar la operaci n de tornillo Estudie detenidamente las si...

Страница 6: ...la ilustraci n anterior Glue not enclosed We recommend to apply some glue into holes before inserting wood dowels Colle non fournie Nous vous recommandons d appliquer quelques gouttes de colle dans l...

Страница 7: ...etar el tornillo firmemente hasta que haya ensamblad o todas las otras partes B x 6 Insert 6 wood dowels B into bottom 5 Inserte 6 Pernos maderas B en el Tablero inferior 5 Connect bottom 5 and front...

Страница 8: ...owels A into the holes on the edge of back rail 7 Inserte 5 Pernos maderas A en la Barra posterior 7 Insert 2 wood dowels A into the holes on the edge of gable left 2 Inserte 2 Pernos maderas A en el...

Страница 9: ...gable left 2 Conecte el Tablero inferior 5 al Tablero izquierdo 2 con 2 Tornillos hexagonales C cerrarlos bien con la Llave Allen L Inserte la Barra posterior 7 Insert 2 wood dowels A into the holes o...

Страница 10: ...ghten with wrench L Conecte el Tablero derecho 3 al Tablero inferior 5 con 2 Tornillos hexagonales C cerrarlos bien con la Llave Allen L Hammer 1 door stop I into the holes on the top 1 Inserte el Top...

Страница 11: ...ith wrench L Conecte el Panel superior 1 al ensamblaje con 4 Tornillos hexagonales E cerrarlos bien con la Llave Allen L Insert back panel 8 into the assembly with 10 screws F Conecte el Tablero poste...

Страница 12: ...the door panel 9 secure with 1 screw K Fije 2 Bisagras G en la Puerta 9 con 4 Tornillos H Fije el Tirador J con 1 Tornillo K Attach door panel 9 to the cabinet secure hinges G with 8 screws H Fije las...

Страница 13: ...tep 13 Paso 13 Insert 4 shelf supports D into the holes on the gable left 2 and gable right 3 then put adjustable shelf 4 into the cabinet Inserte 4 Pernos D y Estante movible 4 D LEGACY HOME FURNISHI...

Страница 14: ...fety hazards or damage to your furniture or household items ADVERTENCIA Este producto ha sido dise ado para soportar la carga m xima indicada Si la carga m xima se superase el producto perder a su est...

Страница 15: ...imitations GARANTIA 1 A O 1 Instale y utilice este tema de conformidad con las instrucciones de instalaci n y funcionamiento proporcionadas con el producto en todo momento Cualquier alteraci n abuso i...

Отзывы: