background image

05

Har

Necessary tools/Herramientas necesarias

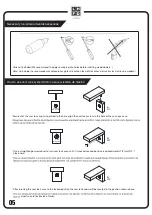
How to use cam lock system/Cómo usar el sistema de fijación

*Ensure that the cam lock arrow is pointed to the hole, align the cam lock screw to the hole of the cam lock case.

*Use a straight edge screwdriver to turn cam lock case until it is locked.Locked position is approximately 1/2 turn(210°)

clock-wise.

*After turnning the cam lock case to the locked position,the cam lock arrow will be located in the position shown above.


muestra en la ilustración anterior.

Glue not enclosed (We recommend to apply some glue into holes before inserting wood dowels.) 
Colle non fournie (Nous vous recommandons d’appliquer quelques gouttes de colle dans les trous avant 
d’y introduire les chevilles de bois.)

madera.)

Glue not included ( We recommend to apply some glue into holes before inserting wood dowels .) 

Cola, no incluida (Le recomendamos colocarunas gotas de cola en los orificios antes de insertar las clavijas de madera.)

Unlocked

Déverrouillé

#1

Nº1

Locked

Desbloqueado

#2

Nº2

#3

Nº3

Содержание C1910126

Страница 1: ...samblaje Email or call customer service for help first Envie correo electrónico o llame al servicio para obtener ayuda primero 1 214 758 1098 Toll free 1 883 907 1099 Monday Friday 9am 4pm CST customer legacyhfd com Do Not Return No Vuelvas Desk with Hutch Escritorio con conejera C1910126 60mns ...

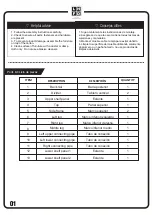
Страница 2: ...4 Limpie la superficie del mueble utilizando solamente un plumero o un paño húmedo no use productos de limpieza abrasivos Consejos útiles Parts list Lista de piezas 01 ITEM DESCRIPTION DESCRIPCIÓN QUANTITY 1 2 1 2 1 1 1 1 1 2 3 4 5 6 7 8 Back rail Barra posterior Divider Upper shelf panel Top Side frame Left leg Right leg Middle leg 1 9 Left upper connecting pipe Tablero vertical Estante Panel sup...

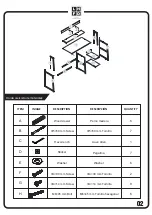
Страница 3: ...l Sticker B 7 Φ5 50 mm Screw C 1 Hex wrench D 7 E 6 Washer F 2 Φ4 30 mm Screw Perno madera Φ5 50 mm Tornillo Llave Allen Pegatina Washer Φ4 30 mm Tornillo G 8 Φ4 14 mm Screw Φ4 14 mm Tornillo H 6 M6 45 mm Bolt M6 45 mm Tornillo hexagonal Har Hardware Lista de materiales ...

Страница 4: ...l M6 30 mm Tornillo hexagonal M6 35 mm Tornillo hexagonal M6 55 mm Tornillo hexagonal Crosshead nut Expansión de plástico Using the wrong screw will cause damage Before you begin assembly check to ensure all parts are present Screws are actual size El uso del tornillo incorrecto puede provocar daños al producto Antes de iniciar la operación de tornillo Estudie detenidamente las siguientes ilustrac...

Страница 5: ...e harm For more information go to www P65Warnings ca gov furniture Este producto puede exponerlo a sustancias quím icas incluyendo el formaldehído el cual es conocido en el estado de California como causante de cáncer defectos de nacimiento u otros daños reproductivos Para obtener más información vaya a www P65Warnings ca gov furniture WARNING ADVERTENCIA 04 ...

Страница 6: ...ion the cam lock arrow will be located in the position shown above muestra en la ilustración anterior Glue not enclosed We recommend to apply some glue into holes before inserting wood dowels Colle non fournie Nous vous recommandons d appliquer quelques gouttes de colle dans les trous avant d y introduire les chevilles de bois madera Glue not included We recommend to apply some glue into holes bef...

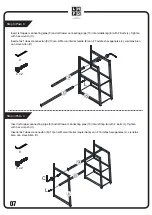
Страница 7: ...mblad o todas las otras partes G x 8 L x 2 Insert right connecting pipe 11 into right leg 7 and middle leg 8 with 2 bolts L tighten with hex wrench C Conecte el Marco inferior derecho 7 el Marco inferior medio 8 al Tubo de conexión 11 con 2 Tornillos hexagonales L cierralos bien con Llave Allen C Insert lower shelf panel 12 13 into right leg 7 and middle leg 8 with 8 screws G Fije los Estantes 12 ...

Страница 8: ...onexión 9 10 en el Marco inferior medio 8 con 2 Tornillos hexagonales L cierralos bien con Llave Allen C Insert left upper connecting pipe 9 and left lower connecting pipe 10 into left leg 6 with 2 bolts L Tighten with hex wrench C Inserte los Tubos de conexión 9 10 en el Marco inferior izquierdo 6 con 2 Tornillos hexagonales L cierralos bien con Llave Allen C C C L x 2 L x 2 L L C ...

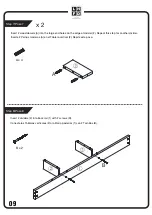
Страница 9: ... top 4 with 2 screws F Fije el Panel superior 4 en el ensamblaje con 6 Washers E y 6 Tornillos hexagonales K cierralos bien con Llave Allen C Conecte el Tubode conexión 9 al Panel superior 4 con 2 Tornillos F Insert 2 wood dowels A into the large end holes on the edge of back rail 1 Inserte 2 Pernos maderas A en la Barra posterior 1 A x 2 A C K x 6 F x 2 K E F C ...

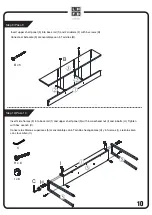
Страница 10: ... large end holes on the edge of divider 2 Repeat this step for another divider Inserte 2 Pernos maderas A en el Tablero vertical 2 Repite este paso Insert 2 dividers 2 into back rail 1 with 2 screws B Conecte los Tableros verticales 2 a la Barra posterior 1 con 2 Tornillos B B A ...

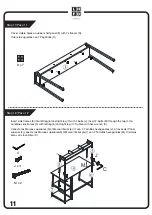
Страница 11: ...l Esteante 3 al ensamblaje con 5 Tornillos B Insert side frames 5 into back rail 1 and upper shelf panel 3 with 6 crosshead nut I and 6 bolts H Tighten with hex wrench C Conecte los Marcos superiores 5 al ensamblaje con 6 Tornillos hexagonales H y 6 Tuercas I cierralos bien con Llave Allen C C B x 5 H x 6 I x 6 B I C H ...

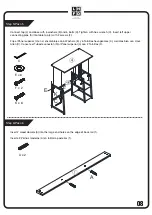
Страница 12: ... right leg 7 with 4 bolts J Insert 2 bolts M through the top 4 to combine side frames 5 with left leg 6 and right leg 7 Tighten with hex wrench C Conecte los Marcos superiores 5 al Marco inferior 6 7 con 4 Tornillos hexagonales J A través del Panel superior 4 conecte los Marcos superiores 5 al Marco inferior 6 7 con 2 Tornillos hexagonales M Cierralos bien con Llave Allen C D x 7 C J M ...

Страница 13: ...y hazards or damage to your furniture or household items ADVERTENCIA Este producto ha sido diseñado para soportar la carga máxima indicada Si la carga máxima se superase el producto perdería su estabilidad y podría provocar lesiones graves No permita que los niños suban al mueble y ni salten sobre él Podrían producirse accidentes lesiones o muertes Nunca empuje o tire los muebles que no están dise...

Страница 14: ...ditions and limitations GARANTIA 1 AÑO 1 Instale y utilice este tema de conformidad con las instrucciones de instalación y funcionamiento proporcionadas con el producto en todo momento Cualquier alteración abuso intencional accidente o mal uso del producto deberá anular esta garantía 2 Esta garantía no es transferible y se hace al dueño original siempre que la compra se hizo a través de un proveed...

Отзывы: