LG W4-2 Скачать руководство пользователя страница 6

Table of Contents

6

Table of Contents

1  Getting Started

Safety Information

8 Introduction

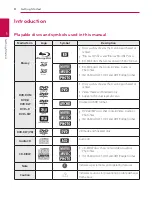
– Playable discs and symbols used in

this manual

– About the “

7

” symbol display

– Regional code

– System Select

10  Remote Control
11 

Front Panel

11 

Rear Panel

2 Connecting

12 

Positioning the System

13 

Speaker Connection

13  –  Attaching the speakers to the player
13  –  Attaching the rear speakers to the 

wireless receiver

14 

Wireless speakers connection

14  –  Setting up the wireless receiver for 

the first time

14  –  Manually pairing wireless receiver
15 

Connecting to Your TV

16  –  What is SIMPLINK?
16  –  ARC (Audio Return Channel) function
16  –  Resolution setting
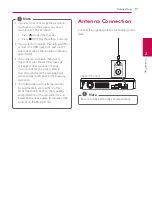
17 

Antenna Connection

18  Connections with External Device
18  –  AUX connection
18  –  OPTICAL IN connection
19 

Connecting to Your Home Network

19  –  Wired network connection
20  –  Wired network setup

3  System Setting

22  Initial Setup
23 Settings
23  –  Adjust the setup settings
24  –  [NETWORK] menu
25  –  [DISPLAY] menu

26  –  [LANGUAGE] menu 
27  –  [AUDIO] menu 
28  –  [LOCK] menu
29  –  [OTHERS] menu
31 

Sound Effect

4 Operating

32  Home Menu Display
32  –  Using [HOME] menu
33  Playing the Linked Devices
33  –  Playing a disc
33  –  Playing Blu-ray 3D disc
34  –  Playing a file on disc/USB device
35  –  Playing a file on android device
36  –  Playing a file on a network server
36  Using Home Network Server for PC
36  –  About SmartShare PC Software
36  –  Downloading SmartShare PC 

Software

36  –  Installing SmartShare PC Software
37  –  Sharing files and folders
37  –  System requirements
38  General Playback
38  –  Basic operations for video and audio 

content

38  –  Basic operations for photo content
38  –  Using the disc menu 
39  –  Resume playback 
39  –  Last scene memory
40  On-Screen Display
40  –  To control video playback
41  –  To control photo view
42  Advanced Playback
42  –  Repeat playback
42  –  Repeating a specific portion
42  –  Playing from selected time 
43  –  Selecting a subtitle language
43  –  Hearing a different audio 
43  –  Watching from a different angle 
43  –  Changing the TV Aspect Ratio
44  –  Changing Subtitle Code Page
44  –  Changing the Picture Mode
45  –  Viewing content information
45  –  Changing content list view 
45  –  Selecting a subtitle file
46  –  Listening to music during slide show

Содержание W4-2

Страница 1: ... manual carefully before operating your set and retain it for future reference OWNER S MANUAL 3D Blu ray DVD Home Cinema System LHB655W LHB655W S65T1 S S65T1 C S65T1 W W4 2 LHA755W LHB755W S65T1 S S65T1 C S65T1 W W4 2 ...

Страница 2: ... rug or other similar surface This product shall not be placed in a built in installation such as a bookcase or rack unless proper ventilation is provided or the manufacturer s instruction has been adhered to CAUTION This product employs a Laser System To ensure proper use of this product please read this owner s manual carefully and retain it for future reference Shall the unit require maintenanc...

Страница 3: ...e government or the local authorities 3 The correct disposal of your old appliance will help prevent potential negative consequences for the environment and human health 4 For more detailed information about disposal of your old appliance please contact your city office waste disposal service or the shop where you purchased the product Disposal of waste batteries accumulators 1 When this crossed o...

Страница 4: ... European Shared Service Center B V European Standard Team Krijgsman 1 1186 DM Amstelveen The Netherlands or can be requested at our dedicated DoC website http www lg com global support cedoc cedoc This device is a 2 4 GHz and 5 GHz wideband transmission system intended for use in all EU member states and EFTA countries with indoor use restriction for 5 GHz band 5150 5250 MHz This device should be...

Страница 5: ... for home and other limited viewing uses only unless otherwise authorized by Rovi Corporation Reverse engineering or disassembly is prohibited y y Under the U S Copyright laws and Copyright laws of other countries unauthorized recording use display distribution or revision of television programs videotapes BD ROM discs DVDs CDs and other materials may subject you to civil and or criminal liability...

Страница 6: ...UDIO menu 28 LOCK menu 29 OTHERS menu 31 Sound Effect 4 Operating 32 Home Menu Display 32 Using HOME menu 33 Playing the Linked Devices 33 Playing a disc 33 Playing Blu ray 3D disc 34 Playing a file on disc USB device 35 Playing a file on android device 36 Playing a file on a network server 36 Using Home Network Server for PC 36 About SmartShare PC Software 36 Downloading SmartShare PC Software 36...

Страница 7: ...55 Network 56 Picture 56 Sound 56 Customer Support 56 OPEN SOURCE SOFTWARE NOTICE 6 Appendix 57 Controlling a TV with the Supplied Remote Control 57 Setting up the remote to control your TV 58 Network Software Update 58 Network update notification 58 Software update 60 Additional Information 60 File requirement 61 AVCHD Advanced Video Codec High Definition 62 About DLNA 62 Certain system requireme...

Страница 8: ...mat DVD ROM DVD R DVD RW DVD R DVD RW r y y Discs such as movies that can be purchased or rented y y Video mode and finalized only y y Supports the dual layer disc also o Finalized AVCHD format y u i y y DVD R RW discs that contain Video Audio or Photo files y y ISO 9660 JOLIET UDF and UDF Bridge format DVD RW VR r VR mode and finalized only Audio CD t Audio CD CD R RW y u i y y CD R RW discs that...

Страница 9: ...es of recordable disc formats including CD R containing MP3 or WMA files and these require certain pre existing conditions to ensure compatible playback y y Customers should note that permission is required in order to download MP3 WMA files and audio from the Internet Our company has no right to grant such permission Permission should always be sought from the copyright owner y y You have to set ...

Страница 10: ...POPUP Displays the DVD title menu or BD ROM s pop up menu if available Z STOP Stops playback z PLAY Starts playback M PAUSE STEP Pauses playback C V SKIP Goes to the next or previous chapter track file c v SCAN Searches backward or forward c SPEAKER LEVEL Sets the sound level of desired speaker SOUND EFFECT Selects a sound effect mode VOL Adjusts speaker volume OPTICAL TV SOUND Changes input mode ...

Страница 11: ... Window c Operation buttons R Open Close T Play Pause I Stop F Function Changes the input source or function Volume 1 Power d USB Port Rear Panel a b c d e f g h a AC power cord b Cooling Fan c Speakers connectors d LAN port e HDMI OUT TO TV f AUX L R INPUT g OPTICAL IN h Antenna Connector ...

Страница 12: ...these speakers behind your listening position facing slightly inwards D E E F A G C B Subwoofer The position of the subwoofer is not so critical because low bass sounds are not highly directional But it is better to place the subwoofer near the front speakers Turn it slightly toward the center of the room to reduce the wall reflections D E E F A G C Unit y y Be careful to make sure children not to...

Страница 13: ... Position Green C Center Center Orange Sub woofer Any front position Red F R L Front Front right White F R L Front Front left To connect the cable to the speakers press each plastic finger pad to open the connection terminals on the base of each speaker Insert the wire and release the finger pad y y Be careful to make sure children do not put their hands or any objects into the speaker duct Speake...

Страница 14: ...ailable range is 20 m for wireless connection in an open place Note Manually pairing wireless receiver When your connection is not completed you can see the red LED or the blinking yellow green LED on the wireless receiver and the rear speakers are not made sound To solve the problem follow the below steps 1 Adjust the volume level of the main unit to minimum VOL MIN appears on the display window ...

Страница 15: ...put y y Not all HDCP compatible HDMI or DVI devices will work with this player The picture will not be displayed properly with non HDCP device y y If a connected HDMI device does not accept the audio output of the player the HDMI device s audio sound may be distorted or may not output y y When you use HDMI connection you can change the resolution for the HDMI output Refer to Resolution setting on ...

Страница 16: ...DMI CEC and ARC must be set to On The setting method of HDMI CEC and ARC may differ depending on the TV For details about ARC function refer to your TV manual You must use the HDMI cable Type A High Speed HDMI cable with Ethernet You must connect with the HDMI IN that supports the ARC function using the HDMI OUT on this player You can connect only one Home Theater to TV compatible with ARC To acti...

Страница 17: ... that your TV does not accept the warning message will appear After resolution change if you cannot see the screen please wait 20 seconds and the resolution will automatically revert back to the previous resolution y y The 1080p video output frame rate may be automatically set to either 24 Hz or 50 Hz depending both on the capability and preference of the connected TV and based on the native video...

Страница 18: ... the input mode To the audio output jacks of your component TV VCR etc Rear of the unit Red White OPTICAL IN connection You can enjoy the sound from your component with a digital optical connection through the speakers of this system Connect the optical output jack of your component into the OPTICAL IN jack on the unit And then select the OPTICAL option by pressing FUNCTION Or press OPTICAL TV SOU...

Страница 19: ...corresponding port on your Modem or Router using a commercially available LAN or Ethernet cable y y When plugging or unplugging the LAN cable hold the plug portion of the cable When unplugging do not pull on the LAN cable but unplug while pressing down on the lock y y Do not connect a modular phone cable to the LAN port y y Since there are various connection configurations please follow the specif...

Страница 20: ... is highlighted Network will automatically be connected to the unit Advanced Setting If you want to set the network settings manually use W S to select Advanced Setting on the Network Setting menu and press ENTER b 1 Use W S A D to select the IP mode between Dynamic and Static Normally select Dynamic to allocate an IP address automatically If there is no DHCP server on the network and you want to ...

Отзывы: