background image

A3

Important Precautions

On Cleaning

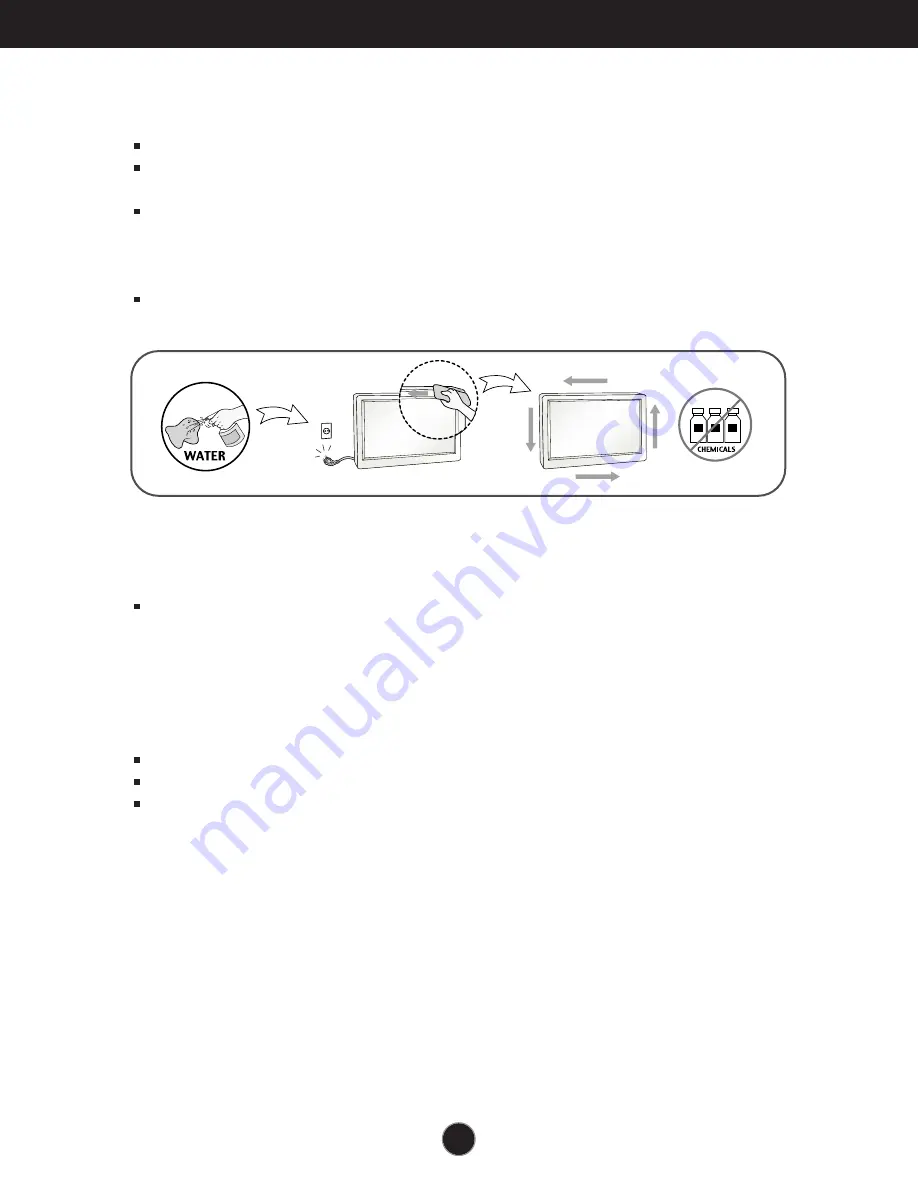
Unplug the display before cleaning the face of the display screen.
Use a slightly damp (not wet) cloth. Do not use an aerosol directly on the display

screen because over-spraying may cause electrical shock.

When cleaning the product, unplug the power cord and scrub gently with a soft

cloth to prevent scratching. Do not clean with a wet cloth or spray water or
other liquids directly onto the product. An electric shock may occur. (Do not use
chemicals such as benzene, paint thinners or alcohol) 

Spray water onto a soft cloth 2 to 4 times, and use it to clean the front frame;

wipe in one direction only. Too much moisture may cause staining.  

On Repacking

Do not throw away the carton and packing materials. They make an ideal
container in which to transport the unit. When shipping the unit to another
location, repack it in its original material.

On Disposal

The fluorescent lamp used in this product contains a small amount of mercury.
Do not dispose of this product with general household waste.
Disposal of this product must be carried out in accordance to the regulations of

your local authority.

Содержание W1943SE

Страница 1: ...t Precautions before using the product Keep the User s Guide CD in an accessible place for future reference See the label attached on the product and give the information to your dealer when you ask for service W1943SE User s Guide ...

Страница 2: ...rd Call your service technician for replacement As long as this unit is connected to the AC wall outlet it is not disconnected from the AC power source even if the unit is turned off Do not Open the Display There are no user serviceable components inside There are Dangerous High Voltages inside even when the power is OFF Contact your dealer if the display is not operating properly To Avoid Persona...

Страница 3: ...x LCD permanently Do not press the LCD screen with your finger for a long time as this may cause some afterimages Some dot defects may appear as Red Green or Blue spots on the screen However this will have no impact or effect on the display performance If possible use the recommended resolution to obtain the best image quality for your LCD display If used under any mode except the recommended reso...

Страница 4: ...r Do not use chemicals such as benzene paint thinners or alcohol Spray water onto a soft cloth 2 to 4 times and use it to clean the front frame wipe in one direction only Too much moisture may cause staining On Repacking Do not throw away the carton and packing materials They make an ideal container in which to transport the unit When shipping the unit to another location repack it in its original...

Страница 5: ...injure your foot Before setting up the monitor ensure that the power to the monitor the computer system and other attached devices is turned off Connecting the stand 1 Place the monitor with its front facing downward on a soft cloth 2 Assemble the Stand Base Front Rear into the Stand Body in the correct direction 3 Tie down the base lock to perpendicularity direction 4 Once assembled take the moni...

Страница 6: ... Change your lock on the product as it follows and turn it in the arrow direction 2 Place the monitor face down on the cushion or soft cloth If you can t release the stand base even the locking rib is at a release position Please push the indicated rib down and retry it 4 Pull out the stand to remove ...

Страница 7: ...and other attached devices is turned off Positioning your display 1 Adjust the position of the panel in various ways for maximum comfort Tilt Range 5 15 Ergonomic It is recommended that in order to maintain an ergonomic and comfortable viewing position the forward tilt angle of the monitor should not exceed 5 degrees ...

Страница 8: ...Image Setting Function is executed automatically NOTE Self Image Setting Function This function provides the user with optimal display settings When the user connects the monitor for the first time this function automatically adjusts the display to optimal settings for individual input signals AUTO SET Function When you encounter problems such as blurry screen blurred letters screen flicker or til...

Страница 9: ...A8 Connecting the Display Using the cable holder This feature is not available in all models N E P O 1 2 3 E P O N 4 N OPE Cable holder ...

Страница 10: ... page A17 OSD LOCKED UNLOCKED This function allows you to lock the current control settings so that these settings are not inadvertently changed To lock the OSD settings press and hold the MENU button for several seconds The message OSD LOCKED appears You can unlock the OSD settings at any time by pushing the MENU button for several seconds The message OSD UNLOCKED appears Front Panel Controls But...

Страница 11: ...button to select an icon in the On Screen Display AUTO SET Button AUTO IMAGE ADJUSTMENT When adjusting your display settings always press the AUTO SET button prior to entering the On Screen Display OSD This will automatically adjust your display image to the ideal settings for the current screen resolution size display mode The best display mode is W1943SE 1360 x 768 Buttons Use these buttons to s...

Страница 12: ...ke using the OSD To make adjustments in the On Screen Display follow these steps Press the MENU Button then the main menu of the OSD appears To access a control use the or Buttons When the icon you want becomes highlighted press the AUTO SET Button Use the Buttons to adjust the image to the desired level Use the AUTO SET Button to select other sub menu items Push the MENU Button once to return to ...

Страница 13: ...the screen To adjust the position of the screen To costomize the screen status for a user s operating environment To improve the clarity and stability of the screen To select or customize desired image settings FLATRON F ENGINE SETUP TRACKING COLOR PICTURE PHOTO EFFECT 4 3 IN WIDE NORMAL GAUSSIAN BLUR SEPIA MONOCHROME BRIGHTNESS CONTRAST GAMMA sRGB 6500K 9300K RED GREEN BLUE HORIZONTAL VERTICAL CL...

Страница 14: ...ed to the procedure of selecting and adjusting an item using the OSD system Listed below are the icons icon names and icon descriptions of the all items shown on the Menu Press the MENU Button then the main menu of the OSD appears Menu Name Icons Main Menu Button Tip MENU Exit Adjust Decrease Increase SET Enter Select another sub menu Restart to select sub menu ...

Страница 15: ...splay whitish images and low gamma values display high contrast images PICTURE PRESET RED GREEN BLUE sRGB Set the screen color to fit the SRGB standard color specification 6500K Slightly reddish white 9300K Slightly bluish white Set your own red color levels Set your own green color levels Set your own blue color levels COLOR PICTURE COLOR MENU Exit Decrease Increase SET Select another sub menu ME...

Страница 16: ...ckground The horizontal screen size will also change To adjust the focus of the display This item allows you to remove any horizontal noise and clear or sharpen the image of characters To adjust the clearness of the screen TRACKING TRACKING MENU Exit Decrease Increase SET Select another sub menu HORIZONTAL VERTICAL To move image left and right To move image up and down ...

Страница 17: ...on the screen LANGUAGE OSD POSITION WHITE BALANCE FACTORY RESET If the output of the video card is different the required specifications the color level may deteriorate due to video signal distortion Using this function the signal level is adjusted to fit into the standard output level of the video card in order to provide the optimal image Activate this function when white and black colors are pr...

Страница 18: ... according to input image signal 4 3 Change the image signal ratio into 4 3 WIDE 4 3 PHOTO EFFECT NORMAL The PhotoEffect function is disabled GAUSSIAN BLUR This option is to add the effect to the screen that the dark and sharp image becomes brighter and more blurred SEPIA This option changes the screen to be Sepia tone The Sepia tone is brown color tone MONOCHROME This option changed the screen to...

Страница 19: ...customer in the shops It s setting is same with Movie mode and screen is divided by half This feature lets you easily select the best desired image condition optimized to the environment ambient illumination image types etc User You can manually adjust ACE or RCM You can save or restore the adjusted value even when using a different environment ACE Adaptive Clarity Enhancer Selects the clarity mod...

Страница 20: ...ry moving the mouse or pressing any key on the keyboard to bring up the screen Try to turn on the PC This message appears when the signal from the PC video card is out of horizontal or vertical frequency range of the display See the Specifications section of this manual and configure your display again This message appears when the signal cable between your PC and your display is not connected Che...

Страница 21: ...our display image to the ideal setting If the results are unsatisfactory decrease the horizontal bars using the PHASE icon in the on screen display Check Control Panel Display Settings and adjust the display to the recommended resolution or adjust the display image to the ideal setting Set the color setting higher than 24 bits true color Important Check Control Panel Display Settings and see if th...

Страница 22: ...ttings Check if the screen is set to interlace mode and if yes change it to the recommend resolution Troubleshooting Have you installed the display driver Have you installed the display driver Do you see an Unrecognized monitor Plug Play VESA DDC monitor found message Be sure to install the display driver from the display driver CD or diskette that comes with your display Or you can also download ...

Страница 23: ...VESA 1360 x 768 60 Hz DDC 2AB On Mode 21W Typ Sleep Mode 1 W Off Mode 1 W With Stand Without Stand Width 44 90 cm 17 68 inches 44 90 cm 17 68 inches Height 36 08 cm 14 20 inches 29 10 cm 11 46 inches Depth 18 30 cm 7 20 inches 5 56 cm 2 19 inches Net 2 5 kg 5 62 lbs Tilt 5 15 12V 2 0A Type ADS 24S 12 1224G manufactured by HONOR Electronic or type MU24 B120200 xx manufactured by LEADER Electronics ...

Страница 24: ...req Hz 1 2 3 4 5 6 7 8 9 720 x 400 640 x 480 640 x 480 800 x 600 800 x 600 832 x 624 1024 x 768 1024 x 768 1360 x 768 31 468 31 469 37 500 37 879 46 875 49 725 48 363 60 123 47 712 70 60 75 60 75 75 60 75 60 Recommend Mode W1943SE Indicator On Mode Sleep Mode Off Mode Red Flicker Off LED Color MODE ...

Страница 25: ...Digitally yours ...

Отзывы: