background image

12

ENGLISH

 NOTE


Use the screws specified by VESA standards.


The wall mount kit includes the installation guide and all necessary parts.


The wall mounting bracket is optional. You can obtain optional accessories from 

your local dealer.


The length of the screw may differ for each wall mounting bracket. Be sure to use 

the proper length.


For more information, please refer to the user manual for the wall mounting 

bracket.

 CAUTION 


Unplug the power cord before moving or installing the monitor to avoid electric 

shock.


Installing the monitor on the ceiling or on a slanted wall may result in the monitor 

falling off, which could lead to injury. Use an authorized LG wall mount and contact 

the local dealer or qualified personnel.


Applying excessive force when tightening screws may cause damage to the 

monitor. Damage caused in this way will not be covered by the product warranty.


Use the wall mounting bracket and screws that conform to VESA standards. 

Damage caused by the use or misuse of inappropriate components will not be 

covered by the product warranty.


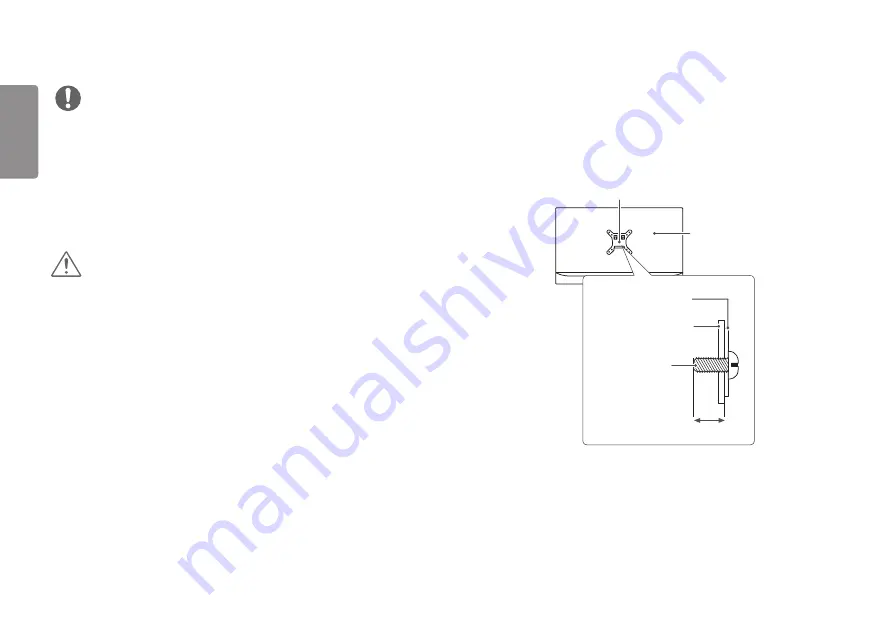
When measured from the back of the monitor, the length of each installed screw 

must be 8 mm or less.

Wall Mount Plate

Back of the Monitor

Screw 

Dimensions  

: M4 x L10

Wall Mount Plate

Back of the 

Monitor

Max. 8 mm

Содержание UltraGear 32GN50R

Страница 1: ...ED Monitor applies LCD screen with LED backlights Please read this manual carefully before operating your set and retain it for future reference 24GN60R 27GN60R 32GN50R www lg com Copyright 2022 LG Electronics Inc All Rights Reserved ...

Страница 2: ...N60R 32GN50R Using the Kensington Lock Installing the Wall Mount Plate Installing on the Wall USING THE MONITOR 13 Connecting to a PC 13 HDMI Connection DisplayPort Connection Connecting AV Devices 14 HDMI Connection Connecting Peripherals 15 Connecting Headphones USER SETTINGS 16 Activating the Main Menu 16 Main Menu Features User Settings 18 Menu Settings TROUBLESHOOTING 29 PRODUCT SPECIFICATION...

Страница 3: ...has different licenses Visit www lg com for more information on the license The terms HDMI and HDMI High Definition Multimedia Interface and the HDMI Logo are trademarks or registered trademarks of HDMI Licensing Administrator Inc ...

Страница 4: ... the stand and could result in personal injury When lifting or moving the monitor do not touch the monitor screen The force applied to the monitor screen may cause damage to it For wave pattern on appearance unlike the general method of coating it s applied to added glittering material in raw material With no peeled off appearance it has good durability Please use it with confidence because there i...

Страница 5: ...ons Power on Press the joystick button once with your finger to turn on the monitor Power off Press and hold the joystick button once with your finger to turn off the monitor Volume control You can control the volume by moving the joystick button left right Controls screen brightness You can control the screen s brightness by moving the joystick button up down NOTE The joystick button is located a...

Страница 6: ...nnect the power cord and all other cables Hold the bottom and side of the monitor frame firmly Do not hold the panel itself When holding the monitor the screen should face away from you to prevent it from being scratched When transporting the monitor do not expose the monitor to shock or excessive vibration When moving the monitor keep it upright and never turn the monitor on its side or tilt it s...

Страница 7: ... and fall resulting in damage to the monitor or human injury In addition this may cause the joystick button to malfunction Installing on a Table Lift the monitor and place it on the table in an upright position Place the monitor at least 100 mm away from the wall to ensure sufficient ventilation 100 mm 100 mm 100 mm 100 mm ...

Страница 8: ...kage and connect it to a grounded power outlet If you need another power cord please contact your local dealer or the nearest retail store Adjusting the Angle 1 Place the monitor mounted on the stand base in an upright position 2 Adjust the angle of the screen The angle of the screen can be adjusted forward or backward from 5 to 15 for a comfortable viewing experience Front Rear ...

Страница 9: ...creen do not hold the lower part of the monitor s frame as illustrated below Be careful not to touch or press the screen area when adjusting the angle of the monitor Tidying up Cables 27GN60R 32GN50R Arrange the cables using the cable holder as shown in the illustration ...

Страница 10: ...ts the specifications for the wall mount plate or other compatible devices 1 Place the screen face down To protect the monitor panel screen cover the surface with a soft cloth or the monitor protection pad included in the product package 2 Remove the four screws tightened on the back of the monitor 3 Place the wall mount plate onto the monitor and align it with the screw holes 4 Tighten the four s...

Страница 11: ...100 mm 100 mm 100 mm To install the monitor to a wall attach a wall mounting bracket optional to the back of the monitor Make sure that the wall mounting bracket is securely fixed to the monitor and to the wall 1 If you use screws longer than the standard length it may damage the inside of the product 2 A non VESA standard screw may damage the product and cause the monitor to fall LG Electronics i...

Страница 12: ...itor on the ceiling or on a slanted wall may result in the monitor falling off which could lead to injury Use an authorized LG wall mount and contact the local dealer or qualified personnel Applying excessive force when tightening screws may cause damage to the monitor Damage caused in this way will not be covered by the product warranty Use the wall mounting bracket and screws that conform to VES...

Страница 13: ...here the temperature is low This is normal Sometimes red green or blue spots may appear on the screen This is normal Connecting to a PC This monitor supports the Plug and Play feature Plug and Play A feature that allows you to add a device to your computer without having to reconfigure anything or install any manual drivers HDMI Connection Transmits digital video and audio signals from your PC to ...

Страница 14: ...cable or gender that supports DisplayPort1 4 sold separately Connecting AV Devices HDMI Connection HDMI transmits digital video and audio signals from your AV device to the monitor NOTE Using a DVI to HDMI DP DisplayPort to HDMI cable may cause compatibility issues Use a certified cable with the HDMI logo attached If you do not use a certified HDMI cable the screen may not display or a connection ...

Страница 15: ...eral devices are sold separately If you use angled earphones it may cause a problem with connecting another external device to the monitor Therefore it is recommended to use straight earphones Angled Straight Recommend Depending on the audio settings of the PC and external device headphones and speaker functions may be limited ...

Страница 16: ... Enters the Menu feature Holding down the button to turn off the monitor You can turn off the monitor this way at any time including when the OSD is on Main menu disabled Adjusts the monitor volume level Main menu enabled Enters the Input features Main menu disabled Adjusts the monitor volume level Main menu enabled Enters the Game Mode feature Main menu disabled Adjusts the monitor brightness lev...

Страница 17: ... ENGLISH Main Menu Features Main Menu Description Power Off Turns off the monitor Input Sets input mode Game Mode Sets the game mode for gaming Menu Configures the screen settings Exit Exits the main menu ...

Страница 18: ...he monitor and then enter the Menu 2 Move the joystick up down and left right to set the options 3 To return to the upper menu or set other menu items move the joystick to or pressing it 4 If you want to exit the OSD menu move the joystick to until you exit Game Mode Game Adjust Picture Adjust Input General ...

Страница 19: ...ure modes allow you to save two sets of customized display settings including game related setup options Gamer 2 FPS This mode is optimized for FPS games RTS This mode is optimized for RTS Game Vivid Optimized the screen for vivid colors Reader Optimizes the screen for viewing documents You can brighten the screen in the OSD menu HDR Effect Optimizes the screen for high dynamic range ...

Страница 20: ...es It is suitable for very dark FPS games RTS This mode is optimized for RTS Game Vivid Optimized the screen for vivid colors NOTE HDR content may not be operated properly depending on the Windows10 OS setting Please check the HDR On Off setting of Windows When the HDR function is turned on the characters or picture quality may be poor according to Graphic card performance While the HDR function i...

Страница 21: ...D s FreeSync is necessary Supported Version Make sure to update the graphic card to the latest driver For more information and requirement refer to AMD website at http www amd com FreeSync FreeSync Premium Adaptive Sync and Motion Blur Reduction cannot be enabled simultaneously Extended FreeSync Premium Adaptive Sync function on Enable wider frequency range of FreeSync function than basic mode Bas...

Страница 22: ...20Hz 144Hz Off Turns Motion Blur Reduction Mode off NOTE To reduce motion blur brightness is reduced with backlight control Motion Blur Reduction and FreeSync feature can not used at the same time This function is game optimized It is recommended to turn off when you are not using the gaming function Flicker may occur during Motion Blur Reduction operation Black Stabilizer You can control the blac...

Страница 23: ...ment feature Crosshair Crosshair provides a mark on the center of the screen for First Person Shooter FPS games Users can select the Crosshair that fits their gaming environment among four different Crosshairs When the monitor is off or enters energy saving mode the Crosshair feature is automatically turned off FPS Counter On The indicator is displayed on the upper left of the screen It will refle...

Страница 24: ...en color to a bluish tone Manual The user can fine tune the color temperature R G B You can customize the picture color using Red Green and Blue colors Six Color Meets the user requirements for colors by adjusting the hue and saturation of the six colors and then saving the settings Hue Adjusts the tone of the screen colors Saturation Adjusts the saturation of the screen colors The lower the value...

Страница 25: ...e Adjust DFC On Adjusts the brightness automatically according to the screen Off Disables the DFC feature Picture Reset Do you want to reset your picture settings No Cancel the select Yes Returns to the default settings ...

Страница 26: ...ideo signal input Original Displays video according to the aspect ratio of the video signal input NOTE The display may look the same for Full Wide and Original options at the recommended resolution 1920 x 1080 Auto Input Switch When automatic input switch is set to On display will automatically switch to new input when connected On Enables Auto Input Switch Off Disables Auto Input Switch ...

Страница 27: ...aving data may differ depending on panel and panel suppliers If you select the option of SMART ENERGY SAVING is High or Low monitor luminance become lower or higher depend on source Power LED On The power LED turns on automatically Off The power LED turns off Deep Sleep Mode When Deep sleep mode is enabled power consumption is minimized while the monitor is in standby mode On Enables Deep sleep Mo...

Страница 28: ...s you set the sound generated from Buzzer when your monitor powers on On Enables your monitor s Buzzer Off Disables your monitor s Buzzer OSD Lock This feature disables the configuration and adjustment of menus On Enables OSD Lock Off Disables OSD Lock NOTE All features are disabled except Brightness Contrast in Picture Adjust Input OSD Lock and Information in General Information The display infor...

Страница 29: ...rs see the troubleshooting guide in the product owner s manual message being displayed This occurs when signals transferred from the PC graphics card are out of the recommended horizontal or vertical frequency range of the monitor Please see the Product Specification section of this manual to set the appropriate frequency Is the No Signal message being displayed This is displayed when the signal c...

Страница 30: ...isplay one horizontal line is called the horizontal cycle If 1 is divided by the horizontal interval the result is the number of horizontal lines displayed per second This is called horizontal frequency and is represented by kHz Check if the graphics card s resolution or frequency is within the range allowed by the monitor and set it to the recommended optimal resolution Control Panel Display Menu...

Страница 31: ...screen When using the monitor pixilated spots red green blue white or black may appear on the screen This is normal for an LCD screen It is not an error nor is it related to the monitor s performance No sound from the headphone port Are images displayed using DP DisplayPort or HDMI input without sound Make sure that the headphone port connections are made properly Try increasing the volume with th...

Страница 32: ...HEN HONOR ELECTRONIC Or ADS 45FSQ 19 19032EPK 1 type manufactured by SHENZHEN HONOR ELECTRONIC Or ADS 45FSQ 19 19032EPCU 1 type manufactured by SHENZHEN HONOR ELECTRONIC Or ADS 45FSQ 19 19032EPBR 1 type manufactured by SHENZHEN HONOR ELECTRONIC Or ADS 45FSQ 19 19032EPI 1 type manufactured by SHENZHEN HONOR ELECTRONIC Or AD10550LF type manufactured by PI Electronics H K Ltd Or AD2138S20 type manufa...

Страница 33: ...5 kg Specifications are subject to change without notice The symbol means alternating current and the symbol means direct current The Power Consumption level can be different by operating condition and monitor setting The On mode power consumption is measured with LGE test standard Full White pattern Maximum resolution The monitor goes to the Sleep Mode in a couple of minutes Max 5 minutes ...

Страница 34: ...HEN HONOR ELECTRONIC Or ADS 45FSQ 19 19040EPG 1 type manufactured by SHENZHEN HONOR ELECTRONIC Or ADS 45FSQ 19 19040EPK 1 type manufactured by SHENZHEN HONOR ELECTRONIC Or ADS 45FSQ 19 19040EPCU 1 type manufactured by SHENZHEN HONOR ELECTRONIC Or ADS 45FSQ 19 19040EPBR 1 type manufactured by SHENZHEN HONOR ELECTRONIC Or AD10530LF type manufactured by PI Electronics H K Ltd Or AD2137S20 type manufa...

Страница 35: ...2 x 364 8 x 51 7 mm Weight Without Packaging With Stand 5 8 kg Without Stand 5 1 kg Specifications are subject to change without notice The symbol means alternating current and the symbol means direct current The Power Consumption level can be different by operating condition and monitor setting The On mode power consumption is measured with LGE test standard Full White pattern Maximum resolution ...

Страница 36: ...DS 45FSQ 19 19040EPK 1 type manufactured by SHENZHEN HONOR ELECTRONIC Or ADS 45FSQ 19 19040EPCU 1 type manufactured by SHENZHEN HONOR ELECTRONIC Or ADS 45FSQ 19 19040EPBR 1 type manufactured by SHENZHEN HONOR ELECTRONIC Or LCAP21C type manufactured by LIEN CHANG ELECTRONIC ENTERPRISE Or LCAP26B E type manufactured by LIEN CHANG ELECTRONIC ENTERPRISE Or LCAP26B A type manufactured by LIEN CHANG ELE...

Страница 37: ... 7 x 428 x 77 5 mm Weight Without Packaging With Stand 5 9 kg Without Stand 5 2 kg Specifications are subject to change without notice The symbol means alternating current and the symbol means direct current The Power Consumption level can be different by operating condition and monitor setting The On mode power consumption is measured with LGE test standard Full White pattern Maximum resolution T...

Страница 38: ...Vertical Frequency Hz Polarity H V Remarks 640 x 480 31 469 59 94 800 x 600 76 302 120 800 x 600 37 879 60 317 1024 x 768 48 363 60 0 1024 x 768 97 551 120 1920 x 1080 67 50 60 1920 x 1080 84 36 74 99 HDMI 1 4 1920 x 1080 137 26 119 98 120 DisplayPort 1920 x 1080 166 59 143 98 Preferred Timing 2560 x 1440 111 86 74 97 ...

Страница 39: ...640 x 480 31 469 59 94 800 x 600 76 302 120 800 x 600 37 879 60 317 1024 x 768 48 363 60 0 1024 x 768 97 551 120 1920 x 1080 67 50 60 1920 x 1080 84 36 74 99 HDMI 1 4 1920 x 1080 137 26 119 98 120 DisplayPort 1920 x 1080 166 59 143 98 1920 x 1080 181 83 165 0 Preferred Timing 2560 x 1440 111 86 74 97 ...

Страница 40: ...ode Horizontal Frequency kHz Vertical Frequency Hz Remarks 480P 31 5 60 720P 45 60 1080P 67 5 60 1080P 135 120 Only HDMI 2 0 and HDMI Freesync Power LED Mode LED Color On Mode Red For a few seconds Sleep Mode Standby Mode Off Off Mode Off ...

Страница 41: ...The model and serial number of the product are located on the back and on one side of the product Record them below in case you ever need service Model Serial No ...

Отзывы: