4-1
OPERATING INSTRUCTIONS
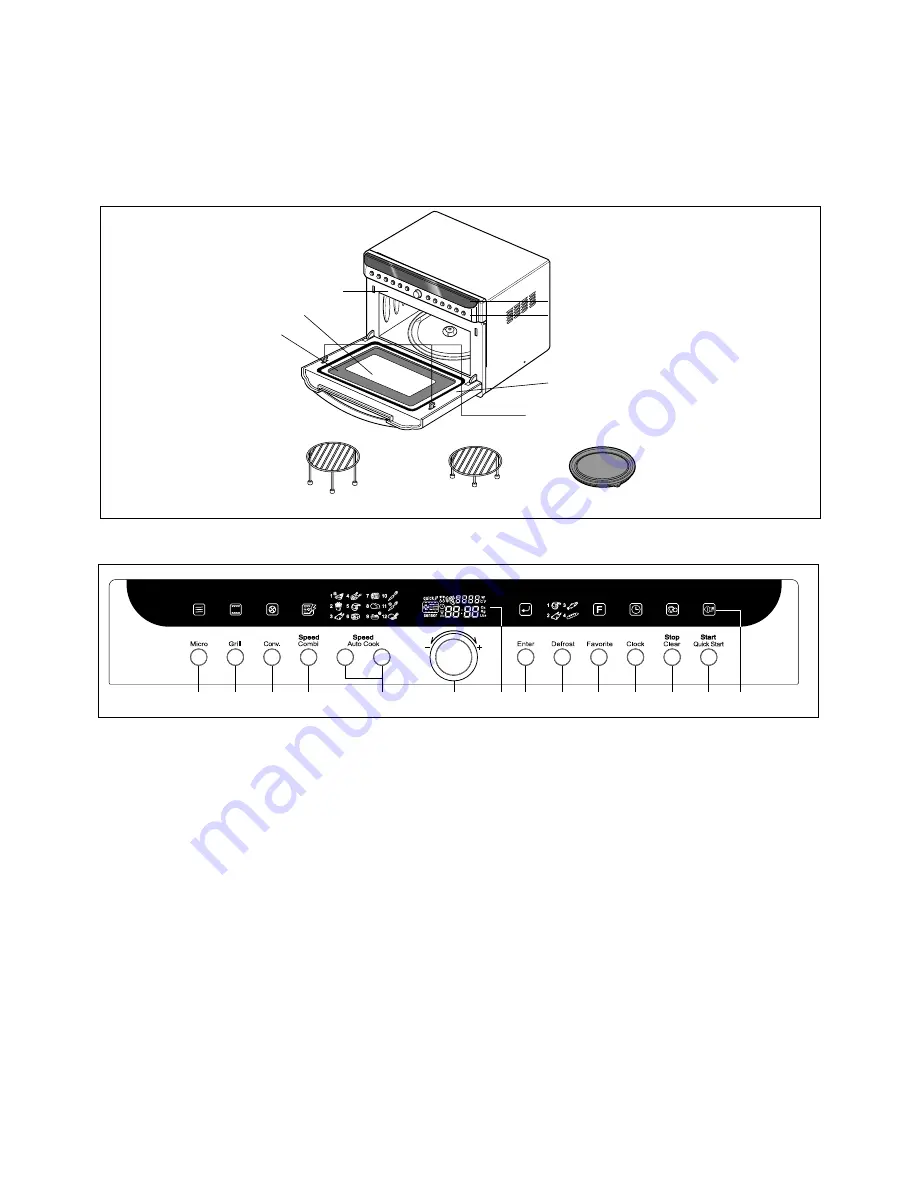
FEATURES
CONTROL PANEL
Metal Tray
HIGH Rack
LOW Rack
Oven Front Plate
Safety Door Lock System
Window Door Screen
Door Frame
Control Panel
Choke Cover
Control Panel Deco.
3
4
5
6
7
8
1
2
9
10
11
12
13
14
1. Display Window:
You can show time of day, cooking time, power
level and cooking categories.
2. Enter:
You can determine the selected cooking category,
microwave power level or temperature.
3. Micro:
You can select five power level settings.
4. Grill:
You can select the grill categories.
5. Conv.:
You can select temperature and time of convection.
6. Speed Combi:
You can select the combination categories.
7. Speed Auto Cook:
Speed auto cook allows you to cook most of
your favorite food quickly by selecting the food type and the
weight of the food.
8. Dial Knob:
• You can set cooking times, temperature, weight and cooking
categories.
• While cooking with auto and manual function, you can lengthen
or shorten the cooking time at any point by turning the dial
knob(except defrost mode).
9. Defrost:
You can select the food type and the weight of the food.
10. Favorite:
The cooking program can be stored in the memory of
your oven up to 9 modes(FA-1~FA-9).
11. Clock:
You can set the time of day.
12. Stop/Clear:
You can stop over and clear all entries except time
of day.
• Press Stop/Clear Button one time, all icons will be displayed
on window in time of day or clear mode.
• Press Stop/Clear Button one more time, all icons will be
disappeared.
13. Start/Quick Start:
• In order to start cooking which is selected, press button one
time.
• The quick start feature allows you to set 30 seconds intervals of
HIGH power cooking with a touch of the quick start button.
14. Icon:
You can see all icons by pressing “Stop/Clear” button one
time and remove all icons by pressing one more time(all icons
will disappear automatically after 15 seconds).
Blink will guide to next step for setting while cooking, the icon of
the selected cooking mode will be displayed on window.
Содержание SolarDOM MP-9482S
Страница 9: ...SCHEMATIC DIAGRAM 4 3 ...
Страница 34: ...6 5 466001 43501L 43500L 44510A 466003 466001 43500R 43501R WSZ085 WSZ085 LATCH BOARD PARTS EV ...
Страница 37: ...8 1 SCHEMATIC DIAGRAM OF P C B ...
Страница 38: ...8 2 PRINTED CIRCUIT BOARD Key P C B 1 ...
Страница 39: ...8 3 PRINTED CIRCUIT BOARD Key P C B 2 ...
Страница 40: ...8 4 PRINTED CIRCUIT BOARD Power P C B 2 ...
Страница 41: ... 19 ...


