background image

Operating

37

Oper

ating

3

Voice command

1. Time 

“What time is it?”, “What time is it now?”, “What 
time is it in Spain?”

2.  Weather


“What’s the weather?”, “What’s the weather this 
weekend?”, “What’s the weather in Paris?”, “Will it 
rain tomorrow?”

3. Plan 

“Tell me about my day.”, “What’s my next 
meeting?”, “Set a reminder to check schedule at 
6pm.”

4.  Alarms


“Set an alarm” , “Set an alarm for 9am”, “Wake me 
up at 9am”, “What alarms are set?”

5.  Music


“Play the music.”, “Next song.”, “Previous song.”, 
“Pause the music”

6.  Volume


“Volume level 3.”, “Maximum volume.”, “Mute.”, “Turn 
it up”, “Turn it down”

7.  Smart Home devices


“Set the heat to 22”


“Turn on lights in the kitchen” 


“Watch on TV” 


y

For more information on the voice commands, 
refer to the “Google Home” app screen or 
visit the web site. http://support.google.com/

assistant


y

Voice command of Volume level change


-

The volume range of this unit is 1-40.


(Except LGOPT function. In LGOPT function, 
the volume range works 1-100.)


-

Google Assistant recognizes voice 
command of volume level change as a scale 
(1-10) or a percentage (1-100 %)


-

For example, if you say “Volume level five.” 
the volume level of this unit changes to 20. 
If you say “Volume to 65 %.”, it changes to 
26.


-

Volume level increases or decreases by 
10 % (i.e. 4) when you say, “volume up” or 
“volume down”.


-

When you say numbers of 10 and less, it is 
recommended to say “percent” to prevent 
too loud sound.


,

Note


y

After connecting to Wi-Fi, this function is 
available to use. If Google Assistant LED 
(White) blinks, the speaker is not connected 
to Wi-Fi. Follow the “Installing “Google Home” 
App” and try again. (Page 17)


y

If the Google Assistant LED is solid amber, 
the microphone is off. In that case, the Google 
Assistant is not available to receive your 
comment. Press 

>

 on the unit.


y

If the Google Assistant fails to understand 
your commands, it will say answers such 
as “Sorry, I can't help with that yet”, “My 
apologies. I don't understand.”


y

Avoid noisy places, because the speaker may 
not receive your commands or “Hey Google”. 
Instead of “Hey Google”, press 

.


y

When the voice recognition time limit is 
exceeded on smart devices, this function 
automatically cancels.


y

Speaking with correct pronunciation will 
increase the voice recognition rate.


y

The Google Assistant may be slow to 
recognize or act depending on the Wi-Fi 
connection status or Google server status.


y

If you have any trouble or question about 
Google Assistant, please suggest by saying 
“Hey Google, Feedback”. It would be helpful 
for improving Google Services.


,

Note

Содержание SN8YG

Страница 1: ... LG Wi Fi Sound Bar Please read this manual carefully before operating your set and retain it for future reference MODEL SN8YG SN8YG SPN8 W 2001_Rev01 www lge com Copyright 2020 LG Electronics Inc All Rights Reserved ...

Страница 2: ... This product shall not be placed in a built in installation such as a bookcase or rack unless proper ventilation is provided or the manufacturer s instruction has been adhered to CAUTION No naked flame sources such as lighted candles should be placed on the apparatus NOTICE For safety marking information including product identification and supply ratings please refer to the main label on the bot...

Страница 3: ...etting Started 3 Getting Started 1 Symbols Refers to alternating current AC 0 Refers to direct current DC Refers to class II equipment 1 Refers to stand by Refers to ON power Refers to dangerous voltage ...

Страница 4: ...Ferrite Core 26 Connecting to your TV 26 Using an OPTICAL cable 26 LG Sound Sync 27 Using an HDMI cable 28 ARC Audio Return Channel function 28 eARC Enhanced Audio Return Channel function 28 What is SIMPLINK 29 Additional information for HDMI 30 Optional equipment connection 30 DOLBY ATMOS 30 DTS X 31 HDMI IN connection 31 OPTICAL IN connection 32 USB connection 1 Getting Started 2 Safety Informat...

Страница 5: ...bout BLUETOOTH 42 BLUETOOTH profiles 42 Listening to Music of a BLUETOOTH Device 45 Other operations 45 Using your TV remote control 45 AUTO POWER On Off 46 Auto function change 47 Standby mode 47 Standby mode 47 Networked standby mode 47 Reset the Speaker 4 Troubleshooting 48 Troubleshooting 48 General 50 Network 50 Application 51 NOTES to use wireless 51 NOTES to release Demo mode 5 Appendix 52 ...

Страница 6: ...Getting Started 6 Getting Started 1 Introduction Symbol used in this manual Note Indicates special notes and operating features Caution Indicates cautions for preventing possible damages from abuse ...

Страница 7: ...You can use Bluetooth function after making Wi Fi network connection by using Google Home app o p Volume Adjusts volume level N Starts playback Pauses playback Mic mute Disables the detect voice recognition by pressing on the unit All the Google Assistant LED turns amber and The mic is muted is heard To cancel it press on the unit again Google Assistant LED turns off and The mic is back on is hear...

Страница 8: ...n the display window will brighten Precautions in using the touch buttons y y Use the touch buttons with clean and dry hands In a humid environment wipe out any moisture on the touch buttons before using y y Do not press the touch buttons hard to make it work If you apply too much strength it can damage the sensor of the touch buttons y y Touch the button that you want to work in order to operate ...

Страница 9: ...al device You can enjoy the sound and picture from HDMI connection on an external device C HDMI OUT TV eARC ARC Connect the HDMI OUT TV eARC ARC jack on the back of the unit to ARC jack on the TV D OPTICAL IN Connect the OPTICAL IN jack on the back of the unit to OPTICAL OUT jack on the TV E USB Port Connect USB memory device to the USB port on the back of the unit ...

Страница 10: ...h 4 and 5 matched correctly Risk of fire or explosion if the battery is replaced by an incorrect type a 1 Standby Switches the unit ON or OFF y y Networked standby It allows the unit to switch to standby mode To turn on Networked standby function Press 1 To turn off Networked standby function press 1 for about 3 seconds b VOL Volume o p Adjusts speaker volume ...

Страница 11: ...mote control even by other company s product Page 45 To turn on or off the TV Remote function press and hold SOUND EFFECT for about 3 seconds and press it again Supported TV brands LG Panasonic Philips Samsung Sharp Sony Toshiba Vizio d C V Skip Press C or V to go to next or previous file e N Play Pause Starts playback Pauses playback f 8 Night time It is useful when you want to watch movies at lo...

Страница 12: ...me Control 6 6 R Rear 6 6 TRE Treble 5 5 BAS Bass 5 5 y y Surround sound It allows you to enjoy surround sound with rear speakers Page 22 To turn on or off the surround sound press and hold for about 3 seconds and press it again l J Information You can display various information of the input source by pressing J Wi Fi Connected Application name BT Bluetooth Connected Bluetooth device name OPT Opt...

Страница 13: ...rted 1 Speakers position a b b c c d e e a Center speaker b Front speakers c Top speakers d Subwoofer e Rear speakers You can enjoy surround sound by using Wireless Rear Speaker kit Wireless Rear Speakers Kit sold separately SPK8 S ...

Страница 14: ...peakers as shown below y y If the sound bar covers the remote sensor of the TV please separate distance between the sound bar and TV by 10 15 cm 3 9 5 9 inch or more y y The illustration above may differ from actual units y y You can enjoy surround sound by using Wireless Rear Speaker kit Wireless Rear Speakers Kit sold separately SPK8 S Note y y For best performance of wireless connection such as...

Страница 15: ...ry or damage to the product y y When the unit is installed on a wall please make sure that a child does not pull any of connecting cables as it may cause it to fall Caution You can mount the main unit on a wall Because it is difficult to make a connection after installing this unit you should connect the cables before installation Caution Preparation materials Unit Wall bracket install guide Screw...

Страница 16: ...ou should drill some holes A guide sheet Wall bracket install guide is supplied to drill Use the sheet to check the point to drill 3 Remove the Wall bracket install guide 4 Fix the brackets with screws A as shown in the illustration below 5 Put the unit on the brackets to match screw holes on the bottom of the unit 6 Fix the unit with the screws firmly To detach the unit perform it in reverse orde...

Страница 17: ...me App The Google Home app allows you to use various functions of this speaker through your smart device Requirements before setup y y A wireless router must be connected to the internet A smart device such as Android or iOS devices must be connected to the wireless router via Wi Fi connection y y It needs Google account to use this app During connect Wi Fi this app may request to create Google ac...

Страница 18: ...peaker name Follow the Edit speaker name Page 44 y y For more information on the setup visit the web site https support google com assistant answer 7538816 Note 3 When the speaker is properly connected to Wi Fi CONNECTED will appear on the display window with sound y y Depending on wireless router status it might not work well Wi Fi connection y y It is recommended that you use Wi Fi Group Play wi...

Страница 19: ...vided Note Connecting the AC Adapter Connect the sound bar to the power supply with the supplied AC adapter 1 Connect the supplied AC power cord to the AC adapter 2 Connect the AC adapter cable to DC IN adapter input 3 Plug the AC power cord into an AC outlet Only use the AC adapter supplied with this device Do not use a power supply from another device or manufacturer Using any other power cable ...

Страница 20: ...ofer to the outlet 2 Turn on the sound bar The sound bar and the wireless subwoofer will be automatically connected Pairing is completed The green LED on the rear of the wireless subwoofer turns on Manually pairing wireless subwoofer When your connection is not completed you can check red LED on the wireless subwoofer and the wireless subwoofer does not make sound To solve the problem follow the s...

Страница 21: ...s wireless connection such as a medical equipment a microwave or a wireless LAN device Keep the sound bar and the subwoofer away from the device ex wireless router microwave oven etc over 1 m 3 3 ft to prevent wireless interference 1 m 3 3 ft Note Rear speakers connection Sold Separately Connecting the rear speakers 1 Connect the black stripe wire to the terminal marked minus and the other end to ...

Страница 22: ... the wireless receiver turns on Manually pairing wireless receiver When your connection is not completed you can see the red LED on the wireless receiver and rear speakers do not make sound To solve the problem follow the below steps 1 Press PAIRING on the rear of the wireless receiver The yellow green LED on the wireless receiver blinks quickly 2 Turn on the main unit Paring is completed The yell...

Страница 23: ...ct Input Output No rear speakers Rear speakers connected AI SOUND PRO 2 0 Ch 5 1 Ch 7 1 Ch or more BASS BLAST or BASS BLAST 2 0 Ch 5 1 Ch 7 1 Ch or more STANDARD 2 0 Ch 5 1 Ch 7 1 Ch or more MOVIE 2 0 Ch 5 1 Ch 7 1 Ch or more MUSIC 2 0 Ch 5 1 Ch 7 1 Ch or more ...

Страница 24: ...ct Input Output No rear speakers Rear speakers connected AI SOUND PRO 2 0 Ch 5 1 Ch 7 1 Ch or more BASS BLAST or BASS BLAST 2 0 Ch 5 1 Ch 7 1 Ch or more STANDARD 2 0 Ch 5 1 Ch 7 1 Ch or more MOVIE 2 0 Ch 5 1 Ch 7 1 Ch or more MUSIC 2 0 Ch 5 1 Ch 7 1 Ch or more ...

Страница 25: ...ter the sound bar is turned off When the wireless receiver is in standby mode the LED will turn on in red y y When you turn on the sound bar the wireless receiver will turn on and the LED will change to yellow green and then the rear speakers makes sound within a few seconds y y It takes a few seconds and may take longer for the main unit and Wireless Receiver to communicate with each other y y Us...

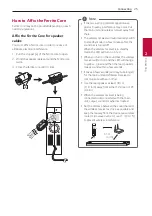
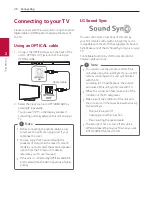
Страница 26: ... connected by OPTICAL and ARC at the same time the ARC signal has a higher priority Note LG Sound Sync You can control some functions of this unit by your TV s remote control with LG Sound Sync It is compatible with the LG TV that supports LG Sound Sync Make sure of the LG Sound Sync logo is on your TV Controllable function by LG TV s remote control Volume up down mute y y You can also use the rem...

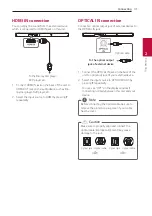
Страница 27: ...ugh the speakers of this unit without connecting the optical cable 1 Connect the HDMI OUT TV eARC ARC jack on the back of the unit to ARC jack on the TV using an HDMI cable HDMI cable 2 Select the input source to OPT HDMI ARC by pressing F repeatedly You can see ARC or E ARC on the display window if connecting normally between this unit and your TV y y You can enjoy the TV audio through the speake...

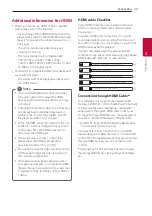
Страница 28: ...the TV For details about eARC or ARC function refer to your TV manual You must use the certified HDMI cable page 29 You must connect the HDMI OUT on the unit with HDMI IN of the TV that supports eARC or ARC function using an HDMI cable You can connect only one Sound bar to TV compatible with eARC or ARC What is SIMPLINK Some functions of this unit are controlled by the TV s remote control when thi...

Страница 29: ...ution of the connected component y y If the video output signal is abnormal when your personal computer is connected to HDMI IN jack change the resolution of your personal computer to 576p or 480p 720p 1080i or 1080p Note HDMI cable Checklist Some HDMI cables have poor signal transmission which can cause problems with sound and video transmission Even after HDMI cable connections if no sound sound...

Страница 30: ...does not support DTS sound source connect the playback source device to the HDMI IN or OPTICAL IN jack on the soundbar to listen to DTS audio 1 Connect HDMI IN jack on the back of the unit to HDMI OUT jack on the external device such as Blu ray disc player DVD player etc 2 Connect HDMI OUT TV eARC ARC jack on the back of the unit to HDMI IN ARC jack on the TV 3 Select the input source to HDMI or O...

Страница 31: ... devices to the OPTICAL IN jack Optical cable To the optical output jack of external device 1 Connect the OPTICAL IN jack on the back of the unit to optical out jack of your external device 2 Select the input source to OPT HDMI ARC by pressing F repeatedly You can see OPT on the display window if connecting normally between this unit and your device Before connecting the optical cable be sure to r...

Страница 32: ...DMI cable 3 Select the input source to OPT HDMI ARC by pressing F repeatedly If the sound bar does not have sound or the video on TV is not smooth the HDMI cable may be the problem Refer to the HDMI cable checklist Page 29 Note USB connection Connect USB memory device to the USB port on the back of the unit For more information of playing files on a USB refer to the page 35 Removing the USB Device...

Страница 33: ...owings on this unit External HDD Card readers Locked devices Hard type USB devices USB hub Using USB extension cable iPhone iPod iPad Android device Playable file Sampling Frequency MP3 within 32 to 48 kHz OGG within 32 to 48 kHz AAC within 32 to 48 kHz FLAC 32 kHz 44 1 kHz 48 kHz 88 2 kHz 96 kHz 176 4 kHz and 192 kHz 16 bit 24 bit WAV 32 kHz 44 1 kHz 48 kHz 88 2 kHz 96 kHz 176 4 kHz and 192 kHz 1...

Страница 34: ...he folder will not appear y y File will be played from file A to file J one by one y y Files will be played in order recorded and it may be different depending on the record circumstances y y This unit can display file or folder names that contain numbers or English characters only y y ROOT The first screen you can see when a this unit recognize the USB is ROOT Note ...

Страница 35: ...o go to the beginning of the file Play repeatedly or randomly Press REPEAT on the remote control repeatedly Refer to the note for details about the display change Search a folder Press FOLDER W S on the remote control y y The resume point may be cleared when you pull out the power cord or removing the USB device from the unit y y Repeat Random playback operates as follows On Display Description OF...

Страница 36: ...s your voice command 4 After a few seconds the Google Assistant will respond to your command y y The Google Assistant only responds to voice commands when you are using Wi Fi or BT Bluetooth as the input If you are using HDMI Optical ARC Optical Sound Sync or USB input then you must use the button to activate the Google Assistant y y Each time you use voice recognition say Hey Google or press Note...

Страница 37: ...t changes to 26 Volume level increases or decreases by 10 i e 4 when you say volume up or volume down When you say numbers of 10 and less it is recommended to say percent to prevent too loud sound Note y y After connecting to Wi Fi this function is available to use If Google Assistant LED White blinks the speaker is not connected to Wi Fi Follow the Installing Google Home App and try again Page 17...

Страница 38: ...t answer 7539991 Control smart home devices https support google com assistant answer 7540703 Create a shopping list https support google com assistant answer 7540969 Buy items on your shopping list https support google com assistant answer 7384588 speaker Set up and manage My Day https support google com assistant answer 7393908 speaker Listen to radio https support google com assistant answer 75...

Страница 39: ...e commands with accurate and clear pronunciation Note Available voice commands LG TV Commands Action Turn on LG TV Turn LG TV on Power on LG TV Power LG TV on Turns on your LG TV Turn off LG TV Turn LG TV off Power off LG TV Power LG TV off Turns off your LG TV Channel up on LG TV LG TV channel up Next channel on LG TV Your LG TV changes the channel to up Channel down on LG TV LG TV channel down P...

Страница 40: ...ges the sound effect to MUSIC BASS BLAST BASS BLAST PLUS Changes the sound effect to BASS BLAST BASS BLAST PLUS Display the input source information Displays the input source information on display window Enable Auto volume Disable Auto volume Turns on Auto volume function Turns off Auto volume function Enable Auto Power Disable Auto Power Turns on Auto power function Turns off Auto power function...

Страница 41: ...emote control Requirements y y A wireless router must be connected to the internet y y A smart device such as a smartphone or tablet must be connected to the wireless router via Wi Fi connection For more informations of LG Wi Fi Speaker follow the instructions of the application Note Installing LG Wi Fi Speaker App Through Apple App Store or Google Play Store 1 Tap the Apple App Store icon or Goog...

Страница 42: ...ke sure that the Bluetooth feature on your smart device is turned on Refer to your Bluetooth device s user guide Once a pairing operation is performed it does not need to be performed again 1 Turn on the speaker and connect Wi Fi Follow Network connection Page 17 18 2 Select the Bluetooth function by pressing F repeatedly BT and then READY appears in the display window 3 Operate the Bluetooth devi...

Страница 43: ...ound Bar off and back on Then follow the TV s on screen instructions y y Available TV LG TV models released after 2016 and some TVs may not work well Note y y This unit supports Bluetooth auto pairing However it does not operate in the case below When you restart this unit When you disconnect this unit by yourself When you disconnect this unit on the connected Bluetooth device y y The sound may be...

Страница 44: ...ntrols connected BLUETOOTH device You can control the connected Bluetooth device from the unit play pause skip volume y y Only Android OS and iOS is available to use this function y y This function may not be supported depending on the Bluetooth device or some of TV operated differently y y You can control connected Bluetooth devices by voice recognition Follow the How to use Google Assistant Page...

Страница 45: ...trol and press it once again while OFF AUTO POWER is scrolled To check the status of this function press AUTO POWER on the remote control To turn off this function press AUTO POWER on the remote control and press it once again while ON AUTO POWER is scrolled Turning on When you turn on your TV or an external device connected to this unit this unit recognizes the input signal and selects the suitab...

Страница 46: ...ct a BLUETOOTH device When you try to connect your Bluetooth device to this unit Bluetooth function is selected Play your music on the Bluetooth device When you play music by LG Wi Fi Speaker app When you play music by LG Wi Fi Speaker app on your smart device this sound bar changes the function to WI FI and you can listen to the music through it This unit does not change the function to optical i...

Страница 47: ...andby mode Option 1 When music is not played and buttons are not pressed for 15 minutes the speaker switches to the Networked standby mode Then GOOD BYE appears on the display window Option 2 If you press 1 the speaker switches to the Networked standby mode Then GOOD BYE appears on the display window Reset the Speaker If the speaker doesn t respond reset the speaker Press and hold the on the unit ...

Страница 48: ...s the function selected properly y y Check the input source and select the correct input source No woofer sound Is the subwoofer plugged in y y Plug the power cord of subwoofer into the wall outlet securely Is pairing between the unit and the subwoofer disconnected y y Connect the unit and the subwoofer Page 20 The remote control does not work properly Is the remote control too far from the unit y...

Страница 49: ... off Night Time mode USB is not recognized y y Format the USB device and connect it again When formatting the USB device select the available file system Page 33 Bluetooth pairing does not work well y y Be sure your Bluetooth device is on y y Switch Bluetooth off and on again on your Bluetooth device then try pairing again y y Remove the obstacle in the path of the Bluetooth device and the unit y ...

Страница 50: ...ck that the speaker and your smart device are connected to same Wi Fi Wi Fi connection does not work well If you restart the router y y You need to turn the speaker s power off and on again If you install new router y y You need to perform a factory set and setup the network connection for speaker Application Symptoms Cause Solution The application doesn t work properly Does an error occur when ac...

Страница 51: ...is a device a wireless LAN a medical equipment or a microwave using same frequency make the distance between the products as far away as possible each other y y When connecting the device to the Bluetooth device make the distance between the products as close as possible each other y y When the device gets too far from the Bluetooth device the connection is disconnected and also malfunction may oc...

Страница 52: ...g on the operating system and or the manufacturer of the smart device and PC Trademarks and licenses All other trademarks are trademarks of their respective owners Manufactured under license from Dolby Laboratories Dolby Dolby Atmos and the double D symbol are Trademarks of dolby Laboratories For DTS patents see http patents dts com Manufactured under license from DTS Licensing Limited DTS the Sym...

Страница 53: ...le Digital Input Audio Sampling Frequency 32 kHz 44 1 kHz 48 kHz 88 2 kHz 96 kHz 192 kHz Available Digital Input Audio format Dolby Atmos Dolby Audio DTS X DTS HD PCM Input Output OPTICAL IN 3 V p p Optical jack x 1 HDMI IN 19 Pin Type A HDMI connector x 1 HDMI OUT 19 Pin Type A HDMI connector x 1 1080p 1080i 720p 576p 480p 2160p 24 25 30 Hz 4 4 4 2160p 60 50 Hz 4 2 0 4K Sources dependent on HDCP ...

Страница 54: ...i networks SPK8 S SPK8 S S78S1 S Sold Separately Wireless receiver Power requirements Refer to the main label on the wireless receiver Power consumption Refer to the main label on the wireless receiver Rear 70 W RMS x 2 3 Ω at 1 kHz THD 10 Dimensions W x H x D Approx 60 0 mm x 220 0 mm x 175 0 mm 2 4 inch x 8 7 inch x 6 9 inch Rear speakers Each Type 1 Way 1 Speaker Impedance 3 Ω Rated Input Power...

Страница 55: ...widgets applications products and other content Content and all services and offerings Services provided or made available by or through any third party each a Service Provider is the sole responsibility of the Service Provider from whom it originated The availability of and access to Content and Services furnished by the Service Provider through the LGE Device are subject to change at any time wi...

Страница 56: ...al security legal or regulatory reasons We do not accept any responsibility if for any reason the Services or any part of them are unavailable at any time or for any period Although you may use LG Software to download and access content or applications made available by third parties on your LG Software we make no promises or guarantees that you will always be able to access such content or applic...

Страница 57: ...accept responsibility for any loss or damage caused by a virus distributed denial of service attack or other technologically harmful material that may infect your LG Smart TV data or other material belonging to you during your use of the Services Modify as you think appropriate Complaints If you have any queries concerns or complaints about the Services please contact include reference to non pers...

Страница 58: ...ail request to opensource lge com This offer is valid for a period of three years after our last shipment of this product This offer is valid to anyone in receipt of this information For more information about Google s open source visit device settings of Google Home app Disclaimers Google Google Home Google Play Chromecast built in and other related marks and logos are trademarks of Google LLC Th...

Страница 59: ......

Отзывы: