- 13 -
Installation Options
Installation Options
Desktop Pedestal Installation
¥ The set can be mounted on a desk as shown above. (For further information, refer to the optional 'Desktop Stand
Installation and Setup Guide'.)
¥ Speakers and speaker stands shown are optional, and are shown for example only.
¥ The set can be installed in different ways such as on a wall, or on a desktop etc.
Wall Mount: Horizontal Installation
¥ The set can be installed on a wall as shown above. (For further information, refer to the optional ÔWall Mounting
Bracket Installation and Setup GuideÕ.)
¥ Speakers are optional, and are shown for illustration only.
3cm
10cm
10cm
10cm
10cm
To Mount on a Wall
Wall mount minimum allowable clearances for ade-
quate ventilation.
To Install on a Desktop
Pedestal mount minimum allowable clearances for
adequate ventilation.
1. Put the RING SPACER in the holes of the bolts before con-
necting to the wall mounting bracket.
2. When you connect the wall mounting bracket to the set,
connect to it by using the bolts, (supplied with the product),
as shown.
¥
Install the RING SPACER with the bolts on the set as shown.
(Only RT-60PY10/11 series)
Содержание RT-60PY10
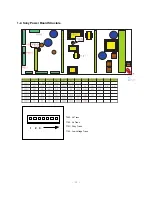
Страница 22: ... 22 1 2 Sony Power Board Structure T502 Vs Trans T702 Va Trans T101 St by Trans T103 Low Voltage Trans 1 2 3 ...
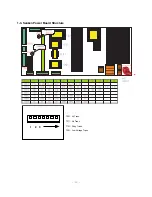
Страница 23: ... 23 1 3 Sanken Power Board Structure T221 Vs Trans T271 Va Trans T121 St by Trans T201 Low Voltage Trans 1 2 3 ...
Страница 47: ......
Страница 48: ......
Страница 49: ......
Страница 50: ......
Страница 51: ......
Страница 53: ...Aug 2004 Printed in Korea P NO 3828VD0161L ...


