background image

23

Hook-up and

Settings

Recording Settings

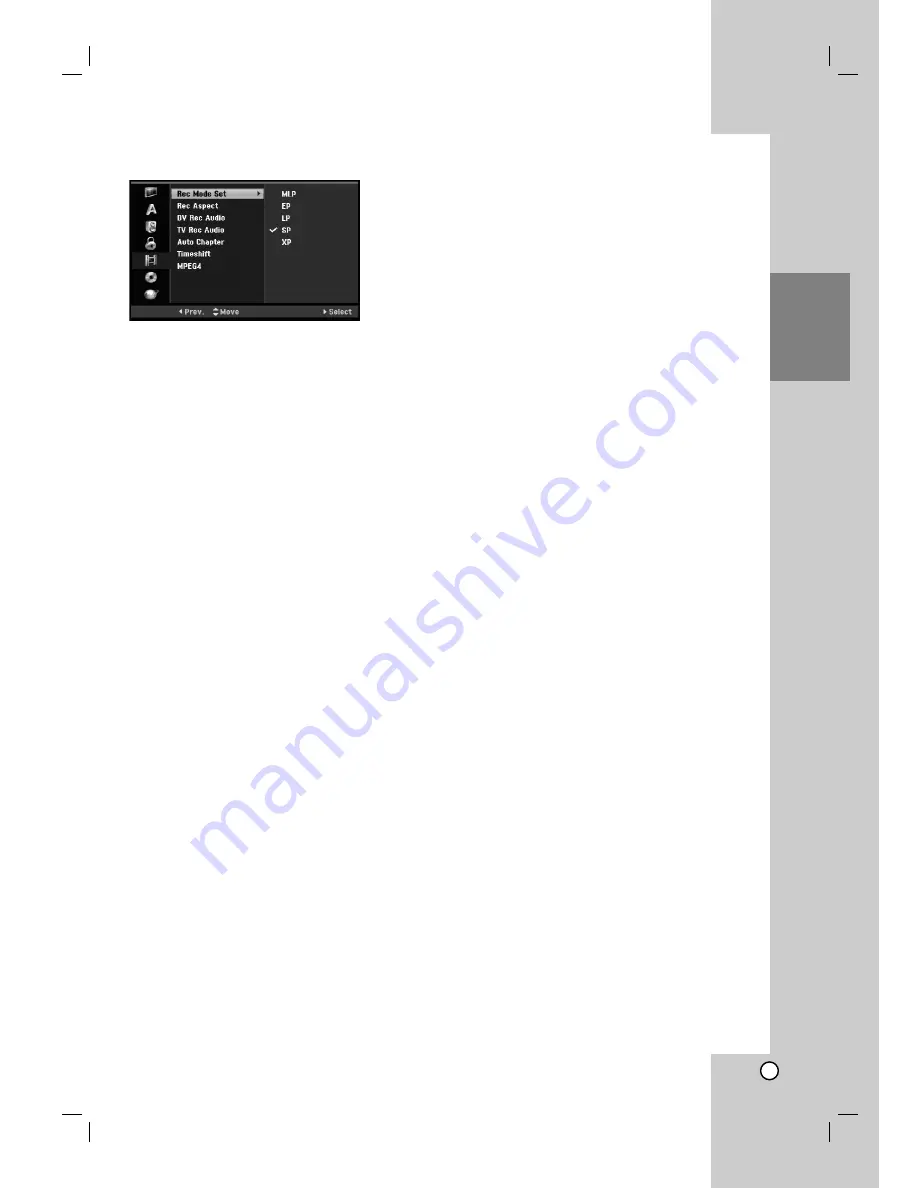
Record Mode Set

You can set the picture quality for recording; 
XP (High Quality), SP (Standard Quality), 
LP (Low Quality), EP (Extend Quality).
MLP (Maximum Long Play)

XP

– Highest quality setting, gives about 1 hour of

recording time on a DVD (4.7GB).

SP

– Default quality, sufficient for most applications,

gives about 2 hours of recording time on a DVD (4.7GB).

LP

– Slightly lower video quality, gives about 4 hour

of recording time on a DVD disc (4.7GB).

EP

– Low video quality, gives about 6 hour of

recording time on a DVD (4.7GB).

MLP

– The longest recording time with the lowest

video quality, gives about 11 hours of recording time
on a DVD (4.7GB).

Note:

You may see a fragmented picture or distorted subtitle
during playing back the contents recorded in EP and
MLP mode.

Record Aspect

When recording, you can set the recording aspect
ratio to suit the material you’re recording (16:9 or 4:3).

Note:

This option does not affect to the MPEG4 recording.

DV Recording Audio

You need to set this if you have a camcorder using
32kHz/12-bit sound connected to the front panel DV
IN jack.
Some digital camcorders have two stereo tracks for
audio. One is recorded at the time of shooting; the
other is for overdubbing after shooting.
On the Audio 1 setting, the sound that was recorded
while shooting is used. 
On the Audio 2 setting, the overdubbed sound is
used.

TV Recording Audio

When TV recording with bilingual, you can choose
audio channel to record.
[Main+Sub] Main language and Sub language
[Main] Main language only
[Sub] Sub language only

Auto Chapter

When DVD recording, chapter markers are put in
specified setting. You can change this interval to 5
minutes, 10 minutes or 15 minutes. If you select
[None], switch off automatic chapter marking
altogether with the [None] setting.

Timeshift 

Set this option to [ON] make this unit to use the
Timeshift function automatically without pressing the
TIMESHIFT button. The Timeshift function will start
automatically about 5 seconds after the TV tuner
mode is start. 
If you want to use this function manually, see
“Timeshift” on page 42.
[ON] Use Timeshift function automatically.
[OFF] Use Timeshift function manually.

MPEG4 

When HDD recording, you can set the video recording
format to MPEG2 or MPEG4. If you want to record a
video with MPEG4 format, select [ON]. When this
choice is made, this unit will record the video with
MPEG4 format on the HDD.
[OFF] For MPEG2 recording in HDD mode
[ON] For MPEG4 recording in HDD mode

Содержание RH2T160

Страница 1: ... T HDD DVD RECORDER OWNER S MANUAL MODEL RH2T80 RH2T160 RH2T250 Before connecting operating or adjusting this product please read this instruction booklet carefully and completely RH2T5 2T8 WL NA2ALLB ENG ...

Страница 2: ...ratus should not be exposed to water dripping or splashing and no objects filled with liquids such as vases should be placed on the apparatus CAUTION concerning the Power Cord Most appliances recommend they be placed upon a dedicated circuit That is a single outlet circuit which powers only that appliance and has no additional outlets or branch circuits Check the specification page of this owner s...

Страница 3: ...de Digital program only 27 Program Selection 28 Program List 28 Teletext Operation 29 Playback 30 40 General Playback Features 30 33 Playing a DivX Movie File 34 Playing an Audio CD or MP3 WMA file 35 Program Playback with Audio CD and MP3 WMA file 36 Viewing a JPEG File 37 38 Editing a MP3 WMA JPEG DivX file 39 40 Recording 41 48 About DVD recording 41 About HDD recording 41 Timeshift 42 Basic Re...

Страница 4: ... do not get on the surface Never stick paper or tape on the disc Storing Discs After playing store the disc in its case Do not expose the disc to direct sunlight or sources of heat and never leave it in a parked car exposed to direct sunlight Cleaning Discs Fingerprints and dust on the disc can cause poor picture quality and sound distortion Before playing clean the disc with a clean cloth Wipe th...

Страница 5: ...ents are playable on DVD RW compatible players only after finalization Recordings can be edited the title chapter DVD R Digital Video Disc Recordable These Discs can be recorded only once After you finalize a DVD R you cannot record on it or edit it any more Playable on DVD R compatible players after finalization Any edited contents are not be compatible on DVD R compatible players Hide chapter co...

Страница 6: ...o create the disc Check with the software publisher for more detailed information This recorder requires discs and recordings to meet certain technical standards in order to achieve optimal playback quality Pre recorded DVDs are automatically set to these standards There are many different types of recordable disc formats including CD R containing MP3 or WMA files and these require certain pre exi...

Страница 7: ...ove the recorder please follow the steps below 1 After the message POWER OFF is shown in the display wait at least two minutes 2 Unplug from the wall socket 3 Move the recorder If there s a power failure while the recorder is on there is a chance that some data on the HDD will be lost The HDD is very delicate If used improperly or in an unsuitable environment it is possible that the HDD will fail ...

Страница 8: ... control here e Z OPEN CLOSE Opens or closes the disc tray f HDD DVD Set the recorder s mode to HDD or DVD g RESOLUTION Sets the output resolution for HDMI and COMPONENT OUTPUT jacks HDMI 576i 576p 720p 1080i COMPONENT 576i 576p h N X PLAY PAUSE Starts playback Pause playback or recording temporarily press again to exit pause mode i x STOP Stops playback or recording j z REC Starts recording Press...

Страница 9: ...rack PAUSE STEP X Pause playback or recording temporarily PLAY N Starts playback STOP x Stops playback or recording d HOME Accesses or removes the HOME menu MENU LIST Accesses menu on a DVD disc Switches between Title List Original and Title List Playlist menu b B v V left right up down Selects an option in the menu ENTER Acknowledges menu selection PR Scans up or down through memorized channels G...

Страница 10: ...al from the ANTENNA IN to your TV monitor g OPTICAL Digital audio out jack Connect to digital optical audio equipment h COAXIAL Digital audio out jack Connect to digital coaxial audio equipment i S VIDEO OUTPUT Connect to a S Video Input on TV j AUDIO OUTPUT Left Right Connect to a TV with audio inputs k VIDEO AUDIO OUTPUT Left Right Connect to a TV with video audio inputs l HDMI Connector Type A ...

Страница 11: ...nna system you must make sure that it is equipped with antennas filter and or amplifier that can handle those frequencies that the digital channels are transmitted on Cable TV Please observe that this recorder is not designed for the reception of regular digital cable TV signals QAM signal Despite this operators of smaller cable networks may have chosen to distribute the digital terrestrial signal...

Страница 12: ...n jack on the TV using the S Video cable S Audio Left Right Connection Connect the left and right AUDIO OUTPUT jacks of the recorder to the audio left and right IN jacks on the TV using the audio cables A Do not connect the recorder s AUDIO OUTPUT jack to the phono in jack record deck of your audio system Component Video connection Connect the COMPONENT OUTPUT jacks on the recorder to the correspo...

Страница 13: ...r may result in malfunctions To solve the problem turn off the recorder and then turn it on again About HDMI HDMI High Definition Multimedia Interface supports both video and audio on a single digital connection for use with DVD Players Set Top Boxes and other AV devices HDMI was developed to provide the technologies of HDCP High Definition Contents Protection HDCP is used to protect digital conte...

Страница 14: ...ur recorder MPEG 2 Dolby Digital and DTS Check the receiver manual and the logos on the front of the receiver Caution Due to the DTS Licensing agreement the digital output will be in DTS digital out when DTS audio stream is selected Notes If the audio format of the digital output does not match the capabilities of your receiver the receiver will produce a strong distorted sound or no sound at all ...

Страница 15: ...t the Initial Setup Wizard function sets the language clock and tuner channels automatically 1 Select a language for the Setup menu and on screen display Use v V to select a language then press ENTER 2 Please check your antenna connections Press ENTER to move next step 3 Use v V to select the Clock Set option then press ENTER Auto When Channel auto search is completed the actual Time and Date are ...

Страница 16: ...nu for disc MUSIC See page 35 HDD Displays Music List menu for HDD DISC Displays Music List or Audio CD menu for disc SPECIAL Rec Mode Displays the menu to select the record mode See page 23 SETUP See page 16 Start Displays Setup menu Initial Settings In this menu system there are several ways to customize the settings provided Most menus consist of three levels to set up the options but some requ...

Страница 17: ...nnels in the area and place them in the tuner s memory You can skip the analogue channel scanning by pressing B Note If you skip the Auto Setup menu and access the Setup menu for the first time you can only set the Auto Programming option You can set the other options after finishing Auto Programming Manual Channel Add This feature manually adds channels Note Password is needed to access the Add C...

Страница 18: ...station name The display for entering characters appears To enter characters see page 53 Note The station name may be changed automatically according to the program information that is supplied by broadcaster Program Edit Analogue channel only Sets the analogue channel manually 5 Press RETURN O repeatedly to exit Program List menu Switching the program list to DIGITAL TV ANALOG TV or RADIO 1 Press...

Страница 19: ...le when summer time is started in local area Press B to select Time Offset option 4 Press v V to select a value then press B 0 30 60 90 120 Select 0 if the clock that has automatically set is identified with your local clock 5 Press v V to select a time zone then press ENTER Note There are cases where the TV station does not send or sends wrong date and or time information and the recorder sets th...

Страница 20: ...ppear 3 Use b B to select Yes or No then press ENTER Language Settings Display Menu Select a language for the Setup menu and on screen display Disc Menu Audio Subtitle Original Refers to the original language in which the disc was recorded Other To select another language press ENTER Press number buttons then ENTER to enter the corresponding 4 digit number according to the language code list in th...

Страница 21: ...ocal to ON only when a multi channel karaoke DVD is playing The karaoke channels on the disc will mix into normal stereo sound Lock Parental Control Settings Lock System Allows you to set up specific programs and ratings through blocking schemes Also allows you to activate or disable all of the lock schemes previously set up A password is required to gain access to the lock menu options When the L...

Страница 22: ...st enter the 4 digit password or change the rating level in order to view the program Set Password 1 Select Set Password option then press B 2 Follow step 2 as shown Lock System To change the password select the Change press ENTER and input the new 4 digit code then press ENTER Input it again to verify To delete the password select Delete then press ENTER If you forget your 4 digit code If you for...

Страница 23: ...wo stereo tracks for audio One is recorded at the time of shooting the other is for overdubbing after shooting On the Audio 1 setting the sound that was recorded while shooting is used On the Audio 2 setting the overdubbed sound is used TV Recording Audio When TV recording with bilingual you can choose audio channel to record Main Sub Main language and Sub language Main Main language only Sub Sub ...

Страница 24: ... a regular DVD player or computer equipped with a suitable DVD ROM drive Finalizing a disc creates a menu screen for navigating the disc This is accessed by pressing MENU LIST or TITLE Caution Once you have finalized a DVD R and DVD R disc you cannot edit or record anything else on that disc You can record and edit a DVD RW disc by choosing Unfinalize option You can edit or record on the DVD RW di...

Страница 25: ... likely be turned off If your recorder is on when an update is sent you may experience a disruption in reception for a few hours The recorder turns off then turn the unit back on after the update is complete Please consult the System Info screen to check for an upgrade planned by service provider or distributor Caution Your recorder must be plugged into AC power to receive any updates Do not unplu...

Страница 26: ...ation about the disc loaded on screen 1 Press DISPLAY once to show current status 2 Press DISPLAY once again to show various playback information The items displayed differ depending on the disc type or playing status 3 You can select an item by pressing v V and change or select the setting by pressing b B For details about each item see the pages in parenthesis Title Current title or track number...

Страница 27: ...ams by scrolling page by page with the or buttons on the remote control Each button stroke scrolls one page up or down To tune to another current channel Use b B v V to select a current channel then press ENTER You can watch the channel To display the Full Information window You can view detail information for the highlighted program Press blue colour button to display detail information window To...

Страница 28: ...tton and switch into other channel on the channel list 1 Press ENTER while watching a program to display the channel list 2 Select your desired channel using the v V and press ENTER to change the channel Switching Program List You can switch the program list to DIGITAL TV ANALOG TV or RADIO 1 Press v to move the highlight position to top of the program list 2 Press b B to select a DIGITAL TV ANALO...

Страница 29: ...etext The initial page or last page appears on the screen Two page numbers TV station name date and time are displayed on the screen headline The first page number indicates your selection while the second shows the current page displayed 2 Press TEXT or RETURN O to switch off teletext Note If your TV is in zoom mode the Telext menu screen may be cut off In this case set the TV s zoom mode to norm...

Страница 30: ...eatedly to play Frame by Frame Tip You can advance or back up the picture frame by frame by pressing b B repeatedly during PAUSE mode SKIP During playback press SKIP or to go to the next chapter track or to return to the beginning of the current chapter track Press SKIP twice briefly to step back to the previous chapter track Tips To go directly to any chapter during DVD playback press DISPLAY twi...

Страница 31: ... menu may appears MENU LIST The disc menu appears on the screen SUBTITLE During playback press SUBTITLE then press b B repeatedly to select a desired subtitle language AUDIO Press AUDIO then press b B repeatedly to hear a different audio language audio track or encoding method Note Some discs feature both Dolby Digital and DTS soundtracks There is no analogue audio output when DTS is selected To l...

Страница 32: ...h To enter a Marker You can start playback from up to six memorized points To enter a marker press MARKER at the desired point on the disc The Marker icon appears on the TV screen briefly Repeat to enter up to six markers To Recall or Clear a Marked Scene 1 During disc playback press SEARCH The marker search menu appears on the screen 2 Use b B v V to select a marked scene that you want to recall ...

Страница 33: ...omatically begins Random Playback and RANDOM appears on the TV screen 2 To return to normal playback press RANDOM until NORMAL appears on the TV screen Tip By pressing SKIP during Random playback the unit selects another title track and resumes Random playback Note This function only works with DVD Karaoke discs PIP Picture in Picture This function enables you to view the stored stations in sub pi...

Страница 34: ...cted media 2 Press v V b B to select an option and press ENTER Play Start playback the selected title Open Opens the folder and a list of files in the folder appears Delete Deletes the file s or folder s from the media Rename Edits the file name page 39 Move Moves the file s to another folder or media page 40 Copy Copies the file s to another folder or media page 40 Tip You can create new folder S...

Страница 35: ...ions displayed differ depending on the selected media 2 Press v V b B to select an option and press ENTER Play Start playback the selected title Random Start or stop random playback Open Opens the folder and a list of files in the folder appears Delete Deletes the file s from the media Rename Edits the file name page 39 Move Moves the file s to another folder or media page 40 Copy Copies the file ...

Страница 36: ...ccess or remove the Program List screen by pressing MENU LIST Program List menu options 1 Press v V to select a track file on the Program List then press ENTER The menu options appear 2 Use v V to select an option then press ENTER to confirm your selection Play Playback begins in the order in which you programmed the tracks from the selected track Random Start or stop random playback Delete Delete...

Страница 37: ... on the menu by pressing CLEAR button To cancel the selections press CLEAR again Selecting multiple files folders 1 Press MARKER A check mark appears on the file or folder Press MARKER again to cancel the marked file or folder 2 Repeat step 1 to mark additional file folders 2 Use v V to select an option then press ENTER to confirm your selection Open Opens the folder and a list of files in the fol...

Страница 38: ...nu To Pause the Slide Show 1 Press PAUSE STEP X to pause slide show 2 When you want to continue slide show press PLAY N To listen to music while slide show simultaneously You can display photo files while listening to MP3 WMA music files recorded on HDD Note This function is not available during digital channel is recording 1 Select Slide Show option on the Photo List menu Refer to Photo List menu...

Страница 39: ...r Press MARKER again to cancel the marked file or folder 2 Repeat step 1 to mark additional file folders 2 Press ENTER The menu options appear on the menu 3 Select Delete option then press ENTER The confirm message for deleting will appear Use b B to select Yes then press ENTER The selected file s is deleted Naming a file on the HDD You can name MP3 WMA JPEG or DivX file s folder s on the HDD inde...

Страница 40: ...ER The album folder list appears 2 Select a folder Also you can create new album folder Select New Album option on the Copy menu then press ENTER NONAME folder is created 6 Select Copy option then press ENTER to begin copying Note If a folder s depth is more than 5 level the copy is not available Moving a file s to the other folder on the HDD You can move a file s folder s to the other folder on t...

Страница 41: ...for recording The maximum number of titles that can be recorded on the HDD is 255 Using the HDD allows you to record a maximum of 12 hours continuously You cannot record a radio channel and teletext The recording times shown are not exact because the recorder uses variable bit rate video compression This means that the exact recording time will depend on the material being recorded When recording ...

Страница 42: ...k one in Timeshift mode Press MARKER at the desired point during Timeshift Press SEARCH to recall the marked scene Jump to Start or End during Timeshift 1 Press and hold ENTER about 1 second during timeshift The menu will appear 2 Press b to jump to the beginning of the timeshift Press B to jump to the end of the timeshift To Exit the Timeshift 1 Press STOP to exit Timeshift function Confirm messa...

Страница 43: ...E to select Closed Caption language before recording You cannot select the Closed Caption language during recording To display the recorded Closed Caption during playback refer to page 31 The unit records only the selected Closed Caption The Closed Caption is recorded only when MPEG4 option is set to OFF in the setup menu The Closed Caption cannot be recorded in MLP recording mode 4 Press REC z on...

Страница 44: ...sor position Press RETURN O to exit the Timer Record menu 5 Set a recording mode as necessary by pressing REC repeatedly XP SP LP EP or MLP 6 Press ENTER after filling in all the program information The program will be memorized by the recorder To check the programming the Timer Record List menu will appear Check field s Rec OK on the Timer Record List indicates that the timer recording is program...

Страница 45: ...will appear Press ENTER to stop the recording or press RETURN O to continue the recording Timer Recording Troubleshooting Even though the timer is set the recorder will not record when There is no disc loaded and there is not free space on the HDD A non recordable disc is loaded and there is not free space on the HDD Disc Protect option is set to ON in the Setup menu and there is not free space on...

Страница 46: ...r See Copyright on page 57 for more details Simultaneous recording and playback Playback another title during recording Playback and recording for both DVD and built in hard disk drive HDD are completely independent For example you can record to either the DVD or HDD source and play back video from the other source at the same time 1 Start recording 2 Press HOME to display the Home Menu screen 3 U...

Страница 47: ...c The loss of video may occur while MPEG4 recording because of characteristics of MPEG4 video encoding This is not a malfunction You can select the audio channel to record by pressing AUDIO The TV Rec Audio option on the Setup menu does not affect to the MPEG4 recording You cannot record the DTV Closed Caption if MPEG4 option is set to ON on the setup menu HDD Specifications of MPEG4 Recording Vid...

Страница 48: ... this recorder s remote If you connect a second recorder using a DV cable you cannot control the second DVD from this one You cannot control this unit remotely from a component connected to the DV IN jack You cannot record date and time information from a DV cassette 1 Make sure your digital camcorder is connected to the front panel DV IN jack See page 15 2 Select TV option on the HOME menu then p...

Страница 49: ...D or HDD You can change these thumbnails using the THUMBNAIL button see Changing Title Thumbnails on page 50 Press DISPLAY to display the information of selected title on the Title List menu After selecting a title or chapter on the Title List or Chapter List menu then press ENTER The menu options appears on the left side of the menu Use v V to select a option then press ENTER to confirm your sele...

Страница 50: ...nal and Playlist to refer to the actual content and the edited version Original content refers to what s actually recorded on the disc Playlist content refers to the edited version of the disc how the Original content is to be played Adding Chapter Markers You can create chapters within a title by inserting chapter marks at the desired points During playing back at the point you want to start a ne...

Страница 51: ... v V to select Playlist Add option then press ENTER 3 Select New Playlist then press ENTER The new title appears in the updated Playlist All chapters of the title are added to the Playlist Adding Additional Title Chapters to the Playlist You can add an Original title or chapter to add to a Playlist title even if it is already registered 1 Choose a title or chapter on the Title List Original menu o...

Страница 52: ...s When DVD RW recording the deleted title s name is changed to Deleted Title If more than two titles are repeatedly deleted the titles are combined into one When you are deleting a title or chapter only the last one on DVD RW increases remaining recording time Deleting a Part You can delete a part which you do not want in the title 1 Use b B v V to choose a title you want to delete on the Title Li...

Страница 53: ...he corresponding character at the cursor position Tip You can add the genre for HDD title name If you set the genre for the title you can easily find the title on the relevant genre folder of HDD title list menu 4 Choose OK then press ENTER to fix the name and return to the previous menu screen 5 Press RETURN O repeatedly to exit the menu Notes Names can be up to 32 characters long For discs forma...

Страница 54: ...enu options appears on the left side of the screen 2 Select Combine option then press ENTER 3 Select the second title of the two titles you want to combine then press ENTER Confirm message appears 4 Use b B to select Yes then press ENTER After pressing ENTER the updated menu is displayed Combining Two Chapters Into One Use this function to combine two adjacent chapters into one 1 On the Chapter Li...

Страница 55: ...t The title is divided into two new titles It take up to 4 minutes to divide Notes You cannot select dividing point less than 3 seconds This function is not available for the titles that are less than 7 seconds long Moving a Playlist Chapter Use this function to re arrange the playing order of Playlist chapters on the Title List Playlist menu Note This function is not available if there is only on...

Страница 56: ...t from the options 4 Press ENTER to confirm The lock mark will appears on the title s thumbnail Tip If you select a title that has already been protected on the Title List menu you can unprotect it by choosing Unprotect option from the Title List menu options After doing that you can edit and delete the title Additional functions for the recordable DVD discs Using the Title List menu you can use t...

Страница 57: ...tents and other intellectual property rights owned by Macrovision Corporation and other rights owners Use of this copyright protection technology must be authorized by Macrovision Corporation and is intended for home and other limited viewing uses only unless otherwise authorized by Macrovision corporation Reverse engineering or disassembly is prohibited CONSUMERS SHOULD NOTE THAT NOT ALL HIGH DEF...

Страница 58: ... not available When you dub the title on the HDD to VR mode DVD RW or DVD RAM disc the Fast mode is not available for edited HDD title and Clip Recording title You cannot select Fast mode if multiple titles are selected The Closed Caption on the HDD title cannot be dubbed Dubbing from DVD to HDD 1 On the Title List menu select a title you want to dub then press ENTER Menu options appears on the le...

Страница 59: ...opy from DVD to HDD copies a single title to the HDD in real time When you start copying playback jumps back to the start of the title then continues through to the end of the title when recording automatically stops The copy will be made in the recording mode XP SP LP EP or MLP that is currently set During DVD playback press DUBBING to copy the current title to HDD Playback starts again from the ...

Страница 60: ...le List menu will appear as shown below Tip You can remove the Title List menu by pressing STOP x 3 To play back a title select the title you want then press ENTER or PLAY N Playing Your Recordings on Other DVD Players Finalizing a Disc Most regular DVD players can play finalized discs recorded in Video mode finalized DVD R or DVD RWs A small number of players can also play DVD RW discs recorded i...

Страница 61: ...sian 6669 Cambodian 7577 Catalan 6765 Chinese 9072 Corsican 6779 Croatian 7282 Czech 6783 Danish 6865 Dutch 7876 English 6978 Esperanto 6979 Estonian 6984 Faroese 7079 Language Code Fiji 7074 Finnish 7073 French 7082 Frisian 7089 Galician 7176 Georgian 7565 German 6869 Greek 6976 Greenlandic 7576 Guarani 7178 Gujarati 7185 Hausa 7265 Hebrew 7387 Hindi 7273 Hungarian 7285 Icelandic 7383 Indonesian ...

Страница 62: ...ble below set the appropriate manufacturer code 1 While holding down TV POWER button press the number buttons to select the manufacturer code for your TV see the table below 2 Release TV POWER button Code numbers of controllable TVs If more than one code number is listed try entering them one at a time until you find the one that works with your TV Manufacturer Code Number LG GoldStar 1 Default 2 ...

Страница 63: ...mode on the audio receiver so you can listen to the sound from the recorder Connect the audio cable securely Turn on the equipment connected with the audio cable Replace it with new one Clean the disc Insert a disc Check that the disc indicator in the display window is lit Insert a playable disc Check the disc type colour system and regional code Place the disc with the playback side down Place th...

Страница 64: ...ote control is too far from the recorder There is an obstacle in the path of the remote control and the recorder The batteries in the remote control are exhausted Solution Finalize the disc page 24 No solution The other player must be RW compatible in order to play it No solution You cannot record the source Select the channel on the recorder s built in TV tuner Use a VR mode formatted disc for co...

Страница 65: ...rmat MPEG2 or MPEG4 HDD only Audio recording format Sampling frequency 48kHz Compression format Dolby Digital Playback Frequency response DVD PCM 48 kHz 8 Hz to 22 kHz CD 8 Hz to 20 kHz DVD PCM 96 kHz 8 Hz to 44 kHz Signal to noise ratio More than 100 dB AUDIO OUTPUT connector Harmonic distortion Less than 0 008 AUDIO OUTPUT connector Dynamic range More than 95 dB AUDIO OUTPUT connector Inputs ANT...

Страница 66: ...P NO MFL56778745 ...

Отзывы: