background image

HOOKUP

17

Before Operation 

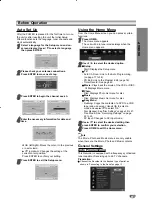
Auto Set Up

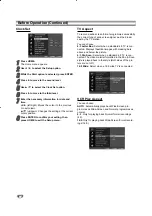
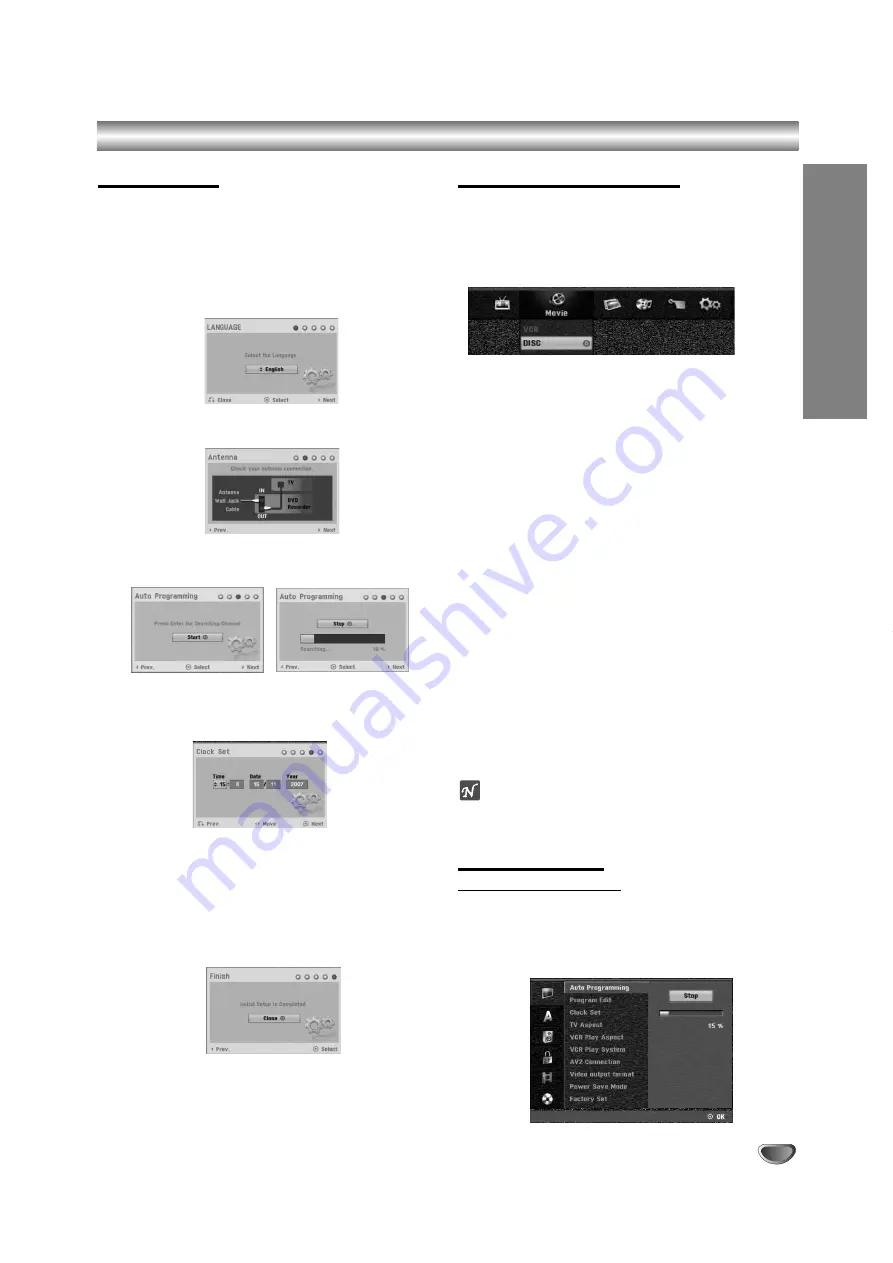
After the POWER is pressed for the first time to turn on
the unit or after resetting the unit, the Initial Setup
Wizard function sets the language, tuner channels and
clock automatically.

11

Select a language for the Setup menu and on-
screen display. Use 

v

to select a language

then press ENTER.

2

2

Please check your antenna connections.
Press ENTER to move next step.

3

3

Press ENTER to begin the channel search.

4

4

Enter the necessary information for date and
time.

b

B

(left/right): Moves the cursor to the previous

or next column.

v

V

(up/down): Changes the setting at the

current cursor position.
Press ENTER to confirm your setting.

5

5

Press ENTER to exit the Setup menu.

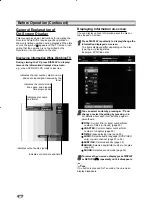
Using the Home Menu

From the Home Menu screen you can access certain
functions.

11

Press HOME.
The Home menu appears.
The unit will be in tuner mode always when the
Home menu appears.

2

2

Use 

b

B

to select the desired option.

Setup

StartDisplays the Setup menu.

TV

- Auto Ch. ScanLink to the Auto Programming.

(on page 17 to 18)

- PR EditLink to the Program Edit. (page 18)
- Timer RecordSee page 40.

Movie: Plays back the movie of the VCR or DISC.

Or Displays Movie menu.

Photo 

- Disc: Displays Photo List menu for disc.

Music 

- Disc: Displays Music List menu for disc.

Easy Menu

- DubbingCopys the contents of a DVD to a VHS 

tape (and vice versa). Use 

b

to select a

mode and use 

v

to select “OK”.

- Disc ManagerSee “Disc Settings” on page 25 to 27.
- Rec. ModeSee “Recording Settings” on page 

24 to 25.

- DV InputChanges to DV Input mode.

3

3

Use 

v

V

to select the desired setting then

press ENTER to confirm your selection.

4

4

Press HOME to exit the Home menu.

ote

The Movie, Photo and Music menus are only enable
when there are the Movie, Photo and Music contents.

G

eneral Settings

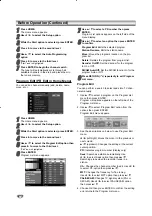
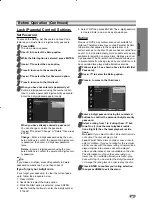
Auto Programming

This Recorder is equipped with a frequency synthesized
tuner capable of receiving up to 99 TV channels.
Preparation:

Connect the Recorder to the desired type of aerial, as
shown in ‘Connecting to the Aerial’ on page 13.

Содержание RC278

Страница 1: ...RDER VIDEO CASSETTE RECORDER OWNER S MANUAL MODEL RC278 Before connecting operating or adjusting this product please read this instruction booklet carefully and completely PAL SECAM RC278 S_NA7BLLS_ENG ENGLISH ...

Страница 2: ...t is manufactured to comply with the EEC DIRECTIVE 89 336 EEC 93 68 EEC and 73 23 EEC Disposal of your old appliance 1 When this crossed out wheeled bin symbol is attached to a product it means the product is cov ered by the European Directive 2002 96 EC 2 All electrical and electronic products should be dis posed of separately from the municipal waste stream via designated collection facilities a...

Страница 3: ... Auto Chapter 25 Disc Settings 25 27 Initialize 25 Finalize 26 Disc Label 26 Disc Protect 27 PBC 27 Auto Play 27 About DivX R 27 General Explanation of On Screen Display 28 PLAYBACK Operation with DVD and Video CD 29 32 Playing a DivX Movie Disc 33 Audio CD and MP3 WMA Operation 34 35 Playing an Audio CD or MP3 WMA Disc 34 Music menu options 34 JPEG File Operation 36 VCR Mode Tape Playback 37 RECO...

Страница 4: ... or editing in a personal computer DVD drive When a DVD that has been used as above is used again in this recorder When a DVD disc recorded in a DVD recorder of another manufacturer or in a personal computer DVD drive is used Playable Discs DVD 8 cm 12 cm disc Video CD VCD 8 cm 12 cm disc Audio CD 8 cm 12 cm disc In addition this unit can play DVD R DVD RW discs DVD R DVD RW discs CD R CD RW discs...

Страница 5: ...h functions or other typical computer like operations Moreover high resolu tion still pictures can be played if they are included on the disc Video CDs not equipped with PBC Version 1 1 Operated in the same way as audio CDs these discs allow playback of video pictures as well as sound but they are not equipped with PBC About Symbols About the symbol display may appear on the TV screen during opera...

Страница 6: ...herefore experience problems playing recordable DVD discs in some players Symptoms include video artifacts audio and or video dropouts and playback suddenly stopping Our company cannot take responsibility for problems playing discs recorded on this recorder in other players Is editing a DVD like editing a video tape No When you edit a video tape you need one video deck to play the original tape an...

Страница 7: ... The displayed times for recording and time remaining may not always add up to exactly the length of the disc The recording time available may decrease if you heavily edit a disc If using a DVD RW disc make sure you change the recording format Video mode or VR mode before you record anything on the disc See page 25 Initialize for how to do this When using a DVD R disc you can keep recording until ...

Страница 8: ...opyright material such as films or music is unlawful unless permitted by a legal exception or consented to by the rights owner This product incorporates copyright protection tech nology that is protected by method claims of certain U S patents and other intellectual property rights owned by Macrovision Corporation and other rights owners Use of this copyright protection technology must be authoriz...

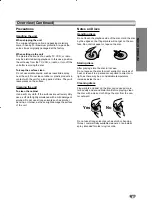
Страница 9: ...tremely dirty use a soft cloth lightly moistened with a mild detergent solution Do not use strong solvents such as alcohol benzine or thinner as these might damage the surface of the unit Notes on Discs Handling discs Do not touch the playback side of the disc Hold the disc by the edges so that fingerprints will not get on the sur face Do not stick paper or tape on the disc Storing discs After pla...

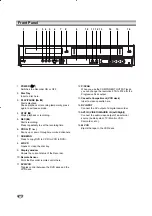
Страница 10: ...o DVD 8 Z DVD Opens or close the disc tray 9 Display window Shows the current status of the Recorder 10 Remote Sensor Point the Recorder remote control here 11 DVD VCR Toggles control between the DVD deck and the VCR deck 12 P SCAN When you use the COMPONENT OUTPUT jacks you can change the resolution 576i to 576p for the Progressive Scan output 13 Cassette Compartment VCR deck Insert a video casse...

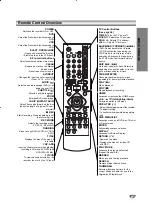
Страница 11: ...Control Buttons See page 56 POWER Turns the TV on or off AV INPUT Selects the TV s source PR CH Selects TV s channel VOL Adjusts TV s volume BACKWARD FORWARD m M DVD Search backward or forward VCR Rewinds the tape during the STOP mode for fast reverse picture search and Advances the tape during the STOP mode fast forward picture search SKIP Go to next chapter or track Returns to beginning of curre...

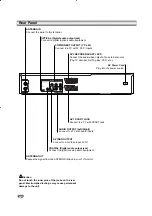
Страница 12: ...the power source S VIDEO OUTPUT Connect to a S Video Input on TV OPTICAL Digital audio output jack Connect to digital optical audio equipment ANTENNA OUT Passes the signal from the ANTENNA IN jack to your TV monitor AV 1 SCART JACK Connect to a TV with SCART jack AUDIO OUTPUT Left Right Connect to a TV with audio inputs COMPONENT OUTPUT Y PB PR Connect to a TV with Y Pb Pr inputs AV2 DECODER SCART...

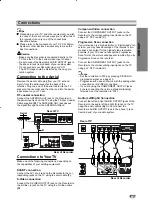
Страница 13: ...sing the scart cable T S Video connection Connect the S VIDEO OUTPUT jack on the Recorder to the S Video in jack on the TV using the S Video cable S Component Video connection Connect the COMPONENT OUTPUT jacks on the Recorder to the corresponding input jacks on the TV using an Y Pb Pr cable C Progressive Scan connection If your television is a high definition or digital ready tel evision you may ...

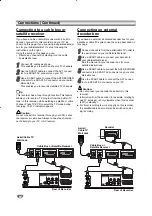
Страница 14: ...e box Always connect each compo nent directly to your TV or AV receiver Connecting an external decoder box If you have an external dedicated decoder box for your satellite or cable TV system use the setup described on this page 1 1 Connect the cable from the aerial cable TV outlet to the aerial input on your cable satellite tuner 2 2 Use a SCART cable to connect your decoder to your cable satellit...

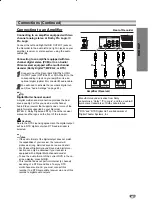
Страница 15: ...rmats supported by your Recorder MPEG 2 Dolby Digital and DTS Check the receiver manual and the logos on the front of the receiver Caution Due to the DTS Licensing agreement the digital output will be in DTS digital out when DTS audio stream is selected otes If the audio format of the digital output does not match the capabilities of your receiver the receiver will produce a strong distorted sound...

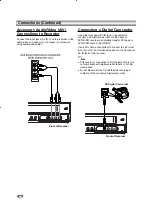
Страница 16: ...or DVD R RW recorder and digitally transfer DV tapes or DVD R RW discs to DVD R RW Use a DV cable not supplied to connect the DV in out jack of your DV camcorder video deck to the front panel DV IN jack of this recorder ote This jack is for connection to DV equipment only It is not compatible with digital satellite tuners or D VHS video decks Do not disconnect the DV cable while recording a conten...

Страница 17: ...2 Use b B to select the desired option Setup Start Displays the Setup menu TV Auto Ch Scan Link to the Auto Programming on page 17 to 18 PR Edit Link to the Program Edit page 18 Timer Record See page 40 Movie Plays back the movie of the VCR or DISC Or Displays Movie menu Photo Disc Displays Photo List menu for disc Music Disc Displays Music List menu for disc Easy Menu Dubbing Copys the contents o...

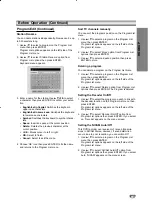
Страница 18: ...ion name Move Moves the program s location on the pro gram list Delete Deletes the program from program list Decoder On Off Set the decoder for the program to On or Off NICAM Auto Off Set the NICAM function to for the program Auto or Off 9 9 Press RETURN O repeatedly to exit Program List menu Program Edit You can perform a search to select and store TV chan nels manually 1 Use v V to select a prog...

Страница 19: ...R Program List options appears on the left side of the Program List menu 2 Use v V to select Move option from Program List options then press ENTER 3 Use v V to select a desired position then press ENTER to store Deleting a program You can delete a program on the Program List menu 1 Use v V to select a program on the Program List menu then press ENTER Program List options appears on the left side ...

Страница 20: ...ect To record a wide screen format programme successfully the correct type of wide screen signal must be broad cast by the TV station You can choose 4 3 Letter Box Select when a standard 4 3 TV is con nected Displays theatrical images with masking bars above and below the picture 4 3 Pan Scan Select when a standard 4 3 TV is con nected The video material formatted in the Pan Scan style is played b...

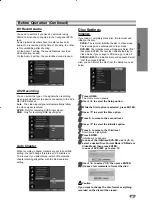
Страница 21: ...OFF Power Save Mode is not active otes The encoded television signals CANAL or PRE MIERE are not decoded in the Power Save Mode The Power Save Mode is not available in the standby mode for the timer recording and when power off of the unit after receiving the encoded television signals CANAL or PREMIERE Factory Set If you need to you can reset the recorder to all its facto ry settings Select SET i...

Страница 22: ...udio outputs sounds in the PCM 2ch format when you play a DVD video disc recorded on the MPEG2 recording system Bitstream Select Bitstream if you connected the Recorder s DIGITAL OUT jack to a MPEG decoder or an amplifier or other equipment with a MPEG decoder Sampling Frequency If your receiver or amplifier is NOT capable of handling 96 kHz signals select 48 kHz When this choice is made this unit...

Страница 23: ...umber 210499 5 Select OK then press ENTER The 4 digit password is cleared Enter a new code as shown above Rating Movies on DVDs may contain scenes not suitable for children Therefore discs may contain Parental Control information that applies to the complete disc or to certain scenes on the disc These scenes are rated from Level 1 to 8 and alternatively more suitable scenes are available for selec...

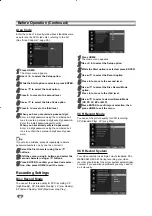
Страница 24: ...the cursor using B buttons and select the second character using v V buttons 1 11 1 Press ENTER to confirm your Area Code selec tion then press HOME to exit the menu Recording Settings Disc Record Mode You can set the picture quality for DVD recording XP High Quality SP Standard Quality LP Low Quality EP Extend Quality MLP Maximum Long Play 1 1 Press HOME The Home menu appears 2 2 Use b B to selec...

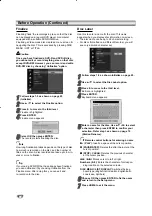
Страница 25: ...sc Settings Initialize If you load a completely blank disc the recorder will initialize the disc DVD R The recorder initialize the disc to Video mode The recording mode will always be Video mode DVD RW The Initialize menu will appears Select OK then press ENTER The recorder initialize the disc to Video mode If you change to VR mode go to step 9 DVD R RW The Initialize menu will appears Select OK t...

Страница 26: ...t by choosing Unfinalize from the Finalize menu After doing this you can edit and re record onto the disc Disc Label Use this to enter a name for the disc This name appears when you display disc information on screen The disc name can be up to 32 characters long For discs formatted on a different Recorder you will see only a limited character set 1 1 Follow steps 1 5 as shown Initialize on page 25...

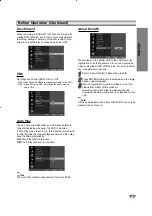
Страница 27: ...le that has the longest playback time and then play back the title automatically ON Auto Play function is active OFF Auto Play function is not active ote The Auto Play function may not work for some DVDs About DivX R We provide you the DivX VOD Video On Demand registration code that allows you to rent and purchase videos using the DivX VOD service For more informa tion visit www divx com vod 1 1 S...

Страница 28: ...ype tape or playing status Example DVD Video disc 2 2 You can select an item by pressing v V and change or select the setting by pressing b B For details about each item see the pages in parenthesis TITLE Current title or track number total number of titles or tracks page 29 CHAPTER Current chapter number total number of chapters page 29 TIME Elapsed playing time page 30 AUDIO Selected audio langu...

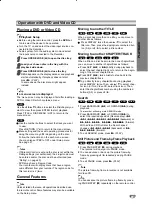
Страница 29: ...res ote Unless stated otherwise all operations described use the remote control Some features may also be available on the Setup menu Moving to another TITLE When a disc has more than one title you can move to another title as follows Press DISPLAY twice then use v V to select the title icon Then press the appropriate numbered but ton 0 9 or b B to select a title number Moving to another CHAPTER T...

Страница 30: ...EPEAT TITLE RANDOM NORMAL VCD REPEAT TRACK REPEAT ALL REPEAT OFF or REPEAT TRACK REPEAT ALL RANDOM NORMAL DVD RW VR REPEAT CHAPTER REPEAT TITLE REPEAT ALL REPEAT OFF ip By pressing SKIP during Random playback the unit selects another title track and resumes Random playback ote On a Video CD with PBC you must set PBC to OFF in the Setup menu See page 27 The play mode may vary according to the recor...

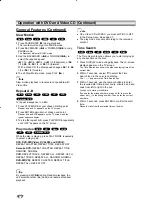
Страница 31: ...arker Proceed message appears 4 Use b B to select OK then press ENTER 5 Repeat steps 2 4 to erase additional Marked scene 6 To remove the Marker Search menu press RETURN O Checking the Contents of DVD Video Discs Menus DVDs may contain menus that allow you to access special features To open the disc menu press DISC MENU LIST Then press the appropriate number but ton to select an option Or use the ...

Страница 32: ...es Press SUBTITLE then press b B repeatedly during playback to see the different subtitle languages Finding Locations on a Disc You can directly access any point on a video CD using this function Use this function only while a video CD is playing Playback jumps to the point specified 1 Press SEARCH during playback The progress bar appears on the TV screen 2 Use b B to find a start position for pla...

Страница 33: ...lay Start playback the selected title Open Opens the folder and a list of files in the folder appears About DivX movie files DivX disc compatibility with this recorder is limited as follows Available resolution size of the DivX file is under 720x576 W x H pixel The DivX subtitle file name has to be identified with the DivX file name to display by this unit The total number of files and folders on ...

Страница 34: ...o CD menu Music MP3 WMA CD menu and Photo CD menu by pressing TITLE repeatedly in Stop mode If you select a MP3 and press DISPLAY the file informations are displayed Press DISPLAY again to remove the file informations If you select a folder and press DISPLAY the number of subfolders and number of MP3 WMA files in the folder are displayed If you are in a file list and want to return to the Folder l...

Страница 35: ...ed on the menu screen 3 To exit SEARCH mode press N PLAY Notes on MP3 WMA Recordings About MP3 An MP3 file is audio data compressed by using the MPEG1 audio layer 3 file coding scheme We call files that have the mp3 file extension MP3 files The recorder can not read an MP3 file that has a file extension other than mp3 About WMA Window Media Audio An WMA file is a Microsoft audio compression techno...

Страница 36: ...ng a picture to flip the picture clockwise or counterclockwise View Slide Shows 1 Select Slide Show option on the Photo menu 2 Press ENTER The Slide Show menu appears 3 Use v V b B to set the options Object Selected file or All files Speed Sets the speed for Slide Show Slow Normal or Fast 4 Select the Start option then press ENTER to start the Slide Show 5 Press STOP to stop the Slide Show and ret...

Страница 37: ...al effects playback notes Horizontal lines noise bars will appear on the TV screen This is normal The audio is automatically muted during special effect modes so there is no sound during search During the high speed picture search modes a short time is needed to stabilize tape speed when re entering the PLAY mode Slight interference may be observed during this time Search This function lets you vi...

Страница 38: ... space VCR Each subsequent press increases the recording time by 30 minutes Please confirm the VHS tape has enough remaining time to be recorded before recording Instant Timer Record Menu Checking the Recording Time Press REC z or DISPLAY once to check the record ing time The recalled setting will automatically return to the TV screen for a moment Also remaining time of recording is shown in the d...

Страница 39: ...ay and record over and over again Dubbing from VCR to DVD You can copy the contents of a VHS tape to a record able DVD disc using the DUBBING button This allows you to archive your old VHS tapes to DVD ote If the VHS video tape you are attempting to copy is copy protected you will not be able to copy the tape It is not permitted to copy Macrovision encoded tapes 1 1 Insert a recordable DVD disc In...

Страница 40: ...rd List 8 8 Make sure that you load a recordable disc or tape and press POWER to switch your unit to Standby otes The Timer indicator lights on the front panel display Nothing is displayed while the Power Save Mode is ON If the Disc and Tape indicator are blinking either no disc or tape is loaded or the loaded disc is not recordable The Recorder will record the audio according to the cur rent TV t...

Страница 41: ...e program Press POWER Timer Recording Troubleshooting Even though the timer is set the recorder will not record when There is no disc or tape loaded A non recordable disc or tape is loaded Disc Protect is set to ON in the Setup menu see page 27 Power is turned on There are already 99 titles DVD RW DVD R or 49 titles DVD RW DVD R recorded on the disc You cannot enter a timer program when A recordin...

Страница 42: ...this recorder Using the recorder s remote you can control both the cam corder and this recorder Before recording make sure that the audio input for the DV IN jack is set up see page 25 ips The source signal must be DVC SD format Some camcorders cannot be controlled using this recorder s remote If you connect a second DVD Recorder using a DV cable you cannot control the second DVD Recorder from thi...

Страница 43: ...ils in the source component or the DV cable becomes discon nected Although DV Record Audio is set to Audio 2 and Audio 2 signal is not present DV Record Audio will be reset to Audio 1 automatically DV Related Messages You may see the following messages appear on your TV screen when using the DV IN jack Not connected to Camcorder The camcorder is not connected properly or the cam corder is switched...

Страница 44: ...e 52 Edit Selects Edit options Title Name Edits the title name page 51 Delete Part Deletes a part of the Title page 50 Playlist Add Adds the title to the Playlist page 49 Dubbing Copys the title to a VHS tape 4 4 Press RETURN O repeatedly to exit Title List Original menu ip Press DISPLAY to display more detailed title information for selected title Using the Chapter List Original menu 1 1 Press DI...

Страница 45: ... 4 4 Press RETURN O repeatedly to exit Title List Playlist menu Using the Chapter List Playlist Menu 1 1 Press DISC MENU LIST repeatedly to display the Title List Playlist menu 2 2 Use v V b B to choose the title you want to view Chapter List Playlist menu then press ENTER Title List Playlist options appears on the left side of the menu 3 3 Use v V to select Search Chapter from Title List Playlist...

Страница 46: ...ist Deleting a Title Before a disc is finalized you can delete titles recorded on the disc Caution If you delete a title from a DVD R disc the title will disappear from the Title List but the available record ing time will not increase When deleting a title from a DVD RW disc the remaining time available for recording will only increase if it is the last title on the disc 1 1 Press DISC MENU LIST ...

Страница 47: ...Edit Selects Edit options Title Name Edits the title name page 51 Divide Divides one title into two titles page 53 Hide Show Hides or Shows the all chapters within the title page 52 Dubbing Copys the title to a VHS tape 4 4 Press RETURN O repeatedly to exit Title List menu ip Press DISPLAY to display more detailed title information for selected title Caution If you press REC z z when the Title Lis...

Страница 48: ...tly as set in the start and end point display During Playlist playback you may notice a momentary pause between edits This is not a malfunction Adding Chapter Markers You can put a chapter marker during recording or playback Once the chapter is marked you can use the Chapter Search feature as well as delete combine and move chapters in the Chapter List Original or Chapter List Playlist menu ote Ch...

Страница 49: ... the Original menu 3 3 Use v V to select Playlist Add from Original options then press ENTER 4 4 Select New Playlist then press ENTER The new title appears in the updated Playlist All chapters of the title are added to the Playlist Adding Additional Title Chapters to the Playlist You can add an Original title or chapter to add to a Playlist title even if it is already registered 1 1 Press DISC MEN...

Страница 50: ...ed the titles are combined into one Deleting a Part You can delete a part which you do not want in the title 1 1 Press DISC MENU LIST repeatedly to display Title List Original or Title List Playlist menu 2 2 Use v V b B to choose a title you want to delete then press ENTER The options appears on the left side of the menu 3 3 Select Edit Delete Part from the options on the menu e g If you select De...

Страница 51: ...splayed on the DVD player only after finalizing Combining Two Chapters Into One Use this function to combine two adjacent chapters into one ote This function is not available if there is only one chapter within the title or if Highlight is in first chapter 1 1 On the Chapter List menu select the second chapter of the two chapters you want to com bine then press ENTER Chapter List options appears o...

Страница 52: ...s DISC MENU LIST to display Title List menu 2 2 Use v V b B to choose a title you want to pro tect then press ENTER Options appears on the left side of the screen 3 3 Select Protect option on the options e g If you select Protect on Title List menu DVD RW R 4 4 Press ENTER to confirm The lock mark will appears on the title s thumbnail ip If you select a title that has already been protected on the...

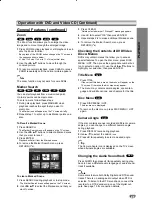
Страница 53: ...v V to select Cancel option then press ENTER The dividing point is clear 6 6 Choose Done option then press ENTER to fix the dividing point The title is divided into two new titles It take up to 4 minutes to divide Time Search You can select start point of the title 1 1 Use b B v V to choose a title on the Title List menu then press ENTER The options appears on the left side of the menu 2 2 Select ...

Страница 54: ...D RW or DVD R discs 1 1 Insert DVD R or DVD RW disc recorded already 2 2 Press TITLE button Title List menu will appear as below ip You can remove the Title List menu by pressing STOP x 3 3 To play back a title select the title you want then press ENTER or N PLAY Playing Your Recordings on other DVD Players Finalizing a Disc Most regular DVD players can play finalized discs recorded in Video mode ...

Страница 55: ...se 7789 Byelorussian 6669 Cambodian 7577 Catalan 6765 Chinese 9072 Corsican 6779 Croatian 7282 Czech 6783 Danish 6865 Dutch 7876 English 6978 Esperanto 6979 Estonian 6984 Faroese 7079 Language Code Fiji 7074 Finnish 7073 French 7082 Frisian 7089 Galician 7176 Georgian 7565 German 6869 Greek 6976 Greenlandic 7576 Guarani 7178 Gujarati 7185 Hausa 7265 Hebrew 7387 Hindi 7273 Hungarian 7285 Icelandic ...

Страница 56: ...manufacturer code 1 While holding down TV POWER button press the number buttons to select the manufacturer code for your TV see the table below 2 Release TV POWER button Code numbers of controllable TVs If more than one code number is listed try entering one of them at a time until you find the one that works with your TV Manufacturer Code Number LG GoldStar 1 Default 2 Zenith 1 3 4 Samsung 6 7 So...

Страница 57: ... ponent is copy protected Those channels are not stored in the recorder Aerial or cables are loose Camcorder is off Recorder INPUT SELECT is incorrect Solution Plug the power cord into the wall outlet securely Select the appropriate video input mode on the TV so the picture from the Recorder appears on the TV screen Connect the video cable securely Turn on the TV Select the correct input mode on t...

Страница 58: ...ono The remote control is not pointed at the remote sensor of the Recorder The remote control is too far from the Recorder There is an obstacle in the path of the remote control and the Recorder The batteries in the remote control are exhausted Solution Finalize the disc page 26 No solution The other player must be RW compati ble in order to play it No solution Use another disc You cannot record t...

Страница 59: ...Sampling frequency 48kHz Compression format Dolby Digital Playback Frequency response DVD PCM 48 kHz 8 Hz to 22 kHz CD 8 Hz to 20 kHz DVD PCM 96 kHz 8 Hz to 44 kHz Signal to noise ratio More than 100 dB AUDIO OUT connector Harmonic distortion Less than 0 008 AUDIO OUT connector Dynamic range More than 95 dB AUDIO OUT connector Inputs ANTENNA IN Aerial input 75 ohms VIDEO IN 1 0 Vp p 75 ohms sync n...

Страница 60: ...P NO MFL36995813 ...
Отзывы: