background image

Connecting

14

C

onnecting

2

Optional equipment 

connection

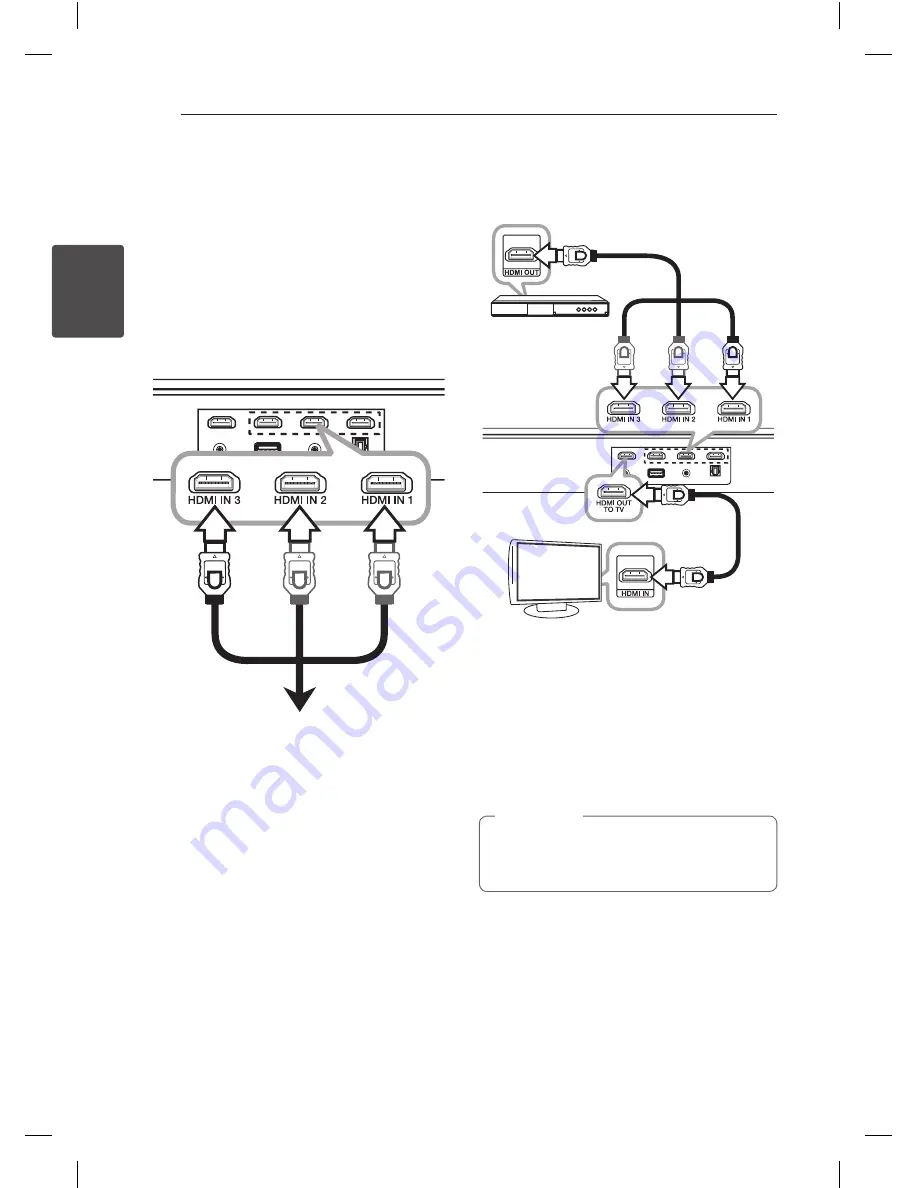
HDMI connection

For enjoying sound only

You can enjoy the sound from the external device 
you connect.

To the Blu-ray disc player, 

DVD player, etc.

1.  Connect HDMI IN 1, 2, or 3 jack on the back of 

the unit to HDMI OUT jack on the audio device 
such as Blu-ray disc player, DVD player, etc.

2.  Set the INPUT source to HDMI IN 1, 2, or 3. Press 

repeatedly 

INPUT

 on the remote control or 

F


on the unit until the function is selected.

For enjoying both sound and picture

You can enjoy both sound and picture from the 
external device you connect.

Blu-ray disc player, 
DVD player, etc.

1.  Connect HDMI IN 1, 2, or 3 jack on the back 

of the unit to HDMI OUT jack on the external 
device such as Blu-ray disc player, DVD player, 
etc.

2.  Connect HDMI OUT TO TV jack on the back of 

the unit to HDMI IN jack on the TV.

3.  Set the INPUT source to HDMI IN 1, 2, or 3. Press 

repeatedly 

INPUT

 on the remote control or 

F


on the unit until the function is selected.

Even though PCM multi channel is inputted to 
the unit through an HDMI cable, the unit can 
only output 2.1 channel.


,

Note

Содержание NB2520A

Страница 1: ...OWNER S MANUAL Sound Bar System with Built in Subwoofer Please read this manual carefully before operating your set and retain it for future reference NB2520A www lg com ENGLISH ...

Страница 2: ...nces recommend they be placed upon a dedicated circuit That is a single outlet circuit which powers only that appliance and has no additional outlets or branch circuits Check the specification page of this owner s manual to be certain Do not overload wall outlets Overloaded wall outlets loose or damaged wall outlets extension cords frayed power cords or damaged or cracked wire insulation are dange...

Страница 3: ...ug does not fit into your outlet consult an electrician for replacement of the obsolete outlet 10 Protect the power cord from being walked on or pinched particularly at plugs convenience receptacles and the point where they exit from the apparatus 11 Only use attachments accessories specified by the manufacturer 12 Use only with the cart stand tripod bracket or table specified by the manufacturer ...

Страница 4: ...anel 9 Installing the sound bar 9 Installing the cover foot 10 Connecting IR transmitter 2 Connecting 11 Connecting to your TV 11 Using an HDMI cable 11 What is SIMPLINK 12 ARC Audio Return Channel function 12 Additional information for HDMI 13 Using an OPTICAL cable 14 Optional equipment connection 14 HDMI connection 15 PORT Portable IN connection 15 OPTICAL IN connection 15 Speaker ez easy setup...

Страница 5: ...rarily 18 Displaying file and input source 19 Sleep timer setting 20 Sound adjustment 20 Setting the surround mode 20 3D Sound effect 20 Adjust the woofer level settings 21 Controlling a TV with the supplied remote control 21 Setting up the remote to control your TV 4 Troubleshooting 22 Troubleshooting 5 Appendix 23 Trademarks and licenses 24 Specifications 25 Maintenance 25 Handling the unit ...

Страница 6: ... DVD or Digital device with vivid 2 1 or 2 0 ch mode Accessories Please check and identify the supplied accessories Remote control 1 Batteries 2 Optical cable 1 Cover foot 2 IR transmitter 1 Screw 4 Gauze 1 Introduction Symbols Used in this Manual Note Indicates special notes and operating features Caution Indicates cautions for preventing possible damages from abuse ...

Страница 7: ...OL Adjusts speaker volume b AUTO POWER This function is automatically turned on the unit Refer to the page 18 AV SYNC Synchronizes the audio and video INFO Displays the information of a file or an input source REPEAT Listens to your files repeatedly or randomly C V Skip Search Skips Fast backward or Forward Searches for a section within a file Z Stop Stops playback d M Play Pause Starts playback P...

Страница 8: ...ture on the touch buttons before using y y Do not press the touch buttons hard to make it work If you apply too much strength it can damage the sensor of the touch buttons y y Touch the button that you want to work in order to operate the function correctly y y Be careful not to have any conductive material such as metallic object on the touch buttons It can cause malfunctions Caution Front panel ...

Страница 9: ...layer DVD player etc Place the unit in front of the TV and connect it to the device you want Refer to pp 11 16 The unit does not support wall mount Note Installing the cover foot You can extend the height of the unit 1 Turn the unit upside down 2 Put the cover foot on the foot of the unit 3 Fix it with screws as shown in the illustration above ...

Страница 10: ...tter with LG TV Remote sensor of TV Sensor of IR transmitter 1 Remove the protective vinyl of IR transmitter 2 Put IR transmitter on the back of the unit with the sensor of IR transmitter facing the remote sensor of the TV 3 Connect the end of IR transmitter to IR OUT jack y y Do not block ventilation when you put IR transmitter on the unit y y Do not disconnect the power cord If you want to use I...

Страница 11: ... an HDMI cable Type A High speed HDMI cable with Ethernet HDMI cable 2 Turn TV and the unit on ARC function is selected automatically What is SIMPLINK Some functions of this unit are controlled by the TV s remote control when this unit and LG TV s with SIMPLINK are connected through HDMI connection Controllable functions by LG TV s remote control Power on off volume up down etc Refer to the TV own...

Страница 12: ...the unit with HDMI IN of the TV that supports ARC function using an HDMI cable You can connect only one Sound bar to TV compatible with ARC Additional information for HDMI y y When you connect a HDMI or DVI compatible device make sure of the following Try switching off the HDMI DVI device and this player Next switch on the HDMI DVI device and leave it for around 30 seconds then switch on this play...

Страница 13: ...on the screen please check the HDMI cable length is generally limited to 4 5 m 15 ft y y You cannot change the video resolution in the HDMI IN mode Change the video resolution of the connected component y y If the video output signal is abnormal when your personal computer is connected to HDMI IN jack change the resolution of your personal computer to 480p 720p 1080i or 1080p Note Using an OPTICAL...

Страница 14: ...il the function is selected For enjoying both sound and picture You can enjoy both sound and picture from the external device you connect Blu ray disc player DVD player etc 1 Connect HDMI IN 1 2 or 3 jack on the back of the unit to HDMI OUT jack on the external device such as Blu ray disc player DVD player etc 2 Connect HDMI OUT TO TV jack on the back of the unit to HDMI IN jack on the TV 3 Set th...

Страница 15: ...the portable player or external device and start playing it OPTICAL IN connection Connect an optical output jack of external devices to the OPTICAL IN jack To the digital optical output jack of external device Speaker ez easy setup Listens to sound from TV DVD or Digital Device with 2 1 or 2ch mode 1 Connect the OPTICAL IN jack on the back of the unit to optical out jack of your TV or digital devi...

Страница 16: ...tion of this unit does not support some USB devices USB device requirement y y The file name is limited to 255 characters y y Using NTFS file system is not supported Only FAT 16 32 file system is supported y y Depending on the size and the number of the files it may take several minutes to read the contents on the media y y Devices which require additional program installation connected to a compu...

Страница 17: ... and release it at the point you want to listen to Play repeatedly or randomly Press REPEAT on the remote control repeatedly the display will be changed in the following order RPT 1 RPT D DIRECTORY RPT ALL RANDOM OFF Select a file directly Press 0 to 9 numerical buttons on the remote control to go to the desired file directly Other operations DOLBY DRC Dynamic Range Control Make the sound clear wh...

Страница 18: ...es of inactivity if AUTO POWER function is turned on y y Depending on the connected device by the optical cable this function may not operate y y If you want to use AUTO POWER SIMPLINK must be turned off It takes for about 30 seconds to switch on or off SIMPLINK y y If SIMPLINK is set to ON AUTO POWER OFF is just scrolled even thouth you press AUTO POWER y y Once AUTO POWER is set the unit will st...

Страница 19: ...ns off To check the remaining time press SLEEP To cancel the sleep function press SLEEP repeatedly until SLEEP 10 appears and then press SLEEP once again while SLEEP 10 is displayed y y You can check the remaining time before the unit turns off Press SLEEP the remaining time appears in the display window y y When you operate the unit in sleep mode you can see operating information in display windo...

Страница 20: ...The NIGHT is Night Mode This may be useful when you want to watch movies at low volume late at night UPSCALER The UPSCALER is MP3 Up Scaling When listening to MP3 files or other compressed music you can enhance the sound This mode is available only to 2 channel sources LOUDNESS Improves the bass and treble sound y y In some of surround modes some speakers there s no sound or low sound It depends o...

Страница 21: ...ng up the remote to control your TV You can operate your TV with the supplied remote control If your TV is listed in the table below set the appropriate manufacturer code 1 While holding down 1 TV POWER button and press the manufacturer code for your TV with the numerical buttons see the table below Manufacturer Code Number LG 1 Default 2 Zenith 1 3 4 GoldStar 1 2 Samsung 6 7 Sony 8 9 Hitachi 4 2 ...

Страница 22: ...l the mute function No LED y y The Dimmer or the Sleep function is activated Press SLEEP to cancel the function The remote control does not work properly y y The remote control is too far from the unit Operate the remote control within about 23 ft 7m y y There is an obstacle in the path of the remote control and the unit Remove the obstacle y y The batteries in the remote control is exhausted Repl...

Страница 23: ...trademarks of Dolby Laboratories Manufactured under license under U S Patent Nos 5 956 674 5 974 380 6 487 535 other U S and worldwide patents issued pending DTS the Symbol DTS and the Symbol together are registered trademarks DTS Digital Surround and the DTS logos are trademarks of DTS Inc Product includes software DTS Inc All Rights Reserved ...

Страница 24: ... F to 95 F 5 C to 35 C Operating humidity 5 to 90 Bus Power Supply DC 5 V 0 500 mA Input Output OPTICAL IN 3 V p p Optical jack x 1 PORT IN 0 5 Vrms 3 5 mm stereo jack HDMI IN 19 Pin Type A HDMI connector x 3 HDMI OUT 19 Pin Type A HDMI connector x 1 Amplifier Stereo mode 18 W 18 W 4 Ω at 1 kHz Subwoofer 44 W 4 Ω at 80 Hz Built In Designs and specifications are subject to change without prior noti...

Страница 25: ... y Do not use volatile liquids such as insecticide spray near the unit y y Wiping with strong pressure may damage the surface y y Do not leave rubber or plastic products in contact with the unit for a long period of time Cleaning the unit To clean the player use a soft dry cloth If the surfaces are extremely dirty use a soft cloth lightly moistened with a mild detergent solution Do not use strong ...

Страница 26: ...LG Customer Information Center 1 800 243 0000 USA Consumer 1 888 865 3026 USA Commercial Register your product Online www lg com Printed in China ...

Отзывы: