background image

2

Safety notes

CAUTION : TO REDUCE THE RISK OF ELECTRIC SHOCK DO NOT SPLIT COVER(OR BACK) NO
USER SERVICEABLE PARTS INSIDE. REFER SERVICING TO QUALIFIED SERVICE PERSONNEL.

CAUTION

RISK OF ELECTRIC SHOCK 

DO NOT OPEN

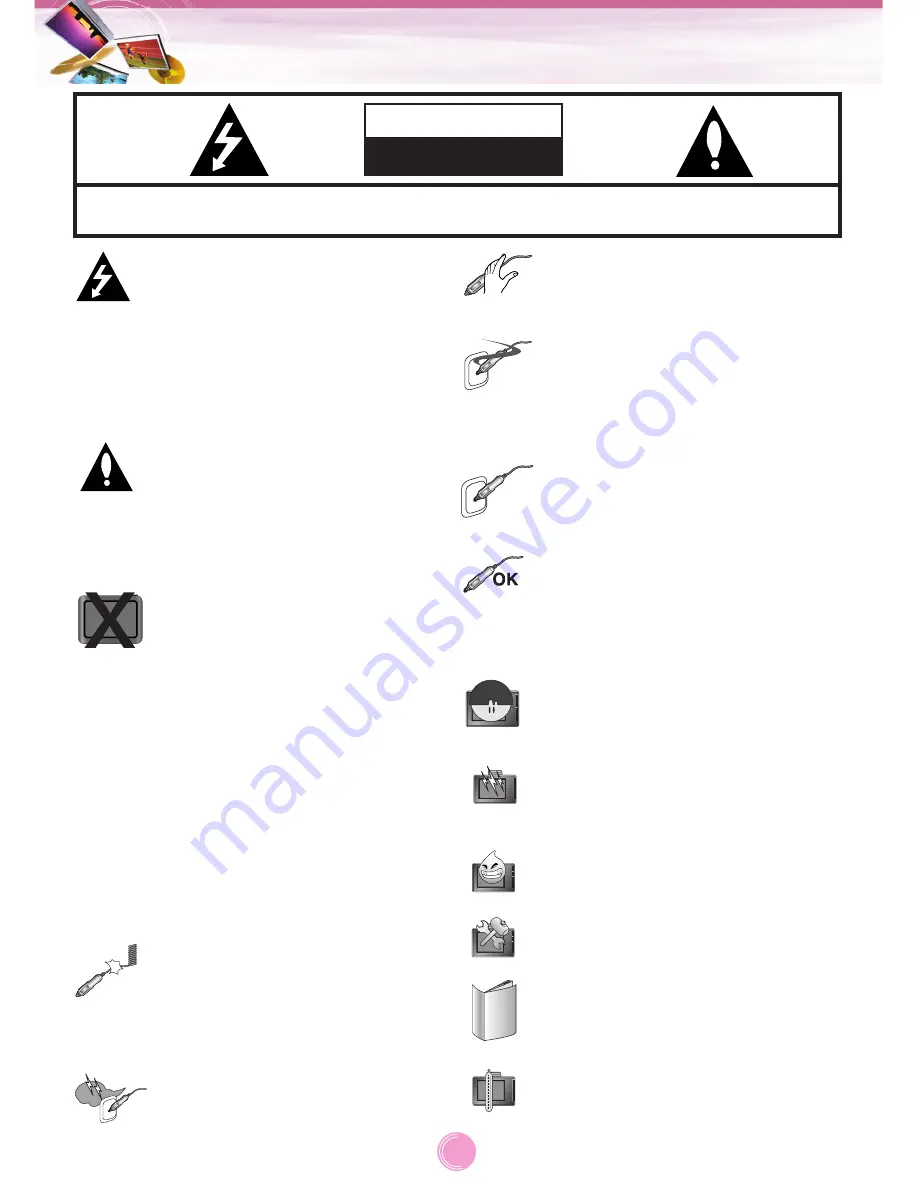
The lightning flash with the 
arrowhead symbol, within an 
equilateral triangle is intended to alert
the user about the presence of 
uninsulated dangerous voltage within
the product’s enclosure that may be
of sufficient magnitude to constitute a
risk of electric shock.

The exclamation point within an 
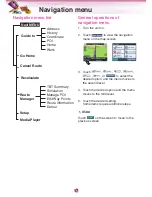
equilateral triangle is intended to alert
the user to the presence of important
operating and maintenance
(servicing) instructions in the litera-
ture accompanying the appliance.

Always operate the vehicle in a safe
manner. Do not become distracted by
the navigation while driving, and
always be fully aware of all driving
conditions.
Minimize the amount of time spent
viewing the navigation screen while
driving and use voice prompts when
possible. 
Do not enter destinations, change
settings, or access any functions
requiring prolonged use of the unit’s
controls while driving. 
Pull over in a safe and legal manner
before attempting such operations.

Do not kink or crease the power
cable or place heavy objects on the
power cable.
Fire can result from damaged power
cables.

Unplug the car charger during 
electrical storms. This may result in
electrical shock.

Do not handle the power plug nor the
adapter with wet hands. 
This may result in a electrical shock.

Immediately power off the unit and
unplug the car charger if you notice
smoke or odours coming from the 
navigation device or adapter.
Fire can result from improper use.

Make sure to insert the power plug
tightly. 
Fire can result from improper use.

Use only the specified power
adapter.
Using a different type of adapter may
damage the product.
(5.0 +/- 0.2V)

The appliance is not intended for use
by children or infirm persons without
supervision.

Note that malfunctions may occur if
you use the product in places where
static electricity occurs frequently.

Do not use the unit near water. 
Do not touch the unit with wet hands.

Do not attempt to disassemble or
repair the product yourself.

Do not use the product for other pur-
poses than those described in this
guide.

Do not use in extreme temperatures.
(-10

°

C~60

°

C)

Содержание N10

Страница 1: ...Device OWNER S MANUAL N10 ENGLISH Please read this manual carefully before operating your navigation device Keep it for future reference Designs and specifications are subject to change without prior notice for improvement ...

Страница 2: ...ng prolonged use of the unit s controls while driving Pull over in a safe and legal manner before attempting such operations Do not kink or crease the power cable or place heavy objects on the power cable Fire can result from damaged power cables Unplug the car charger during electrical storms This may result in electrical shock Do not handle the power plug nor the adapter with wet hands This may ...

Страница 3: ...nd routes where accidents occur frequently is included Voice guidance and map route may differ from the actual traffic conditions Disposal of your old appliance 1 When this crossed out wheeled bin symbol is attached to a product it means the product is covered by the European Directive 2002 96 EC 2 All electrical and electronic products should be disposed of separately from the municipal waste str...

Страница 4: ...der to protect the screen and the unit always store it in the carry case Do not use the memory card SD card with other devices as this may cause damage to the SD card The navigation device needs to have direct line of sight with the sky in order to pick up a sig nal For a speedier fix on your location please allow up to 5 minutes at a standstill for the device to locate you When installing the uni...

Страница 5: ...SB cable 11 Disconnecting the USB lead from the navigation device 11 Downloading files Mass storage 11 Basic operation 12 Turning the unit on off 12 Adjusting the Volume Brightness 12 Mute 12 Lock feature 12 Using a earphone 12 Getting started with navigation 13 16 Map screen 13 14 Cusor menu 15 16 Navigation Menu 17 35 Navigation menu list 17 General operations of navigation menu 17 Guide to 18 2...

Страница 6: ...necting Deleting Connecting again the bluetooth phone 40 Making a call with phone number 41 Call History 42 Using your phone book 42 43 Using voice Dial 43 44 Incoming calls 44 Endinging calls 44 Listening to music files 44 LGE Maploader 45 46 Troubleshooting 47 48 Bluetooth phone compatibility list 49 51 Specifications 52 Support Hotline 53 Table of contents 6 ...

Страница 7: ...ion Main Body Windscreen mount USB Cable Car charger Installation CD Quick Reference Guide GPS Antenna Optional Contents may be changed without notice Package contents Option table by models Model N10E N10B Bluetooth X O ...

Страница 8: ...n or a similar tool Note To activate the menu function on LCD screen touch the LCD screen with your finger If you cut the external power supply or the battery level is too low the device will be turned off after a few seconds Rear Side panel 1 External GPS Antenna Port 2 Speaker 3 Docking connector 4 Earphone jack 5 USB port Power supply connector DC 5V 6 Memory Card Slot Insert a SD Memory Card C...

Страница 9: ...he unit 7 Plug the other end into your vehicle s 12V 24V cigarette lighter socket 8 To adjust the angle of the mount slacken the adjustable knobs at the suction cup and then turn it gently In addition to tilting the mount up and down and from side to side you can also rotate the mount from the left 45 to 45 9 When you finish tighten up the knobs again Note This unit and its car charger are designe...

Страница 10: ...a onto a surface which is as level as possible has line of sight with the sky and can be secured safely with the double sided tape Note Make sure the surface is free of moisture dust grime oil etc before affixing the dou ble sided tape The double sided tape contains a strong adhesive and may leave a mark on the dashboard if removed Some vehicles use window glass that does not allow signals from GP...

Страница 11: ...em tray 2 Click on the icon to eject the unit from the PC and select the Safely remove message 3 A message will appear indicating that it is now safe to disconnect the unit 4 You can now go ahead and remove the USB cable from the PC Downloading files Mass storage 1 Activate Windows Explorer on your PC A mass storage device is displayed in window explorer 2 Create a folder you want to use 3 Select ...

Страница 12: ... brightness by touching and then touch Note If there is no touch input for about 5 seconds the screen moves to the previous screen Mute Touch on the Handy Setup screen to mute the sound To cancel it touch again Lock feature This feature locks the unit to prevent it from operating when you accidentally touch an item Touch on the Handy Setup screen To cancel it touch POWER VOL Using a earphone Conne...

Страница 13: ... opens the GPS Data screen Page 35 The black satellite dish with the red exclamation mark shows there is no con nection with the GPS receiver GPS navi gation is not possible Devices with a built in GPS receiver are permanently connected so this icon may not appear under normal circumstances A black dish and two arcs represent a 3D GPS position The Navigator is ready to navigate 4 Turn preview On t...

Страница 14: ...ctive route or navigating following an active route While cruising the fields show the present speed the current speed limit and the time of day 11 Next street This field shows the road or street that comes next in the route itinerary If you are not yet in the settlement where this next street is the Navigator will display the name of the settlement instead of the name of the road or street The st...

Страница 15: ... route is active the navigator will ask you whether you really want to delete it together with all its via points By inserting the selected map point as a via you instruct the navigator to cross this location before the destination of the route This is the way to build a multi point route in reverse order when you wish to insert a stopover go to A but first get some fuel at B or want to influence ...

Страница 16: ...ons or all direc tions and the speed limit If the map contains speed limit information this will be the default value for Camera Speed Edit Cam You can edit the parameters of the camera near or at the Cursor or delete it This menu point replaces Add Cam and is available only if the selected point is near or at a speed camera A window will open up that contains the same settings as in Add Cam In ad...

Страница 17: ...vel 4 Touch the desired option and the menu moves to the third level 5 Touch the desired setting Some items require additional steps Note Touch on the screen to move to the previous screen Navigation menu 17 Guide to Navi MENU Go Home Cancel Route Recalculate Route Manager Setup Media Player Address History Coordinate POI Home Work TBT Summary Simulation Manage POI Edit Way Points Route Informatio...

Страница 18: ...rch module is the list of recently used cities The first line of the list is always the city you are in or near to 1 Should the settlement you are looking for appear on the list 2 Just tap it and you will immediately jump to the Street Name Input screen with the selected city name or postcode shown at the top of the screen Note If the desired settlement is not displayed use the v and V buttons to ...

Страница 19: ...will do You do not need to enter accents when searching for a destination Type only the base letters the letter most similar to the accented one and the Navigator will search for all their combinations in the database e g for the Canadian town Déléage you only need to type Deleage and the rest is done by the program Note When more than 300 matching items a list of more than 60 pages exist for the ...

Страница 20: ...escribed before Note In Australia you can skip this part by tapping Done before entering any letters This way you can search for a street name in the whole state In other countries this step is compulsory If you tap Done before entering any letters the list of settlements will appear in alphabetical order Changing the country If your destination is in another country tap the Change Country button ...

Страница 21: ...first letter of this too For example searching for Pi A will result in Pine Avenue skipping all Pine Streets and Pine Roads Should the name of the street be a prefix for several other street names just enter the whole name press Done and the exact match will be the first in the list This way you can easily find even very short street names Selecting a house number or the midpoint of the street 1 O...

Страница 22: ... most GPS devices When you enter this page the coordinates of the current GPS position are shown at the top of the display The coordinates are always shown in the format configured in Setup Advanced Display Setup Page 33 but you can enter the coordinates in any of the three formats You can even enter the latitude and longi tude in different formats Entering a latitude longitude pair is easy 1 Use ...

Страница 23: ...ng OK will return to the map with the selected POI in the centre POI Location The search will be carried out around a cer tain reference point Always look at the cur rent reference point shown in the blue field above the POI category buttons and confirm that it matches what you want To change the reference tap the Change ref button in the top right corner Once you tap the Change ref button you are...

Страница 24: ...vigator will lead you to the setup page Go Home The fastest way to find your destination and start navigating is to tap Go Home in the Navi Menu The navigator will immediately show the map screen and start navigation This means that if you plan your route to one of your Favourite destinations you only need one tap to start navigating Note If you try to access a favourite destination that you have ...

Страница 25: ...significant roads and intersections Tap Show button to see the highlighted list item on the map This will help you identify route events in the list Tap Avoid button to show a list of possibili ties for modifying the route They let you recalculate the route avoiding the highlighted event and sometimes also some of the subse quent ones Maneuver This option avoids the highlighted action For example ...

Страница 26: ...ou can set the visibility of the top two levels All levels below that will be shown or hidden according to their respective category i e you can set the visibility of Petrol Stations in the Services category but all brands listed under that will either be shown or suppressed together Groups shown with a grey icon are hidden blue icons are visible on the map while the ones shown in two colours have...

Страница 27: ...tor will ask you to confirm this action Edit You can edit the attributes name icon visi bility level of a previously created My POI group Edit Way Point You can edit the list of all points used in the route The first item in the list is the departure point of the route without a valid GPS position the last reached via point if you open the list during navigation or the point where the Navigator mo...

Страница 28: ...alue that can also be displayed in one of the Route data fields on the Map screen It shows the time needed to reach the final destination of the route based on information available for the remaining segments of the route The calculation cannot take into account traffic jams and other possible delays Estimated Arrival This is an estimated value that can also be displayed in one of the Route data f...

Страница 29: ... icon warns you that the Navigator had to recommend a route that does not match all your preferences given at the Route Parameters settings The recommended route contains areas only accessible to pedestrians The recommended route contains unpaved roads The recommended route contains roads that require a permit or permission to enter Information any other piece of relevant but not categorised infor...

Страница 30: ...ns The Navigator will open a new screen to let you customise the parameters used by the speed warning Maps may contain information about the speed limits of the road segments the Navigator is able to warn you if you exceed the current limit This information may not be available for your region ask your local dealer or may not be fully correct for all roads in the map This setting lets you decide w...

Страница 31: ...k into the streets If you switch these signs on it will be easier to recognise your location on the map if you turn them off it will be easier to see the road geometry Textured Polygons Enable textured polygons and have rivers lakes forests and other large objects dis played in a more realistic and attractive way on the map Sound Settings on this page determine the way Navigator sounds Keys The sw...

Страница 32: ...estimated time enroute ETE and the estimated time of arrival ETA Unpaved Roads Unpaved roads are excluded by default as they can be in a bad condition and you usu ally cannot reach the speed limit on them Highways When driving a slow car or towing another vehicle you may prefer not to take highways Ferries The accessibility of temporary ferries is not necessarily included in the map data Furthermo...

Страница 33: ...rt all of the listed units in some voice guidance languages Set Date Time Format You can set the date and time format dis played by Navigator Various international formats are available Advanced These screens let you set a large number of different advanced settings and initiate some special functions These settings and func tions are divided into groups Display Setup Zoom in after find When this ...

Страница 34: ...ctory settings Tapping this button means you lose all your saved data and cus tomised settings the Navigator will warn you about this Reset Advanced Settings Some changes may cause the Navigator to behave in an unsatisfying manner Tap this button to restore the default settings Smart Zoom Smart zoom is a lot more than just a usual automatic zoom Smart Zoom You can set how close Smart Zoom can zoom...

Страница 35: ... the buttom right corner of the screen you have another button that leads to a new screen where you can synchronize the clock of your Navigator to the very accurate time provided by the connected GPS Turn on the Auto Correction switch to let the Navigator frequently check and correct the Navigator time with the GPS time Below that button you will see the current val ues of the GPS and the Navigato...

Страница 36: ...2 Touch in the left position of the screen The mark appears and the file you touch is stored in My Music folder To cancel it touch 3 Touch and then touch the desired file to play music in My Music folder Touch on the screen to move to the previous next page Touch on the screen to move to the upper folder Touch on the screen to move to the previous screen Note If there is no supported file an error...

Страница 37: ...s repeatedly all music files in your device Shuffle You can set the random playback mode by touching or Returns to the normal playback Plays randomly all the files in your device Viewing the information of music file 1 Touch during playback The information of music file appears If you touch the information screen it moves to the previous screen If there is no information of music file appears Adju...

Страница 38: ...the previous screen Pause 1 Touch the screen during slide show 2 Touch to pause slide show 3 To return to slide show touch again Skip to the next photo Touch to move to the next photo in the selected folder Skip to the previous photo Touch to move to the previous photo in the selected folder Repeat You can set the repeat playback mode by touching or Plays repeatedly all photo files in your device ...

Страница 39: ...logy To use these features you must connect your phone with your device You may initiate this connection from your phone or from your device Please refer to phone s guidebook for more information Connecting your unit and blue tooth phone To connect using the unit settings 1 Press POWER VOL briefly in power on status The Handy Setup screen appears 2 Touch 3 Touch 4 Touch The Searching for available...

Страница 40: ...in the Handsfree available devices screen Setting the Bluetooth You must select to connect successfully your unit and bluetooth phone 1 Touch in the Handsfree available devices screen And then touch 2 Check the PIN code Change the PIN code using the number buttons if you want to change the PIN code And then touch 3 If the visibility option has set as Other Bluetooth devices can t find your device ...

Страница 41: ... you want to make a call again If there is not any touch for about 10 sec onds the screen moves to the MENU screen Storing the phone number 1 Input the phone number in the Dial screen And then touch 2 Input the name And then touch It is stored in the phone book Adjusting the Volume Microphone level 1 Touch during a call The Volume Microphone screen appears 2 Set the volume and microphone level by ...

Страница 42: ...ch Adding the phone number 1 Touch in the Phone Book screen And then Touch after inputting the number buttons 2 Touch after changing the name Receiving all list in your phone Touch in the Phone Book screen And then touch Your device will receive the contact s via Bluetooth in your phone If your phone is not connected it needs to enter the PIN code in the phone With receiving phone book from your p...

Страница 43: ... automatically the data will be stored in the resident memory of your device It will takes a few minutes according to the number of phone book in your phone Deleting all list in the phone book 1 Touch in the Phone Book screen And then touch 2 Touch Deleting the phone number Touch the list to delete in the Phone Book screen And then touch Editing the phone number 1 Touch the list to edit in the Pho...

Страница 44: ...phone conversa tions Listening to music files You can control and hear the music especial ly mp3 files saved on your device via the your stereo headset with Bluetooth wireless technology Touch in the Handy Setup screen Notes You can hear the sound through the speak er of unit or Bluetooth stereo headsets by touching The sound quality depends on Radio Frequency RF conditions and the sam pling rate ...

Страница 45: ...re that your device is connected by USB cable to a port on your PC On the right panel you can see the maps that are on the device The icons before the map name inform you that the map is newer older or the same that you have saved in your computer Installing Maps 1 The map files of maps folder of map loader program will be appeared in Locally available maps screen Select maps which you want to ins...

Страница 46: ...of your device under the user s applica tion data directory c Documents and Settings __user_name__ Application Data LGE LGENAVI backup There will be a new directory with a timestamp name gen erated for each backup To restore stored Navigator data to a navi gation device 1 Select Restore button 2 The Restore button will retrieve the latest backup 3 After finish installing maps reboot your device LG...

Страница 47: ...ocation where the sky can be seen well If there are high buildings or if you are under a tree move to a location where there aren t any obstacles Check the GPS receiving condition from the GPS menu Cannot hear the voice guide You can hear the voice guide when you select Guidance in Setup But during actual driving the voice guide is pro vided If the volume is too low adjust the volume on the right ...

Страница 48: ...y There are no subscription fees or setup charges to use GPS Map matching The GPS used by this Mobile Navigation System is susceptible to certain errors Their calculations may on occasion place you in a location on the map where no road exists In this situation the processing system understands that vehicles travel only on roads and is able to correct your position by adjusting it to a near road T...

Страница 49: ...KU580 KU970 KG245 KG800 M4410 U890 U6 RIZR Z80 ROKR E6 RAZR V3i V360 KRZR K1 ROKR E2 SLVR L7 V195 V600 RAZR V3X E1000 A1000 E550 V525 V600 6230i 6230 8910i N77 Year 2007 2007 2005 2007 2007 2007 2007 2007 2007 2007 2007 2007 2007 2007 2007 2007 2006 2006 2006 2006 2006 2007 2007 2006 2006 2006 2006 2006 2006 2006 2006 2005 2004 2004 2004 2004 2005 2004 2004 2007 Hansfree Calling YES YES YES YES YE...

Страница 50: ... 2006 2006 2004 2006 2004 2004 2004 Hansfree Calling YES YES YES YES YES YES YES YES YES YES YES YES YES YES YES YES YES YES YES YES YES YES YES YES YES YES YES YES YES YES YES YES YES YES YES YES YES YES YES YES YES YES YES YES YES YES YES Display Caller ID YES YES YES YES YES YES YES YES YES YES YES YES YES YES YES YES YES YES YES YES YES YES YES YES YES YES YES NO YES YES YES YES YES YES YES YE...

Страница 51: ...00 Year 2005 2007 2006 2006 2006 2006 2006 2006 2005 2005 2004 2004 Hansfree Calling YES YES YES YES YES YES YES YES YES YES YES YES Display Caller ID YES YES YES YES YES YES YES YES YES YES YES YES Voice Dial YES YES YES NO YES YES YES NO YES YES YES YES Phone Book Sync YES YES YES YES YES YES YES YES YES YES YES YES Object Push vCard YES YES YES YES YES YES YES YES YES YES YES YES ...

Страница 52: ...PS SiRF star III Internal Antenna NAVI EU It depends on models Voice Guidance MAP Tele Atlas POWER DC 5V 1A Vehicle Power Cigar jack Input 12 24V TEMPERATURE Operating 10 C to 60 C Storing 30 C to 80 C Built in BATTERY DC 3 7 V Li Ion 1100mAh MP3 5 hours Brightness Minimum Volume 5 Centre Navigation 4 5 hours Brightness 5 Centre Volume 5 Centre Photo 5 hours Brightness 5 Centre Volume 5 Centre INT...

Страница 53: ...eutschland GmbH GERMANY 01805 4737 84 LG Electronics Italia S p A ITALY 199600099 LG Electronics Hellas S A GREECE 801 11 200 900 LG Electronics Benelux B V BELGIUM LUXEMBOURG NETHERLANDS 015 200 255 0032 15 200 255 0900 543 5454 LG ELECTRONICS MAGYAR KFT CZECH REPUBLIC HUNGARY BULGARIA CZECH SLOVAKIA 06 40 545454 0700 1 5454 810 555 810 0850 111 154 LG Electronics Polska Sp z o o LG Electronics A...

Страница 54: ...th word mark and logos are owned by the Bluetooth SIG Inc and any use of such marks by LG Electronics is under license Other trademarks and trade names are those of their respective owners P N AFN36113911 Bluetooth ...

Отзывы: