background image

16

EXTERNAL EQUIPMENT SETUP

PC SETUP

This product provides Plug and Play capability, meaning that the PC adjusts automatically to the set's settings. 

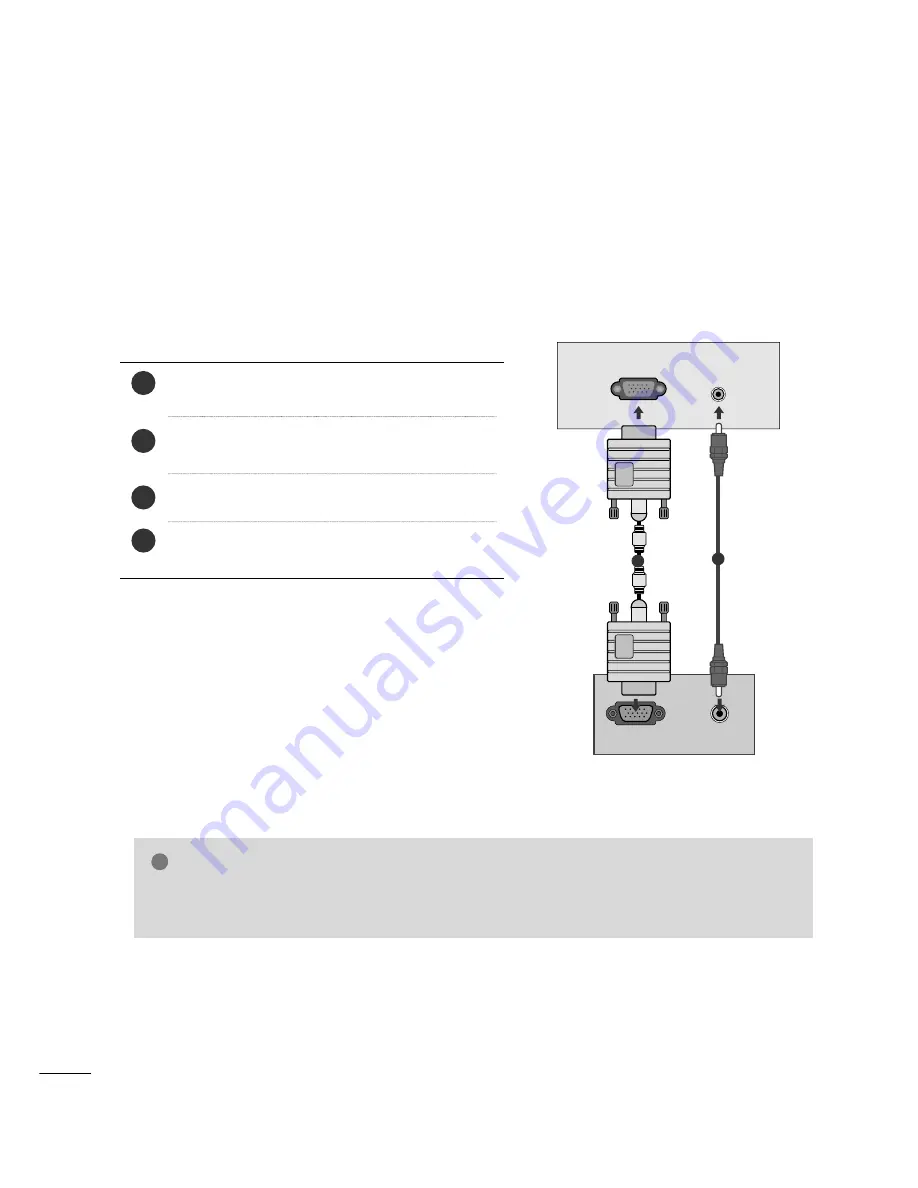
When connecting with a D-sub 15 pin cable

RGB OUTPUT

AUDIO

AUDIO IN

(RGB/DVI)

RGB (PC) IN

1

2

4

Connect the signal cable from the monitor output socket of
the PERSONAL COMPUTER to the PC input socket of the set.

Connect the audio cable from the PC to the A

AU

UD

DIIO

O   IIN

N

((R

RG

GB

B//D

DV

VII)) sockets of the set.

Press the INPUT button to select 

RGB

.

Switch on the PC, and the PC screen appears on the set.

The set can be operated as a PC monitor.

2

3

1

NOTE

!

G

G

User must use shielded signal interface cables (D sub 15 pin cable, DVI cable) with ferrite cores to main-
tain standard compliance for the product.

Содержание M198WDP

Страница 1: ...serial number of the set See the label attached on the back cover and quote this information to your dealer when you require service OWNER S MANUAL M M1 19 98 8W WD DP P M M2 22 28 8W WD DP P Trade Mark of the DVB Digital Video Broadcasting Project 1991 to 1996 I ID D N Nu um mb be er r s s 5576 M198WDP 5577 M228WDP ...

Страница 2: ... a simplified representation of the front panel The image shown may be somewhat different from your set Remote Control Sensor Power Indicator Power Sensor INPUT MENU VOL PR OK PROGRAMME Buttons VOLUME Buttons MENU Button OK Button INPUT Button ...

Страница 3: ...nput Connect over the air signals to this jack Component Input Connect a component video audio device to these jacks RGB DVI Audio Input Connect the monitor output from a PC to the appropriate input port Euro Scart Socket AV1 AV2 Connect scart socket input or output from an external device to these jacks RGB PC IN Connect the output from a PC SERVICE ONLY PORT 1 2 3 4 5 6 7 8 9 10 This is a simpli...

Страница 4: ...cushioned surface that will protect product and screen from damage Hold the h hi in ng ge e b bo od dy y and pull it upward Hinge Body Insert the s st ta an nd d b bo od dy y into the product until you hear a clicking sound Stand Body Assemble the parts of the s st ta an nd d b bo od dy y with s st ta an nd d b ba as se e of the product Stand Base ...

Страница 5: ...ll cover base backward while pressing button on stand body Hold cover base and pull while shaking it back ward to separate from stand body 4 Hold the stand and pull it upward 5 Pull stand body to separate from set while pressing both latches The image shown may be somewhat different from your set ...

Страница 6: ...M MA AN NA AG GE EM ME EN NT T as shown 2 First press the cable management Hold the C CA AB BL LE E M MA AN NA AG GE EM ME EN NT T with both hands and pull it upward NOTE G G Do not hold the C CA AB BL LE E M MA AN NA AG GE EM ME EN NT T when moving the product If the product is dropped you may be injured or the product may be broken How to remove the cable management The image shown may be somewh...

Страница 7: ...on each side and from the wall For proper ventilation allow a clearance of 4 inches on each side and from the wall Detailed installation instructions are available from your dealer see the optional Tilt Wall Mounting Bracket Installation and Setup Guide 4 inches 4 inches 4 inches 4 inches 4 inches 4 inches 4 inches 4 inches 4 inches ...

Страница 8: ...moisture dust or heat Also ensure that the set is placed in a position to allow a free flow of air Do not cover the ventilation openings on the back cover If you intend to mount the set to a wall attach VESA standard mounting interface optional parts to the back of the set When you install the set using the wall mounting bracket optional parts attach it carefully so it will not drop 0 3 12 8 W Wa ...

Страница 9: ...ington company Kensington sells security systems for expensive electronic equipment such as note book PCs and LCD projectors NOTE The Kensington Security System is an optional accessory NOTES a If the product feels cold to the touch there may be a small flicker when it is turned on This is normal there is nothing wrong with product b Some minute dot defects may be visible on the screen appearing a...

Страница 10: ... power cords until you have finished connecting all equipment Multi family Dwellings Apartments Connect to wall antenna socket Single family Dwellings Houses Connect to wall jack for outdoor antenna Outdoor Antenna VHF UHF Wall Antenna Socket RF Coaxial Wire 75 ohm ANTENNA CONNECTION Antenna UHF Signal Amplifier VHF In poor signal areas to get better picture quality install a signal amplifier to t...

Страница 11: ... O sockets of the set Press the I IN NP PU UT T button to select Component 2 3 1 HD RECEIVER SETUP To prevent the equipment damage never plug in any power cords until you have finished connecting all equipment The image shown may be somewhat different from your set When connecting with a component cable Y PB PR L R VIDEO COMPONENT IN AUDIO 1 2 Signal 480i 576i 480p 576p 720p 1080i 1080p Component ...

Страница 12: ...ct the digital set top box to H HD DM MI I D DV VI I I IN N jack on the set Connect the audio output of the digital set top box to the A AU UD DI IO O I IN N R RG GB B D DV VI I jack on the set Turn on the digital set top box Refer to the owner s manual for the digital set top box 2 3 1 When connecting with a HDMI to DVI cable DVI OUTPUT AUDIO R L HDMI DVI IN AUDIO IN RGB DVI 1 2 ...

Страница 13: ... Video output ports on DVD player Y Y Y Y PB B Y Cb Pb PR R Y Cr Pr Connect the video output sockets Y PB PR of the DVD to the C CO OM MP PO ON NE EN NT T I IN N V VI ID DE EO O sockets Y PB PR of the set Connect the audio cable from the DVD to C CO OM MP PO ON NE EN NT T I IN N A AU UD DI IO O sockets of the set Press the I IN NP PU UT T button to select Component Press the P PL LA AY Y button on...

Страница 14: ...creen 2 3 1 1 When connecting HDMI cable Connect the HDMI output of the DVD to the H HD DM MI I D DV VI I I IN N jack on the set 1 1 G G Set can receive the video and audio signal simultaneously by using a HDMI cable G G If the DVD player does not support Auto HDMI you need to set the DVD output resolution appropriately NOTE NOTE G G Signal type RGB i e the signals red green and blue can only be s...

Страница 15: ... screen OUTPUT SWITCH ANT IN R S VIDEO VIDEO ANT OUT L ANTENNA IN AV 1 AV 2 Wall Jack Antenna 1 2 When connecting with an antenna Connect the RF out socket of the VCR to the aerial socket of the set Connect the aerial cable to the RF aerial in socket of the VCR Store the VCR channel on a desired programme number using the Manual programme tuning section Select the programme number where the VCR ch...

Страница 16: ...en You can also record programmes received by the set on video tape 2 1 1 NOTE G G Signal type RGB i e the signals red green and blue can only be selected for the Euro scart and the AV 1 can be received These signals are transmitted for example by a paid TV decoder game machine or photo CD unit etc G G Please use shielded scart cable Insert the CI Module to P PC CM MC CI IA A Personal Computer Mem...

Страница 17: ...monitor output socket of the PERSONAL COMPUTER to the PC input socket of the set Connect the audio cable from the PC to the A AU UD DI IO O I IN N R RG GB B D DV VI I sockets of the set Press the INPUT button to select RGB Switch on the PC and the PC screen appears on the set The set can be operated as a PC monitor 2 3 1 NOTE G G User must use shielded signal interface cables D sub 15 pin cable DV...

Страница 18: ... your LCD monitor If used with other resolutions some scaled or processed pictures may appear on the screen The set has been preadjusted to the mode 1680x1050 60 Hz G G Some dot defects may appear on the screen like Red Green or Blue spots However this will have no impact or effect on the monitor performance G G Do not press the LCD screen with your finger for a long time as this may produce some ...

Страница 19: ...sed pictures may appear on the screen The set has been preadjusted to the mode 1680x1050 60 Hz G G Some dot defects may appear on the screen like Red Green or Blue spots However this will have no impact or effect on the monitor performance G G Do not press the LCD screen with your finger for a long time as this may produce some temporary distortion effects on the screen G G To enjoy best image qua...

Страница 20: ...4 HDMI DVI DTV supported mode 60 60 50 50 60 60 60 60 50 50 60 31 47 31 5 31 25 37 5 44 96 45 33 72 33 75 28 125 56 25 67 5 Resolution 720x480 60p 720x576 50p 1280x720 60p 1280x720 50p Horizontal Frequency kHz Vertical Frequency Hz 1920x1080 60i 1920x1080 50i 1920x1080 50p 1920x1080 60p 1440x900 M228WDP Resolution 640x480 800x600 720x400 1024x768 Horizontal Frequency kHz Vertical Frequency Hz 70 6...

Страница 21: ...t PICTURE 2 Select SCREEN 3 Select Reset 5 Run Reset Contrast 100 Brightness 50 Sharpness 70 Colour 70 Tint 0 Advanced Control Picture Reset PICTURE Move OK D Screen To Set Auto Config SCREEN Move Prev BACK Resolution Position Size Phase Reset G MENU OK OK OK 4 Select Yes OK Press the MENU or EXIT button to close the menu window Press the BACK button to move to the previous menu screen ...

Страница 22: ...osition Size Phase 1 Select PICTURE 2 Select SCREEN 3 Select Position Size or Phase 4 Make appropriate adjustments Contrast 100 Brightness 50 Sharpness 70 Colour 70 Tint 0 Advanced Control Picture Reset PICTURE Move OK D Screen Auto Config SCREEN Move Resolution Position G Size Phase Reset G F D E MENU OK OK Press the MENU or EXIT button to close the menu window Press the BACK button to move to th...

Страница 23: ...resolution Contrast 100 Brightness 50 Sharpness 70 Colour 70 Tint 0 Advanced Control Picture Reset PICTURE Move OK D Screen 1024 x 768 1280 x 768 1360 x 768 1366 x 768 Auto Config SCREEN Move Resolution G Position Size Phase Reset MENU OK OK Press the MENU or EXIT button to close the menu window Press the BACK button to move to the previous menu screen Prev BACK 1400 x 1050 1680 x 1050 Auto Config...

Страница 24: ...ure RGB PC mode only Press the MENU or EXIT button to close the menu window Press the BACK button to move to the previous menu screen If the position of the image is still not correct try Auto adjustment again If picture needs to be adjusted again after Auto adjustment in RGB PC you can adjust the P Po os si it ti io on n S Si iz ze e or P Ph ha as se e Select PICTURE 2 Select SCREEN 3 Select Auto...

Страница 25: ...output Switches the sound on or off 0 9 number button LIST Q VIEW Selects a programme Selects numbered items in a menu Displays the programme table Returns to the previously viewed programme MENU EXIT INFO i GUIDE THUMBSTICK Up Down Left Right OK Selects a menu Clears all on screen displays Shows the present screen information Shows programme schedule Allows you to navigate the on screen menus and...

Страница 26: ...8 9 0 Q VIEW LIST TV INPUT D A POWER VOL PR INDEX SLEEP HOLD REVEAL SUBTITLE UPDATE I II MUTE TEXT BACK FAV TIME INFO i TV RADIO Coloured buttons These buttons are used for teletext only T TE EL LE ET TE EX XT T models or P Pr ro og gr ra am mm me e e ed di it t TELETEXT BUTTONS These buttons are used for teletext For further details see the Teletext section 1 1 1 RATIO SLEEP SUBTITLE Selects your...

Страница 27: ...D REVEAL SUBTITLE UPDATE I II MUTE TEXT BACK FAV TIME INFO i TV RADIO TURNING ON THE TV Initializing setup Note a It will automatically disappear after approx 40 seconds unless a button is pressed b Press the B BA AC CK K button to change current OSD into previous OSD If the OSD On Screen Display is displayed on the screen as figure after turning on the set you can adjust the Language Country Time...

Страница 28: ...ress the VOL or button to adjust the volume If you want to switch the sound off press the MUTE button You can cancel this function by pressing the MUTE VOL or or I II button OK MENU EXIT GUIDE RATIO 1 2 3 4 5 6 7 8 9 0 Q VIEW LIST TV INPUT D A POWER VOL PR INDEX SLEEP HOLD REVEAL SUBTITLE UPDATE I II MUTE TEXT BACK FAV TIME INFO i TV RADIO 1 ...

Страница 29: ...K E Auto Volume Off Balance 0 Sound Mode Standard 120Hz 0 200Hz 0 500Hz 0 1 2KHz 0 3KHz 0 AUDIO Move OK E Clock Off Time Off On Time Off Sleep Timer Off Auto Sleep Off Time Zone Canary GMT TIME Move OK Lock System Off Set Password Block Programme Parental Guidance Off LOCK Move OK Menu Language English Audio Language English Subtitle Language English Hard of Hearing Off Country UK Input Label Key ...

Страница 30: ...n Then press the OK button Otherwise select NO Select SETUP 2 Select Auto Tuning 3 Select Yes 4 Run Auto tuning SETUP Move OK Auto tuning Manual tuning Programme Edit Booster On Software Update On Diagnostics CI Information Auto tuning SETUP Move OK Auto tuning Manual tuning Programme Edit Booster On Software Update On Diagnostics CI Information Auto tuning All service information will be updated ...

Страница 31: ...number SETUP Move OK Auto tuning Manual tuning Programme Edit Booster On Software Update On Diagnostics CI Information Manual tuning SETUP Move OK Auto tuning Manual tuning Programme Edit Booster On Software Update On Diagnostics CI Information Manual tuning Your receiver will add this channel to your channel list VHF CH Bad Normal Good F F DTV G G 30 ADD Close 1MENU OK OK Press the MENU or EXIT b...

Страница 32: ...uning 3 Select TV 4 Select the desired pro gramme number on 5 Select a TV system 6 Select V UHF or Cable 8 Start searching 9 Select Store or 7 Select the desired channel number or SETUP Move OK Auto tuning Manual tuning Programme Edit Booster On Software Update On Diagnostics CI Information Manual tuning SETUP Move OK Auto tuning Manual tuning Programme Edit Booster On Software Update On Diagnosti...

Страница 33: ...e number A Assigning a station name Select SETUP 2 Select Manual Tuning 3 Select TV 4 Select Name 5 Select the position and make your choice of the second character and so on You can use the alphabet A A to Z Z the number 0 0 to 9 9 and space 6 Select Close 7 Select Store 1 Select SETUP 2 Select Manual Tuning 1 MENU OK OK OK OK OK MENU OK OK OK Press the MENU or EXIT button to close the menu windo...

Страница 34: ...ogrammes In some countries it is possible to move a programme number by using the YELLOW button only PROGRAMME EDIT Use NUMBER buttons to input a 4 digit password in Lock System On Select SETUP 2 Select Programme Edit 3 Enter the Programme Edit 4 Select a programme to be stored or skipped SETUP Move OK Auto tuning Manual tuning Programme Edit Booster On Software Update On Diagnostics CI Informatio...

Страница 35: ...s skipped it means that you will be unable to select it using the PR button during normal TV viewing If you wish to select a skipped programme directly enter the programme number with the NUMBER buttons or select it in the programme edit or EPG A Selecting favourite programme Select your favourite pro gramme number 1 It will automatically include the selected programme into your favourite programm...

Страница 36: ... RED RED Release the deleted programme 1 A Skipping a programme number Select a programme number to be skipped 2 BLUE BLUE Turn the skipped programme number to blue 3 BLUE BLUE Release the skipped programme The selected programme is deleted all the fol lowing programmes are shifted up one A Moving a programme Select a programme number to be moved Turn the moved programme number to YELLOW 3 YELL YE...

Страница 37: ...4 Save SETUP Move OK Auto tuning Manual tuning Programme Edit Booster On Software Update On Diagnostics CI Information Booster On SETUP Move OK Auto tuning Manual tuning Programme Edit Booster On Software Update On Diagnostics CI Information Booster On 1 Off On On MENU OK OK OK Press the MENU or EXIT button to close the menu window Press the BACK button to move to the previous menu screen ...

Страница 38: ...ect On or Off If you select On a user confirm message box will be displayed to notify that new software is found 4 Save SETUP Move OK Auto tuning Manual tuning Programme Edit Booster On Software Update Off Diagnostics CI Information Software Update On SETUP Move OK Auto tuning Manual tuning Programme Edit Booster On Software Update Off Diagnostics CI Information Software Update On 1 Off On On MENU...

Страница 39: ...stics 4 Display the Channel information 3 Display Manufacturer Model Type Serial Number and Software Version SETUP Move OK Auto tuning Manual tuning Programme Edit Booster On Software Update On Diagnostics CI Information Diagnostics 1 Engineering Diagnostics Manufacturer LG Electronics Inc Model Type Mx8WDP Serial No 708KGKG00019 Software Version V2 05 1 Popup CH 34 CH 36 CH 38 CH 54 CH 60 Prev BA...

Страница 40: ...ng upon the country broadcasting circumstances This OSD is only for illustration and the menu options and screen format will vary according to the Digital pay services provider It is possible for you to change CI Common Interface menu screen and service by consulting your dealer Viaccess Module Select the item Consultations Authorizations Module information CI COMMON INTERFACE INFORMATION Select S...

Страница 41: ...e programme list You may find some blue programmes These have been set up to be skipped by auto programming or in the programme edit mode Some programmes with the channel number shown in the programme LIST indicate there is no station name assigned 1 Turns the pages 2 Returns to normal TV viewing A Paging through a programme list 1 Display the Favourite Programme table A Displaying the favourite p...

Страница 42: ... English Hard of Hearing Off Country UK Input Label Key Lock Off Set ID 1 OPTION Move OK E Input Label Selects a label for each input source To enjoy best image quality for your PC please change HDMI Input label to PC INPUT LABEL Select OPTION 2 Select Input Label 3 Select the source 4 Select the label RGB HDMI AV1 AV2 Component Close 1MENU OK OK Press the MENU or EXIT button to close the menu win...

Страница 43: ...on is broadcasted by broadcasting companies The EPG displays the programme description for the next eight days Switch on or off EPG 1 Programme Guide 1 YLE TV1 06 Mar 2006 15 09 ALL 06 Mar 14 00 15 00 1 YLE TV1 Kungskonsumente 2 YLE TV2 No Information No Information TV2 Farmen 4 TV No Information No Information No Information Tänään otsikoissa No Information 5 YLE FST 6 CNN 8 YLE24 Radio Pr Change...

Страница 44: ...f Date setting mode GREEN GREEN Change to the selected programme Change to the selected date Select NOW or NEXT Programme Select a date Select the Broadcast Programme Switch off Date setting mode Enter Timer Record Remind setting mode YELL YELLO OW W OK Select TV or RADIO Programme The detailed information on or off Page Up Down Switch off EPG or GUIDE INFO i EXIT Switch off EPG or GUIDE EXIT TV R...

Страница 45: ... Down Function setting Select Schedule list Enter Timer Record Remind setting mode YELL YELLO OW W Change to Guide or Timer list mode YELL YELLO OW W Add new Manual Timer setting mode YELL YELLO OW W Save Timer Record Remind Select Type Service Date or Start End time Enter Schedule list editing mode GREEN GREEN Delete the selected item RED RED Change to Guide mode BLUE BLUE Switch off EPG or GUIDE...

Страница 46: ...owing signal PICTURE SIZE ASPECT RATIO CONTROL 1 16 6 9 9 The following selection will allow you to adjust the picture horizontally in linear proportion to fill the entire screen useful for viewing 4 3 formatted DVDs 4 4 3 3 The following selection will allow you to view a picture with an original 4 3 aspect ratio grey bars will appear on both the left and right of the screen You can also adjust A...

Страница 47: ...ose Zoom 2 when you wish the picture to be altered both horizontally extended and vertically cropped The picture adopting a compromise between alteration and screen coverage J Ju us st t S Sc ca an n The following Selection allows you to view the picture in the best quality without loss of original picture in high resolution image Note If there is interference in original pic ture you can view int...

Страница 48: ...our 70 Tint 0 PICTURE Move OK E Picture Mode Vivid Vivid Standard Cinema Sport Game Vivid Aspect Ratio 16 9 Picture Mode Vivid Backlight 100 Contrast 100 Brightness 50 Sharpness 70 Colour 70 Tint 0 PICTURE Move OK E Picture Mode Standard Vivid sRGB Cinema Sport Game Standard Picture Mode adjusts the set for the best pic ture appearance Select the preset value in the Picture Mode menu based on the ...

Страница 49: ...ect PICTURE 2 Select Advanced Control 3 Select Colour Temperature 4 Select either Cool Medium or Warm 1 Picture Mode Vivid Backlight 100 Contrast 100 Brightness 50 Sharpness 70 Colour 70 Tint 0 Advanced Control PICTURE Move OK E D Advanced Control ColourTemperature F F Cool G G Fresh Contrast High Fresh Colour High Noise Reduction Medium Gamma Medium Film Mode Off Red Contrast 0 Green Contrast 0 B...

Страница 50: ...Close Choose one of two automatic colour adjustments Auto Colour Tone Control 6500K 9300K RGB HDMI PC mode only Advanced control menu is inactivated when picture mode is sRGB Select PICTURE 2 Select Advanced Control 3 Select Colour Temperature 4 Select either 6500K 9300K 1 Picture Mode Standard Backlight 100 Contrast 100 Brightness 50 Sharpness 70 Colour 70 Tint 0 Advanced Control PICTURE Move OK ...

Страница 51: ...rd User Vivid Standard Cinema Sport Game Standard User Aspect Ratio 16 9 Picture Mode Vivid Backlight 80 Contrast 90 Brightness 50 Sharpness 60 Colour 60 Tint 0 PICTURE Move OK E Picture Mode Standard User Aspect Ratio 16 9 Picture Mode Vivid Backlight 100 Contrast 100 Brightness 50 Sharpness 70 Colour 70 Tint 0 PICTURE Move OK E Picture Mode Standard User Standard sRGB Cinema Sport Game Standard ...

Страница 52: ...display whitish images and low gamma values display high contrast images PICTURE IMPROVEMENT TECHNOLOGY Select PICTURE 2 Select Advanced Control 3 Select Fresh Contrast Fresh Colour Noise Reduction or Gamma 4 Select your desired Source 1 Picture Mode Vivid Backlight 100 Contrast 100 Brightness 50 Sharpness 70 Colour 70 Tint 0 Advanced Control PICTURE Move OK E D Advanced Control MENU OK OK ColourT...

Страница 53: ... 0 Advanced Control PICTURE Move OK E D Advanced Control ADVANCED FILM MODE To set the product up for the best picture quality for viewing films This feature operates only in TV AV and Component 480i 576i 1080i mode MENU OK OK ColourTemperature Cool Fresh Contrast High Fresh Colour High Noise Reduction Medium Gamma Medium Film Mode F F Off G G Black Level Auto Close Press the MENU or EXIT button t...

Страница 54: ...id Backlight 100 Contrast 100 Brightness 50 Sharpness 70 Colour 70 Tint 0 Advanced Control PICTURE Move OK E D Advanced Control L Lo ow w The reflection of the screen gets darker H Hi ig gh h The reflection of the screen gets brighter A Au ut to o Realizing the black level of the screen and set it to High or Low automatically MENU OK OK ColourTemperature Cool Fresh Contrast High Fresh Colour High ...

Страница 55: ...100 Contrast 100 Brightness 50 Sharpness 70 Colour 70 Tint 0 Advanced Control PICTURE Move OK D Picture Reset Backlight 100 Contrast 100 Brightness 50 Sharpness 70 Colour 70 Tint 0 Advanced Control PICTURE Move OK D Picture Reset Resetting video configuration i i MENU OK OK Press the MENU or EXIT button to close the menu window Press the BACK button to move to the previous menu screen R G R G ...

Страница 56: ...nd Mode Standard 120Hz 0 200Hz 0 500Hz 0 1 2KHz 0 3KHz 0 AUDIO Move OK E Auto Volume Off L R AVL automatically remains on the same volume level if you change programmes AUTO VOLUME LEVELER Select AUDIO 2 Select Auto Volume 3 Select On or Off 1 Off On Off MENU OK OK Press the MENU or EXIT button to close the menu window Press the BACK button to move to the previous menu screen ...

Страница 57: ...er Sound Mode lets you enjoy the best sound without any Special adjustment as the TV set s the appropriate sound options based on the programme content SRS TruSurround XT Standard Music Cinema Sport and Game are preset for optimum sound quality at the factory Select AUDIO 2 Select Sound Mode 3 Select SRS TruSurround XT Standard Music Cinema Sport or Game 1MENU OK OK Press the MENU or EXIT button t...

Страница 58: ...round XT Standard Music Cinema Sport or Game Set the desired sound level 1 4 Select a frequency band MENU OK OK OK 5 OK Auto Volume Off Balance 0 Sound Mode Standard User 120Hz 0 200Hz 0 500Hz 0 1 2KHz 0 3KHz 0 AUDIO Move OK E Sound Mode Standard User L R Auto Volume Off Balance 0 Sound Mode Standard User 120Hz 0 200Hz 0 500Hz 0 1 2KHz 0 3KHz 0 AUDIO Move OK E Sound Mode Standard User L R SRS TruS...

Страница 59: ... Mode Standard 120Hz 0 200Hz 0 500Hz 0 1 2KHz 0 3KHz 0 AUDIO Move OK E Balance 0 You can adjust the sound balance of the speakers to preferred levels BALANCE Select AUDIO 2 Select Balance 1 3 Make desired adjustment Close Balance 0 L R F F G G MENU OK OK L R Press the MENU or EXIT button to close the menu window Press the BACK button to move to the previous menu screen ...

Страница 60: ...5KHz 0 12KHz 0 Reset AUDIO Move OK D Reset AUDIO RESET Settings of the selected Sound Mode return to the default factory settings Select AUDIO 2 Select Reset 3 Initialize the adjusted value 1 Resetting sound mode configuration i i MENU OK OK Press the MENU or EXIT button to close the menu window Press the BACK button to move to the previous menu screen ...

Страница 61: ...n two languages dual language you can switch to DUAL I DUAL II or DUAL I II DUAL I Sends the primary broadcast language to the loudspeakers DUAL II Sends the secondary broadcast language to the loudspeakers DUAL I II Sends a separate language to each loudspeaker Broadcast Mono Stereo Dual On Screen Display MONO STEREO D DU UA AL L I I D DU UA AL L I II I D DU UA AL L I I I II I Stereo Dual Recepti...

Страница 62: ...AM reception high quality NICAM Near Instantaneous Companded Audio Multiplex digital sound can be received Sound output can be selected according to the type of received broadcast as follows by press ing the I II button repeatedly Speaker Sound Output Selection In AV Component RGB and HDMI mode you can select output sound for the left and right loud speakers Repeatedly press the I I I II I button ...

Страница 63: ...the wrong local country teletext may not appear correctly on the screen and some problems may occur during teletext operation G G The CI Common Interface function may not be applied based on country broadcasting circumstances G G DTV mode control buttons may not function based on country broadcasting circumstances G G In countries that Digital broadcasting regulation isn t fixed some DTV functions...

Страница 64: ...in a simpler form with 1 to 3 characters broadcast by the service provider When you select supplementary Audio Audio for Visual Hearing Impaired it may output a part of the Main audio Audio Language OSD Information Status Not Available MPEG Audio Dolby Digital Audio Audio for Visual Impaired Audio for Hearing Impaired Display N A Subtitle Language Selection G G When two or more subtitle languages ...

Страница 65: ...et the time correctly before using on off timer function CLOCK SETUP Select TIME 2 Select Clock 1 3 Select either the year date or time option 4 Set the year date and time options Clock Off Time Off On Time Off Sleep Timer Off Auto Sleep Off Time Zone Canary GMT TIME Move OK Clock Date 01 Month Jan Year 2008 Hour 00 Minute 00 Close MENU OK OK Press the MENU or EXIT button to close the menu window ...

Страница 66: ... GMT TIME Move OK On Time Off Select TIME 2 Select Off time or On time 1 3 Select Repeat 5 Set the hour 6 Set the minutes 4 Select Off Once Daily Mon Fri Mon Sat Sat Sun or Sun Clock Off Time Off On Time Off Sleep Timer Off Auto Sleep Off Time Zone Canary GMT TIME Move OK On Time Off Repeat F F Off G G Hour 00 Minute 00 Mode DTV Programme 800 Volume 30 Close To cancel On Off Time function select O...

Страница 67: ...leep Timer Off Auto Sleep Off Time Zone Canary GMT TIME Move OK Auto Sleep Off Select TIME 2 Select Auto Sleep 1 3 Select Off or On Clock Off Time Off On Time Off Sleep Timer Off Auto Sleep Off Time Zone Canary GMT TIME Move OK Auto Sleep Off Off On Off MENU OK OK Press the MENU or EXIT button to close the menu window Press the BACK button to move to the previous menu screen ...

Страница 68: ...ich Mean Time which is received with the broadcast signal and the time is set automatically by a digital signal TIME ZONE SETUP Select TIME 2 Select Time Zone 1 3 Select your viewing area time zone 4 Confirm it Select the number of minutes When you switch the set off the preset sleep time is cancelled You can also adjust Sleep Timer in the TIME menu MENU OK OK OK 2 1Q MENU OK SLEEP Select S Sl le ...

Страница 69: ...new password to confirm 1 If you forget your password press 7 7 7 7 on the remote control handset Lock System Off Set Password Block Programme Parental Guidance Off LOCK Move OK Lock System Off Lock System Off Set Password Block Programme Parental Guidance Off LOCK Move OK Lock System Off Off On Off MENU OK OK OK OK 1 2 3 4 5 6 7 8 0 9 Press the MENU or EXIT button to close the menu window Press t...

Страница 70: ...ove OK Block Programme YLE TV1 1 TV DTV Radio 1 YLE TV1 2 YLE TV2 4 TV4 Stockholm 5 YLE FST 6 CNN 8 YLE24 9 YLE Teema 14 TV4 Film 24 TV4 Fakta 50 TV400 24 TV4 Fakta 84 Kanal Lokal 24 TV4 Fakta 86 Info 3sat 87 Doku Kika 88 TVE 1 E D 3 Enter the Block Programme 4 Select a programme to be locked MENU OK OK Pr Change Previous Navigation BACK Block Unlock D F G E Page Change P PR Press the MENU or EXIT...

Страница 71: ...ldren from watching certain adult s TV programmes according to the ratings limit set PARENTAL CONTROL IN DIGITAL MODE ONLY Select LOCK 2 Select Parental Guidance 3 Make appropriate adjustments 4 Save 1 Lock System Off Set Password Block Programme Parental Guidance Off LOCK Move OK Parental Guidance Off Lock System Off Set Password Block Programme Parental Guidance Off LOCK Move OK Parental Guidanc...

Страница 72: ...ey Lock Off Menu Language English Audio Language English Subtitle Language English Hard of Hearing Off Country UK Input Label Key Lock Off Set ID 1 OPTION Move OK E Key Lock Off Off On Off In Key Lock On if the set is turned off press the r I INPUT PR D E button on the TV or POWER INPUT PR or NUMBER buttons on the remote control With the Key Lock On the display Key Lock On appears on the screen if...

Страница 73: ...ton to switch to teletext The initial page or last page appears on the screen Two page numbers TV station name date and time are displayed on the screen headline The first page number indicates your selection while the second shows the current page displayed Press the T TE EX XT T or E EX XI IT T button to switch off teletext The previous mode reappears SWITCH ON OFF A A Page selection Enter the d...

Страница 74: ...nge the sub page press the RED GREEN PR or or NUMBER buttons Press again to exit this function A A H HO OL LD D Stops the automatic page change which will occur if a teletext page consists of two or more sub pages The num ber of sub pages and the sub page displayed is usually shown on the screen below the time When this button is pressed the stop symbol is displayed at the top left hand corner of ...

Страница 75: ...n teletext Follow the indications on digital teletext and move onto the next step by pressing OK D or E F or G RED GREEN YELLOW BLUE or NUMBER buttons and so on Press the TEXT or colour button to switch off digital tele text and return to TV viewing Some services may allow you to access text services by pressing the RED button If pressing the MENU GUIDE or INFO i button the teletext service disapp...

Страница 76: ... password appears Initializing Reset to original factory settings 1 Select OPTION 2 Select Factory Reset 3 Hard of Hearing Off Country UK Input Label Key Lock Off Set ID 1 Power Indicator DDC CI On Factory Reset OPTION Move OK D Factory Reset Enter Password Cancel In Lock System On if you forget your password press 7 7 7 7 on the remote control handset MENU OK OK Press the MENU or EXIT button to c...

Страница 77: ...D when power is turned on POWER INDICTOR 1 Select OPTION 2 Select Power Indicator 3 Hard of Hearing Off Country UK Input Label Key Lock Off Set ID 1 Power Indicatior DDC CI On Factory Reset OPTION Move OK D Power Indicatior MENU OK OK Press the MENU or EXIT button to close the menu window Press the BACK button to move to the previous menu screen F F on G G Close Power Light ...

Страница 78: ...nications between PC and set DDC CI makes it possible to adjust and setup detailed functions on PC instead of the set OSD Set can be adjusted with PC by connecting communication between PC and set when DDC CI is ON and set cannot be adjusted with PC because communication between PC and set is disconnected when DDC CI is OFF DDC CI Only RGB HDMI PC mode 1 Select OPTION 2 Select DDC CI 3 Hard of Hea...

Страница 79: ... function to restore the brightness of the picture A Check for local interference such as an electrical appliance or power tool A Station or cable product experiencing problems tune to another station A Station signal is weak reorient antenna to receive weaker station A Check for sources of possible interference A Check antenna Change the direction of the antenna TROUBLESHOOTING T Th he e o op pe ...

Страница 80: ... la ay ye ed d A Adjust brightness and contrast again A If the product is in power saving mode move the mouse or press any key A In DVD Player or Set top Box check the power status of connected device A The signal from the PC Video card is out of the vertical or horizontal frequency range of the product Adjust the frequency range by referring to the Specifications in this user s guide A The signal...

Страница 81: ...Is the screen position wrong Horizontal noise appears or the characters look blurred Do thin lines appear on the background screen S Sc cr re ee en n c co ol lo or r i is s a ab bn no or rm ma al l A Set screen color resolution to more than 24 bits true color Select control Panel Display Settings Color Table menu in Windows A Check the connection status of the signal cable A Several pixels red gre...

Страница 82: ...ic softener or dishwashing detergent Wring the cloth until it s almost dry and then use it to wipe the screen Make sure the excess water is off the screen and then let it air dry before you turn on your set Cleaning the Cabinet A To remove dirt or dust wipe the cabinet with a soft dry lint free cloth A Please be sure not to use a wet cloth Extended Absence G If you expect to leave your set dormant...

Страница 83: ...ode 1W Off Mode 1W LCD Panel Screen Type Pixel Pitch 19 inches Wide 48 141 cm TFT Thin Film Transistor LCD Liquid Crystal Display Panel Visible diagonal size 48 141 cm 0 282 mm Max Resolution Recommended Resolution Horizontal Frequency Vertical Frequency Synchronization Type Video Signal 1440 X 900 60 Hz 1440 X 900 60 Hz 30 83 kHz 56 75 Hz Separate Sync Digital Input Connector TV D Sub Analog HDMI...

Страница 84: ...de 1W Off Mode 1W LCD Panel Screen Type Pixel Pitch 22 inches Wide 55 868 cm TFT Thin Film Transistor LCD Liquid Crystal Display Panel Visible diagonal size 55 868 cm 0 282 mm Max Resolution Recommended Resolution Horizontal Frequency Vertical Frequency Synchronization Type Video Signal 1680 X 1050 60 Hz 1680 X 1050 60 Hz 30 83 kHz 56 75 Hz Separate Sync Digital Input Connector TV D Sub Analog HDM...

Страница 85: ...trol is ready to be programmed for the code Enter a code number using the number buttons on the remote control Programming code numbers for the corresponding component can be found on the following pages Again if the code is correct the device will turn off Press the M ME EN NU U button to store the code Test the remote control functions to see if the component responds properly If not repeat from...

Страница 86: ...MINOLTA 013 020 MITSUBISHI 013 020 045 046 049 051 059 061 151 MTC 034 040 MULTITECH 024 034 NEC 012 023 039 043 048 NORDMENDE 043 OPTONICA 053 054 PANASONIC 066 070 074 083 133 140 145 PENTAX 013 020 031 033 063 PHILCO 031 034 067 PHILIPS 031 033 034 054 067 071 101 PILOT 101 PIONEER 013 021 048 PORTLAND 108 PULSAR 072 QUARTZ 01 1 014 QUASAR 033 066 075 145 RCA 013 020 033 034 040 041 062 063 107...

Страница 87: ... C5 C6 C7 D0 D1 D2 D3 D4 D5 D6 D7 D0 D1 D2 D3 D4 D5 D6 D7 Lead code Low custom code High custom code Data code Data code Repeat code Tf 4 5 ms 9 ms 2 25 ms 9 ms 0 55 ms 0 56 ms 1 12 ms 0 56 ms 2 24 ms Tf Tf Tf 108ms 455KHz Bit 0 Bit 1 1 How to Connect A Connect your wired remote control to the Remote Control port on the set 2 Remote Control IR Codes A Output waveform Single pulse modulated with 37...

Страница 88: ...BUTTON R C BUTTON R C BUTTON R C BUTTON R C BUTTON R C BUTTON R C BUTTON R C BUTTON POWER ON OFF R C BUTTON R C BUTTON R C BUTTON R C BUTTON R C BUTTON R C BUTTON R C BUTTON R C BUTTON R C BUTTON R C BUTTON R C BUTTON R C BUTTON R C BUTTON R C BUTTON R C BUTTON R C BUTTON R C BUTTON R C BUTTON R C BUTTON R C BUTTON R C BUTTON R C BUTTON R C BUTTON R C BUTTON R C BUTTON R C BUTTON R C BUTTON R C BU...

Страница 89: ...he product Type of Connector D Sub 9 Pin Male No Pin Name 1 No connection 2 RXD Receive data 3 TXD Transmit data 4 DTR DTE side ready 5 GND 6 DSR DCE side ready 7 RTS Ready to send 8 CTS Clear to send 9 No Connection RS 232C IN CONTROL SERVICE 1 5 6 9 RS 232C Configurations 7 Wire Configurations Standard RS 232C cable PC TV RXD 2 3 TXD TXD 3 2 RXD GND 5 5 GND DTR 4 6 DSR DSR 6 4 DTR RTS 7 8 CTS CT...

Страница 90: ...V ID number The adjustment range of SET ID is 1 99 1 Hard of Hearing Country UK Input Label Key Lock Off Set ID Power Indicator DDC CI On Factory Reset OPTION Move OK D Set ID Hard of Hearing Country UK Input Label Key Lock Off Set ID Power Indicator DDC CI On Factory Reset OPTION Move OK D Set ID F F 1 G G Close MENU OK OK Press the BACK button to move to the previous menu screen ...

Страница 91: ... to control the TV Set ID You can adjust the set ID to choose desired monitor ID number in option menu Adjustment range is 1 99 When selecting Set ID 0 every connected set is controlled Set ID is indicated as decimal 1 99 on menu and as Hexa decimal 0x0 0x63 on transmission receiving protocol DATA To transmit command data Transmit FF data to read status of command Cr Carriage Return ASCII code 0x0...

Страница 92: ...d d k k f f G To adjust volume You can also adjust volume with the VOLUME buttons on remote control Transmission Data Min 00 Max 64 Refer to Real data mapping 1 See page 93 k f Set ID Data Cr Ack f Set ID OK NG Data x 0 06 6 C Co on nt tr ra as st t C Co om mm ma an nd d k k g g G To adjust screen contrast You can also adjust contrast in the PICTURE menu Transmission Data Min 00 Max 64 Refer to Re...

Страница 93: ...n 00 Max 64 Refer to Real data mapping 1 See page 93 k k Set ID Data Cr Ack k Set ID OK NG Data x 1 13 3 B Ba al la an nc ce e C Co om mm ma an nd d k k t t G To adjust balance You can also adjust balance in the AUDIO menu Transmission Data Min 00 Max 64 Refer to Real data mapping 1 See page 93 k t Set ID Data Cr Ack t Set ID OK NG Data x 1 14 4 C Co ol lo ou ur r T Te em mp pe er ra at tu ur re e...

Страница 94: ... To set j u Set ID Data Cr Ack u Set ID OK NG Data x Ack Equalize command expression v Set ID OK NG Data x 1 17 7 E Eq qu ua al li iz ze e C Co om mm ma an nd d j j v v G To adjust equalize Transmission Data Frequency 0 120 Hz 1 200 Hz 2 500 Hz 3 1 2 kHz 4 3 kHz 5 7 5 kHz 6 12 kHz Data Step 0 31step Ex 500Hz Step 20 j v Set ID 54 Cr 010 10100 01010100 54 Hex 3 bits of Frequency and 5 bits of Data ...

Страница 95: ...o on nt tr ro ol l B Ba ac ck kl li ig gh ht t C Co om mm ma an nd d m m g g G To Control the backlight Transmission Data Min 00 Max 64 transmit by hexadecimal code m g Set ID Data Cr Ack g Set ID OK NG Data x 1 18 8 T Tu un ne e C Co om mm ma an nd d C Co om mm ma an nd d m m a a G Select channel to following physical number Transmission Data 00 High channel data Data 01 Low channel data ex No 47...

Страница 96: ......

Отзывы: