background image

67

O

PT

IO

N

 S

ET

TIN

G

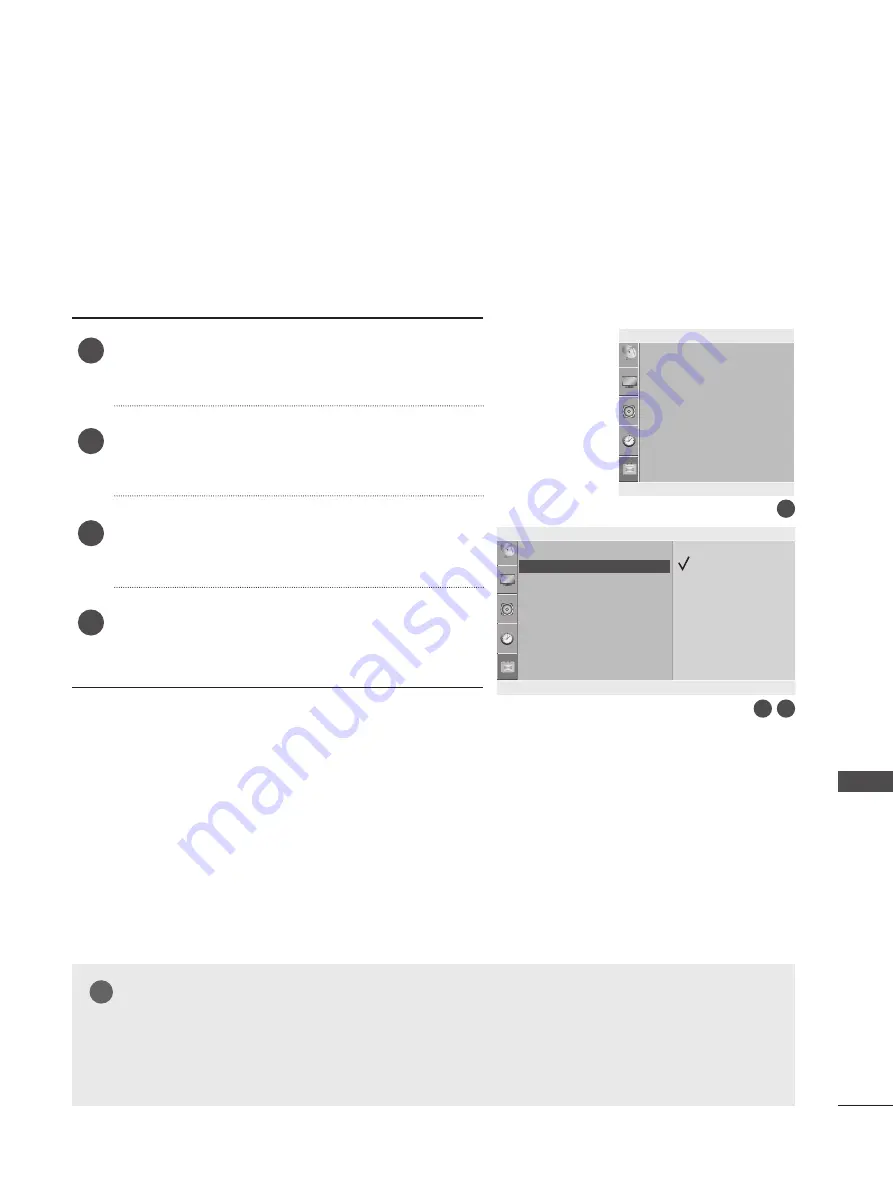
KEY LOCK

The SET can be set so that the remote control is needed to control it.

This feature can be used to prevent unauthorized viewing.

This SET is programmed to remember which option it was last set to even if you turn the SET off.

Press the 

MENU

 button and then ▲ / ▼ button to select 

the 

Option

 menu.

Press the ► button and then ▲ / ▼ button to select 

Key 

Lock.

Press the ► button and then ▲ / ▼ button to select 

On


or 

Off.

Press the 

MENU

 button to move to the previous menu 

screen.

1

2

3

4

Language
Key Lock

DDC-CI

Power Indicator
Mode Setting
Factory Reset

Language
Key Lock

DDC-CI

Power Indicator
Mode Setting
Factory Reset

Option

Option

▲▼◄►

 OK MENU

▲▼◄►

 OK MENU

Off
On

 Key Lock    


NOTE

!

?

!

?


► In 

Key Lock ‘On’

, if the TV is turned off, press the 

 / I button on the SET or 

POWER

 buttons on the remote 

control.


► With the Key Lock On, the display ‘Key Lock On’ appears on the screen if any button on the side panel is pressed 

while viewing the SET.

1

3

2

Содержание M197WAP

Страница 1: ...lg com OWNER S MANUAL MONITOR TV MONITOR TV MODELS M197WAP M227WAP M237WAP M2062A M2262A M2362A M2762A Please read this manual carefully before operating your set and retain it for future reference ENGLISH ...

Страница 2: ...onnecting with a component cable 25 Connecting a set top box with a HDMI cable 26 DVD SETUP Connecting with a component cable 27 Connecting with a HDMI cable 28 VCR SETUP Connecting with a RF cable 29 Connecting with a RCA cable 29 OTHER A V SOURCE SETUP 30 PC SETUP When connecting with a D sub 15 pin cable 31 BACK COVER FOR WIRE ARRANGEMENT 32 SUPPORTED DISPALY RESOLUTION 33 WATCHING TV PROGRAMME...

Страница 3: ... OUTPUT SELECTION 61 TIME SETTING CLOCK SETUP 62 AUTO ON OFF TIMER SETTING 63 SLEEP TIMER SETTING 64 AUTO SLEEP 65 OPTION SETTING ON SCREEN MENU LANGUAGE SELECTION 66 KEY LOCK 67 DDC CI Only RGB 68 POWER INDICATOR 69 MODE SETTING 70 FACTORY RESET 71 TELETEXT SWITCH ON OFF 72 SIMPLE TEXT 72 SWITCH ON OFF 73 FASTEXT 73 SPECIAL TELETEXT FUNCTIONS 74 APPENDIX TROUBLESHOOTING 75 MAINTENANCE 77 PRODUCT ...

Страница 4: ...his is a simplified representation of the side panel The image shown may be somewhat different from your set INPUT MENU VOL PR OK INPUT Button MENU Button OK Button VOLUME Buttons PROGRAMME Buttons Power Button Headphone Jack M197WAP M227WAP M237WAP ...

Страница 5: ...n may be somewhat different from your set INPUT MENU PR VOL OK Power Indicator illuminates blue when the set is switched on Headphone Jack IR receiver Remote controller receiver M2062A M2262A M2362A M2762A INPUT MENU PR VOL OK INPUT Button MENU Button OK Button VOLUME Button PROGRAMME Button POWER Button ...

Страница 6: ... IN AV IN POWER CORD SOCKET This set operates on AC power The voltage is indicated on the Specifications page Never attempt to operate the set on DC power HEADPHONE AUDIO OUTPUT Connect the audio from a Headphone Jack HDMI INPUT Connect a HDMI signal to HDMI IN Or DVI VIDEO signal to HDMI IN with DVI to HDMI cable RGB AUDIO INPUT Connect the audio from a PC RGB INPUT PC Connect the output from a P...

Страница 7: ... Never attempt to operate the set on DC power HEADPHONE AUDIO OUTPUT Connect the audio from a Headphone Jack HDMI INPUT Connect a HDMI signal to HDMI IN Or DVI VIDEO signal to HDMI IN with DVI to HDMI cable RGB AUDIO INPUT Connect the audio from a PC RGB INPUT PC Connect the output from a PC COMPONENT INPUT Connect a component video audio device to these jacks AV AUDIO VIDEO INPUT Connect audio vi...

Страница 8: ...nt from your set Carefully place the product screen side down on a cushioned surface that will protect product and screen from damage Insert the Stand Base into the product Use a Coin on the bottom of the stand base and turn the screw clockwise to tighten 1 2 3 Stand Base Coin INPUT MENU VOL CH ENTER ...

Страница 9: ...arefully place the product screen side down on a cushioned surface that will protect product and screen from damage 1 Insert the Stand Base into the product 2 Use a Coin on the bottom of the stand base and turn the screw clockwise to tighten 3 M237WAP Stand Base Coin INPUT MENU VOL CH ENTER ...

Страница 10: ...4 Carefully place the product screen side down on a cushioned surface that will protect product and screen from damage Turn the Stand Base Lock through 90 to fix the stand base to the stand body Stand Base Lock 2 Insert the Stand Base into the product M2062A M2262A M2362A O P E N O P E N O P E N O P E N O P E N O P E N O P E N O P E N O P E N O P E N Stand Base ...

Страница 11: ...om your set 1 3 2 Carefully place the product screen side down on a cush ioned surface that will protect product and screen from damage Use a Coin on the bottom of the stand base and turn the screw clockwise to tighten Insert the Stand Base into the product M2762A Stand Base Coin ...

Страница 12: ... image shown may be somewhat different from your set 1 2 3 Place the set screen side down on a cushion or soft cloth Detach the stand base from the set by turning the screw to the left with a Coin Pull the Stand base M197WAP M227WAP Coin Stand Base ...

Страница 13: ...mage shown may be somewhat different from your set M237WAP 1 Place the set screen side down on a cushion or soft cloth 2 Detach the stand base from the set by turning the screw to the left with a Coin 3 Pull the Stand base Coin Stand Base ...

Страница 14: ...o the Stand Base by turn ing the screw to the left Turn the stand base lock through 90 to separate the stand base from the stand body Pushing Latch inside Take the stand base from stand body Latch O P E N O P E N O P E N O P E N O P E N O P E N O P E N O P E N O P E N O P E N O P E N O P E N O P E N O P E N O P E N O P E N O P E N O P E N O P E N O P E N O P E N O P E N O P E N O P E N O P E N Sta...

Страница 15: ...mage shown may be somewhat different from your set M2762A 1 2 3 Place the set screen side down on a cushion or soft cloth Detach the stand base from the set by turning the screw to the left with a Coin Pull the Stand base Coin Stand Base ...

Страница 16: ...2762A The image shown may be somewhat different from your set Remove the Stand Body in the same way as the following when using it as a Wall Hook 1 Remove the screw 4 point 2 Pull the stand body M2062A M2262A M2362A M2762A 1 Remove the screw 2 point 2 Pull the stand body ...

Страница 17: ...nded might damage the product 3 Using screws that do not meet VESA standards might either damage the product or result in it coming away from the wall We will not be held responsible for any damage resulting from failure to follow these instructions 4 VESA compatible only with respect to screw mounting interface dimensions and mounting screw speci fications 5 Please use VESA standard as below 5 1 ...

Страница 18: ...or proper ventilation allow a clearance of 10 cm on each side and from the wall The image shown may be somewhat different from your set INPUT MENU VOL CH ENTER 10 cm 10 cm 10 cm 10 cm 10 cm 10 cm 10 cm 10 cm M2062A M2262A M2362A M2762A M197WAP M227WAP M237WAP ...

Страница 19: ...n adjust the set manually to the left or right direction by 179 degrees to suit your viewing position 179 179 M2062A M2262A M2362A M2762A M197WAP M227WAP M237WAP POSITIONING YOUR DISPLAY 5 5 15 15 The image shown may be somewhat different from your set Adjust the position of the panel in various ways for maximum comfort Tilt range ...

Страница 20: ...cessary vibration moisture dust or heat Also ensure that the set is placed in a position to allow a free flow of air Do not cover the ventilation openings on the back cover When adjusting the angle of the screen do not put your finger s in between the head of the monitor and the stand body You can hurt your finger s WARNING M2062A M2262A M2362A M2762A M197WAP M227WAP M237WAP ...

Страница 21: ...bolts and tighten them securely in the upper holes Secure the wall brackets with the bolts sold separately to the wall Match the height of the bracket that is mounted on the wall to the holes in the product Ensure the eye bolts or brackets are tightened securely Use a sturdy rope or cord sold separately to tie the product It is safer to tie the rope so it becomes horizon tal between the wall and t...

Страница 22: ...ging the product Use only an attached screw 1 Screw provided as parts of the product Stand Desk ATTACHING THE TV TO A DESK Only M2762A Image shown may differ from your set WARNING To prevent TV from falling over the TV should be securely attached to the floor wall per installation instructions Tipping shaking or rocking the machine may cause injury ...

Страница 23: ...ems for expensive electronic equipment such as notebook PCs and LCD projectors NOTE The Kensington Security System is an optional accessory NOTES a If the product feels cold to the touch there may be a small flicker when it is turned on This is normal there is nothing wrong with product b Some minute dot defects may be visible on the screen appearing as tiny red green or blue spots However they ha...

Страница 24: ...AUDIO MONO AUDIO Y PB PR L R HDMI IN AC IN ANTENNA CABLE IN L R RGB IN PC COMPONENT IN AV IN AUDIO IN RGB VIDEO VIDEO AUDIO MONO AUDIO Y PB PR L R HDMI IN AC IN ANTENNA CABLE IN L R RGB IN PC COMPONENT IN AV IN Multi family Dwellings Apartments Connect to wall antenna socket Wall Antenna Socket Outdoor Antenna Antenna Signal Amplifier UHF VHF Single family Dwellings Houses Connect to wall jack for...

Страница 25: ...he audio output of the digital set top box to the COMPONENT IN AUDIO jacks on the SET Turn on the digital set top box Refer to the owner s manual for the digital set top box Select COMPONENT input source using the INPUT button on the remote control 1 2 3 4 AUDIO IN RGB VIDEO VIDEO AUDIO MONO AUDIO Y PB PR L R HDMI IN ANTENNA CABLE IN L R RGB IN PC COMPONENT IN AV IN AUDIO IN RGB VIDEO AUDIO MONO L...

Страница 26: ...UDIO Y PB PR L R HDMI IN ANTENNA CABLE IN COMPONENT IN RGB IN PC Signal HDMI 480p 576p O 720p O 1080i 1080p O NOTE SET can receive the video and audio signal simultane ously with using a HDMI cable If the digital set top box supports Auto HDMI function the output resolution of the source device will be automatically SET to 1920 x 1080p If the digital set top box player does not supportAuto HDMI yo...

Страница 27: ...utton on the remote control Refer to the DVD player s manual for operating instructions AUDIO IN RGB VIDEO VIDEO AUDIO MONO AUDIO Y PB PR L R HDMI IN ANTENNA CABLE IN L R RGB IN PC COMPONENT IN AV IN AUDIO IN RGB VIDEO AUDIO MONO L R AV IN VIDEO AUDIO Y PB PR L R HDMI IN ANTENNA CABLE IN COMPONENT IN RGB IN PC Component Input ports To achieve better picture quality connect a DVD player to the comp...

Страница 28: ...PB PR L R HDMI IN ANTENNA CABLE IN COMPONENT IN RGB IN PC NOTE SET can receive the video and audio signal simultane ously with using a HDMI cable If the digital set top box supports Auto HDMI function the output resolution of the source device will be automatically SET to 1920 x 1080p If the digital set top box player does not supportAuto HDMI you need to SET the output resolution appropriately To...

Страница 29: ... remote control Connect the ANT OUT socket of the VCR to the ANTENNA IN socket on the SET Connect the antenna cable to the ANT IN socket of the VCR Press the PLAY button on the VCR and match the appropriate programme between the SET and VCR for viewing 1 1 2 2 3 3 VCR SETUP Connecting with a RF cable To avoid picture noise interference allow adequate distance between the VCR and SET HDMI IN AUDIO ...

Страница 30: ...ght red Select AV input source using the INPUT button on the remote control If connected to AV IN select AV input source Operate the corresponding external equipment Refer to external equipment operating guide 1 2 3 OTHER A V SOURCE SETUP HDMI IN AUDIO IN RGB VIDEO AUDIO Y PB PR L R COMPONENT IN RGB IN PC ANTENNA CABLE IN VIDEO AUDIO MONO L R AV IN L R VIDEO Camcorder Video Game Set ...

Страница 31: ...IO IN RGB sockets of the set Press the INPUT button to select RGB PC Switch on the PC and the PC screen appears on the set The set can be operated as a PC monitor 1 2 3 4 HDMI IN VIDEO AUDIO MONO L R AV IN VIDEO AUDIO Y PB PR L R COMPONENT IN ANTENNA CABLE IN RGB IN PC AUDIO IN RGB RGB OUTPUT AUDIO Connect the signal input cable and tighten the screws by turn ing them clockwise NOTE User must use ...

Страница 32: ...XTERNAL EQUIPMENT SETUP EXTERNAL EQUIPMENT SETUP BACK COVER FOR WIRE ARRANGEMENT Tie cables together with a cable management as shown in the illustration M237WAP M2062A M2262A M2362A M2762A M197WAP M227WAP ...

Страница 33: ...quency kHz Vertical Frequency Hz 640 x 480 31 469 59 94 800 x 600 37 879 60 317 1024 x 768 48 363 60 0 1152 x 864 54 34 60 05 1280 x 960 60 60 1280 x 1024 63 981 60 02 1680 x 1050 64 674 59 883 1680 x 1050 65 290 59 954 1920 x 1080 67 5 60 Resolution Horizontal Frequency kHz Vertical Frequency Hz 720 x 480 31 47 59 94 720 x 480 31 50 60 00 720 x 576 31 25 50 00 1280 x 720 44 96 59 94 1280 x 720 45...

Страница 34: ...OSD will appear on screen as shown Press the button and then OK button to select the desired input source MUTE PSM SSM I II Switches the sound on or off Recalls your preferred picture setting Recalls your preferred sound setting Selects the sound output p 60 0 9 number button LIST Q VIEW Selects a programme Selects numbered items in a menu Displays the programme table Returns to the previously vie...

Страница 35: ...loured buttons TELETEXT BUTTONS These buttons are used for teletext on TELETEXT models only or Programme edit These buttons are used for teletext For further details see the Teletext section p 72 Installing Batteries Open the battery compartment cover on the back side and install the batteries matching correct polarity with with Install two 1 5 V AAA batteries Don t mix old or used batteries with ...

Страница 36: ... remote control and the SET will switch on If the OSD On Screen Display is displayed on the screen after turning on the SET you can adjust the Language Auto Tuning Note a It will automatically disappear after approx 40 seconds unless a button is pressed b If you close without completing the initial setting the Instal lation Guide menu can be displayed again Press the or NUMBER buttons to select a ...

Страница 37: ...ENU OK MENU OK MENU OK MENU Auto Tuning Manual Tuning Programme Edit Favourite Programme Sound Mode Treble 50 Bass 50 Reset Auto Volume Balance 0 Aspect Ratio Picture Mode Backlight 100 Contrast 100 Brightness 50 Sharpness 70 Colour 70 Tint 0 Language Key Lock DDC CI Power Indicator Mode Setting Factory Reset Clock Off Time On Time Sleep Timer Auto Sleep Option Picture Audio Time NOTE The OSD On S...

Страница 38: ...BG PAL B G SECAM B G Asia NewZealand M East Africa I PAL I South Africa Hong Kong DK PAL D K SECAM D K China Africa CIS M Philippines Press the button to select Storage From Press the button or NUMBER buttons to select the initial programme number Press the button to select Search Press the button to begin auto tuning All receivable stations are stored To stop auto tuning press the MENU button Whe...

Страница 39: ... to select Band Press the button and then button to select V UHF or Cable Press the button to select Channel Press the button and then You can select the desired programme number with the button or NUMBER buttons If possible select the programme number directly with the number buttons Press the button to select Search Press the button to commence searching If a station is found the search will sto...

Страница 40: ...utton and then button to select Fine Press the button and then button to fine tune for the best picture and sound Press the OK button to store it Press the MENU button to move to the previous menu screen 1 2 3 4 5 6 1 Setup OK MENU Auto Tuning Manual Tuning Programme Edit Favourite Programme 2 Setup OK MENU Auto Tuning Manual Tuning Programme Edit Favourite Programme To Set Manual Tuning 5 4 3 Man...

Страница 41: ...button You can use a blank the number 0 to 9 and the alphabet A to Z Press the button to select the position and make your choice of the second character and so on Press the OK button to store it Press the MENU button to move to the previous menu screen 1 2 3 4 5 7 6 1 Setup OK MENU Auto Tuning Manual Tuning Programme Edit Favourite Programme 2 Setup OK MENU Auto Tuning Manual Tuning Programme Edi...

Страница 42: ...ith the button 4 Press the Green button again to release this function Skipping a programme number 1 Select a programme number to be skipped with the button 2 Press the BLUE button The skipped programme turns to blue 3 Press the BLUE button again to release the skipped programme When a programme number is skipped it means that you will be unable to select it using the button during normal TV viewi...

Страница 43: ...n Press the button to select Select a desired programme with the button or NUMBER buttons To store another programme repeat steps 4 to 5 You can store up to 8 programmes Press the MENU button to move to the previous menu screen 1 2 3 4 5 7 6 1 Setup OK MENU Auto Tuning Manual Tuning Programme Edit Favourite Programme 5 3 4 2 Setup OK MENU Auto Tuning Manual Tuning Programme Edit Favourite Programm...

Страница 44: ...th the button Then press the OK button The TV switches to the chosen programme number Paging through a Programme List There are 20 programme table pages in which contain 200 pro grammes Pressing the button repeatedly turns the pages Press the LIST button to return to normal TV viewing NOTE a You may find some blue programmes They have been set up to be skipped by auto programming or in the pro gra...

Страница 45: ...u to view a picture with an original 4 3 aspect ration black bars will appear on both the left and right of the screen 14 9 You can view a picture format of 14 9 or a general TV programme in the 14 9 mode The 14 9 screen is viewed in the same way as in 4 3 but is magnified to the left and right Zoom 1 The following selection will allow you to view the picture without any alteration while filling t...

Страница 46: ...o Picture Mode Backlight 100 Contrast 100 Brightness 50 Sharpness 70 Colour 70 Tint 0 Aspect Ratio Picture Mode Backlight 100 Contrast 100 Brightness 50 Sharpness 70 Colour 70 Tint 0 Picture Picture Press the MENU button and then button to select the Picture menu Press the button and then button to select Picture Mode Press the button and then button to select Vivid Standard Cinema or sRGB Press t...

Страница 47: ...ss 70 Colour 70 Tint 0 Picture Press the MENU button and then button to select the Picture menu Press the button and then button to select Picture Mode Press the button and then button to select Vivid Standard Cinema or sRGB Press the OK button and then button to select the desired picture option Backlight Contrast Brightness Sharpness Colour and Tint Press the button to make appropriate adjust me...

Страница 48: ...ect Advanced Press the button and then button to select DynamicContrast DynamicColour NoiseReduction Black Level Film Mode or Colour Temperature Press the MENU button to move to the previous menu screen 1 2 3 4 OK MENU Picture Mode Backlight 100 Contrast 100 Brightness 50 Sharpness 70 Colour 70 Tint 0 Advanced Picture 1 OK MENU OK MENU Picture Mode Backlight 100 Contrast 100 Brightness 50 Sharpnes...

Страница 49: ...Low High Reduces screen noise without compromising video quality Black Level Low High Low The reflection of the screen gets darker High The reflection of the screen gets brighter Set black level of the screen to proper level This function enables to select Low or High in the following mode RF AV Component or HDMI Film Mode On Off Makes video clips recorded in film look more natural This feature op...

Страница 50: ...utton and then button to select Picture Reset Press the button to initialize the adjusted value Press the MENU button to move to the previous menu screen 1 2 3 4 OK MENU Backlight 100 Contrast 100 Brightness 50 Sharpness 70 Colour 70 Tint 0 Advanced Picture Reset Picture 1 3 2 OK MENU Backlight 100 Contrast 100 Brightness 50 Sharpness 70 Colour 70 Tint 0 Advanced Picture Reset Picture Picture Rese...

Страница 51: ...ess AUTO CONFIGURE RGB PC mode only Press the MENU button and then use button to select the Picture menu Press the button and then use button to select Screen Press the button and then use button to select Auto Config Press the OK button Press the MENU button to move to the previous menu screen 1 2 3 4 5 OK MENU Aspect Ratio Picture Mode Backlight 100 Contrast 100 Brightness 50 Sharpness 70 Colour...

Страница 52: ... Config Press the button and then use button to select Phase Clock H Position or V Position When the H Position and V Position be changed Value may differ from the aspect ratio Press the button to make appropriate adjust ments Press the MENU button to move to the previous menu screen 1 2 3 4 5 6 OK MENU Aspect Ratio Picture Mode Backlight 100 Contrast 100 Brightness 50 Sharpness 70 Colour 70 Tint ...

Страница 53: ...s the button and then use button to select Screen Press the button and then use button to select Reset Press the button Press the MENU button to move to the previous menu screen 1 2 3 4 5 OK MENU Aspect Ratio Picture Mode Backlight 100 Contrast 100 Brightness 50 Sharpness 70 Colour 70 Tint 0 Picture 1 4 2 3 OK MENU OK MENU Contrast 100 Brightness 50 Sharpness 70 Colour 70 Tint 0 Advanced Picture R...

Страница 54: ...on Press the MENU button to move to the previous menu screen 1 2 3 4 OK MENU Aspect Ratio Picture Mode Backlight 100 Contrast 100 Brightness 50 Sharpness 70 Colour 70 Tint 0 Picture 1 2 3 OK MENU OK MENU OK MENU Contrast 100 Brightness 50 Sharpness 70 Colour 70 Tint 0 Advanced Picture Reset Screen Auto config Manual Config Resolution Reset Auto config Manual Config Resolution Reset Picture Screen ...

Страница 55: ...c and Cinema are preset for optimum sound quality at the factory Press the MENU button and then button to select the Audio menu Press the button and then button to select Sound Mode Press the button and then button to select Standard Music or Cinema Press the MENU button to move to the previous menu screen 1 2 3 4 OK MENU OK MENU Sound Mode Treble 50 Bass 50 Reset Auto Volume Balance 0 Sound Mode ...

Страница 56: ...d then button to select Standard Music or Cinema Press the OK button and then button to select Treble or Bass Press the button to make appropriate adjustments Press the MENU button to move to the previous menu screen 1 2 3 4 5 6 OK MENU OK MENU Sound Mode Treble 50 Bass 50 Reset Auto Volume Balance 0 Sound Mode Treble 50 Bass 50 Reset Auto Volume Balance 0 Audio Audio Treble Standard To set 1 5 3 ...

Страница 57: ...o select the Audio menu Press the button and then button to select Auto Volume Press the button and then button to select On or Off Press the MENU button to move to the previous menu screen 1 2 3 4 OK MENU OK MENU Sound Mode Treble 50 Bass 50 Reset Auto Volume Balance 0 Sound Mode Treble 50 Bass 50 Reset Auto Volume Balance 0 Audio Audio Auto Volume Off On 1 3 2 ...

Страница 58: ...ect the Audio menu Press the button and then button to select Auto Balance Press the button and then button to make desired adjustment Press the MENU button to move to the previous menu screen 1 2 3 4 OK MENU OK MENU Sound Mode Treble 50 Bass 50 Reset Auto Volume Balance 0 Sound Mode Treble 50 Bass 50 Reset Auto Volume Balance 0 Audio Audio Balance 0 1 3 2 ...

Страница 59: ...n to select the Audio menu Press the button and then button to select Reset Press the button or OK button Press the MENU button to move to the previous menu screen 1 2 3 4 OK MENU OK MENU Sound Mode Treble 50 Bass 50 Reset Auto Volume Balance 0 Sound Mode Treble 50 Bass 50 Reset Auto Volume Balance 0 Audio Audio Reset 1 3 2 Standard To set ...

Страница 60: ...to stereo Language selection for dual language broadcast If a programme can be received in two languages dual language you can switch to DUAL I DUAL II or DUAL I II DUAL I Sends the primary broadcast language to the loudspeakers DUAL I I Sends the secondary broadcast language to the loudspeakers DUAL I I I Sends a separate language to each loudspeaker Press the I II button to select the Multi Audi...

Страница 61: ...rom audio L input is sent to the left loudspeaker and audio signal from audio R input is sent to the right loudspeaker L L Audio signal from audio L input is sent to left and right loudspeakers R R Audio signal from audio R input is sent to left and right loudspeakers When NICAM MONO is received you can select NICAM MONO or MONO When NICAM STEREO is received you can select NICAM STEREO or MONO If ...

Страница 62: ... then button to select the Time menu Press the button and then button to select Clock Press the button and then button to set the hour Press the button and then button to set the min ute Press the MENU button to move to the previous menu screen 1 2 3 4 5 OK MENU OK MENU Clock Off Time On Time Sleep Timer Auto Sleep Clock Off Time On Time Sleep Timer Auto Sleep Time Time Clock 1 3 3 2 1 3 4 2 62 TI...

Страница 63: ...utton and then button to select the Time menu Press the button and then button to select On Off Time To cancel On Off Time function select Off Press the button and then button to set the hour Press the button and then button to set the minutes For On Time function only PR Press the button and then button to select the programme Vol Press the button and then button to adjust volume level at switch ...

Страница 64: ...ress the MENU button and then but ton to select the Time menu Press the button and then button to select Sleep Timer Press the button and then button to set the minute Off 10 20 30 60 90 120 180 or 240 Press the MENU button to move to the previous menu screen 1 2 3 4 OK MENU OK MENU Clock Off Time On Time Sleep Timer Auto Sleep Clock Off Time On Time Sleep Timer Auto Sleep Time Time Sleep Timer Of...

Страница 65: ...utes Press the MENU button and then but ton to select the Time menu Press the button and then button to select Auto Sleep Press the button and then button to select On or Off 1 2 3 OK MENU OK MENU Clock Off Time On Time Sleep Timer Auto Sleep Clock Off Time On Time Sleep Timer Auto Sleep Time Time Auto Sleep Off On 1 3 2 1 3 2 ...

Страница 66: ...Press the MENU button and then use button to select the Option menu Press the button and then use button to select Language Press the button and then use button to select your desired language Press the OK button Press the MENU button to move to the previous menu screen 1 2 3 4 5 ON SCREEN MENU LANGUAGE SELECTION The menus can be shown on the screen in the selected language 1 2 66 OPTION SETTING ...

Страница 67: ...y Lock Press the button and then button to select On or Off Press the MENU button to move to the previous menu screen 1 2 3 4 Language Key Lock DDC CI Power Indicator Mode Setting Factory Reset Language Key Lock DDC CI Power Indicator Mode Setting Factory Reset Option Option OK MENU OK MENU Off On Key Lock NOTE In Key Lock On if the TV is turned off press the ꔰ I button on the SET or POWER buttons...

Страница 68: ...CI is ON and when DDC CI is OFF set cannot be adjusted with PC because communication between PC and set is discon nected Press the MENU button and then button to select the Option menu Press the button and then button to select DDC CI Press the button and then button to select On or Off Press the MENU button to move to the previous menu screen 1 2 3 4 Language Key Lock DDC CI Power Indicator Mode ...

Страница 69: ...the button and then button to select On or Off Press the MENU button to move to the previous menu screen 1 2 3 4 1 2 OK MENU OK MENU Language Key Lock DDC CI Power Indicator Mode Setting Factory Reset Language Key Lock DDC CI Power Indicator Mode Setting Factory Reset Option Option Power Indicator It is function to control of LED turn on off 1 2 3 4 Option Off On ...

Страница 70: ...to select Mode Setting Press the button and then button to select Store Demo or Home Use Press the MENU button to move to the previous menu screen 1 2 3 4 Language Key Lock DDC CI Power Indicator Mode Setting Factory Reset Language Key Lock DDC CI Power Indicator Mode Setting Factory Reset Option Option OK MENU To set Mode Stting 1 2 3 Mode Setting Choose the setting mode you want Select Home Use ...

Страница 71: ... button and then button to select the Option menu Press the button and then button to select Factory Reset Press the button and then button to select Yes or No Press the MENU button to move to the previous menu screen 1 2 3 4 Language Key Lock DDC CI Power Indicator Mode Setting Factory Reset Language Key Lock DDC CI Power Indicator Mode Setting Factory Reset Option Option OK MENU To set Factory R...

Страница 72: ...appears Page selection Enter the desired page number as a three digit number with the NUMBER buttons If during selection you press a wrong number you must complete the three digit number and then re enter the correct page number The button can be used to select the preceding or following page Programming a colour button in LIST mode If the SET is in SIMPLE text TOP text or FASTEXT mode press the M...

Страница 73: ...e previous selection Alternatively the button can be used Direct page selection As with SIMPLE teletext mode you can select a page by entering it as a three digit number using the NUMBER buttons in TOP mode The teletext pages are colour coded along the bottom of the screen and are selected by pressing the cor responding coloured button Page selection Press the i button to select the index page You...

Страница 74: ...w teletext page The display will appear at the top left hand corner of the screen When the updated page is available then display will change to the page number Press this button again to view the updated teletext page ꕌREVEAL Press this button to display concealed information such as solutions to riddles or puzzles Press this button again to remove the information from the display ꕉINDEX Select t...

Страница 75: ...ion Test the mains outlet by plugging another SET into the same outlet Picture appears slowly after switching on This is normal the image is muted during the SET startup process Please contact your service center if the picture has not appeared after five minutes No or poor colour or poor picture Adjust Colour in menu option Allow a sufficient distance between the SET and the VCR Try another chann...

Страница 76: ...e may result in an unusu al noise when the TV is switched on or off and does not indicate a fault with the TV Picture ok No sound Check whether volume is 0 Check sound muted HDMI cable installed properly Head phone cable installed properly Check sound format Not supply to bitstream and compressed sound format NO image appear Do you see an OUT OF RANGE message on the screen This message appears whe...

Страница 77: ... and a little fabric softener or dish washing detergent Wring the cloth until it s almost dry and then use it to wipe the screen Ensure there is no excess water on the screen Allow any water or dampness to evaporate before switching on Cleaning the Cabinet To remove dirt or dust wipe the cabinet with a soft dry lint free cloth Do not to use a wet cloth Extended Absence 1 2 CAUTION If you expect to...

Страница 78: ...z Horizontal Frequency 30 kHz to 61 kHz Vertical Frequency 56 Hz to 61 Hz Synchronization Type Separate Sync Input Connector CVBS TV D Sub Analog HDMI PC Audio In component Power Rated Voltage AC 100 240 V 50 60 Hz 0 6 A Power Consumption On Mode 25 W typ Sleep Mode 1 W RGB Off Mode 0 5 W Tilt Tilt Range 5 to 15 Dimensions Width x Height x Depth Weight 454 7 mm x 362 8 mm x 193 2 mm 17 90 inch x 1...

Страница 79: ... kHz to 69 kHz Vertical Frequency 56 Hz to 61 Hz Synchronization Type Separate Sync Input Connector CVBS TV D Sub Analog HDMI PC Audio In component Power Rated Voltage AC 100 240 V 50 60 Hz 0 9 A Power Consumption On Mode 45 W typ Sleep Mode 1 W RGB Off Mode 0 5 W Tilt Tilt Range 5 to 15 Dimensions Width x Height x Depth Weight 519 8 mm x 400 5 mm x 193 2 mm 20 46 inch x 15 77 inch x 7 61 inch 4 5...

Страница 80: ... 30 kHz to 69 kHz Vertical Frequency 56 Hz to 61 Hz Synchronization Type Separate Sync Input Connector CVBS TV D Sub Analog HDMI PC Audio In component Power Rated Voltage AC 100 240 V 50 60 Hz 1 0 A Power Consumption On Mode 50 W typ Sleep Mode 1 W RGB Off Mode 0 5 W Tilt Tilt Range 5 to 15 Dimensions Width x Height x Depth Weight 560 8 mm x 427 mm x 193 2 mm 20 08 inch x 16 81 inch x 7 61 inch 5 ...

Страница 81: ...kHz to 69 kHz Vertical Frequency 56 Hz to 61 Hz Synchronization Type Separate Sync Input Connector CVBS TV D Sub Analog HDMI PC Audio In component Power Rated Voltage AC 100 240 V 50 60 Hz 0 9 A Power Consumption On Mode 42W typ Sleep Mode 1 W RGB Off Mode 0 5 W Tilt Tilt Range 5 to 15 Dimensions Width x Height x Depth Weight 482 3 mm x 384 2 mm x 221 6 mm 18 98 inch x 15 12 inch x 8 72 inch 4 6 k...

Страница 82: ... 1080 60 Hz Horizontal Frequency 30 kHz to 69 kHz Vertical Frequency 56 Hz to 61 Hz Synchronization Type Separate Sync Input Connector CVBS TV D Sub Analog HDMI PC Audio In component Power Rated Voltage AC 100 240 V 50 60 Hz 1 2 A Power Consumption On Mode 45 W typ Sleep Mode 1 W RGB Off Mode 0 5 W Tilt Tilt Range 5 to 15 Dimensions Width x Height x Depth Weight 517 2 mm x 399 8 mm x 221 6 mm 20 3...

Страница 83: ...0 Hz Horizontal Frequency 30 kHz to 69 kHz Vertical Frequency 56 Hz to 61 Hz Synchronization Type Separate Sync Input Connector CVBS TV D Sub Analog HDMI PC Audio In component Power Rated Voltage AC 100 240 V 50 60 Hz 1 2 A Power Consumption On Mode 50 W typ Sleep Mode 1 W RGB Off Mode 0 5 W Tilt Tilt Range 5 to 15 Dimensions Width x Height x Depth Weight 551 8 mm x 419 5 mm x 221 6 mm 21 72 inch ...

Страница 84: ...9 kHz Vertical Frequency 56 Hz to 61 Hz Synchronization Type Separate Sync Input Connector CVBS TV D Sub Analog HDMI PC Audio In component Power Rated Voltage AC 100 240 V 50 60 Hz 1 2 A Power Consumption On Mode 60 W typ Sleep Mode 1 W RGB Off Mode 0 5 W Tilt Tilt Range 5 to 15 Swivel Swivel Range 358 Dimensions Width x Height x Depth Weight 649 1 mm x 485 mm x 210 mm 25 56 inch x 19 09 inch x 8 ...

Страница 85: ......

Страница 86: ...s before using the product Keep the Owner s Manual CD in an accessible place for future reference The model and serial number of the SET is located on the back and one side of the SET Record it below should you ever need service MODEL SERIAL ...

Отзывы: