background image

14

Connecting to External Devices

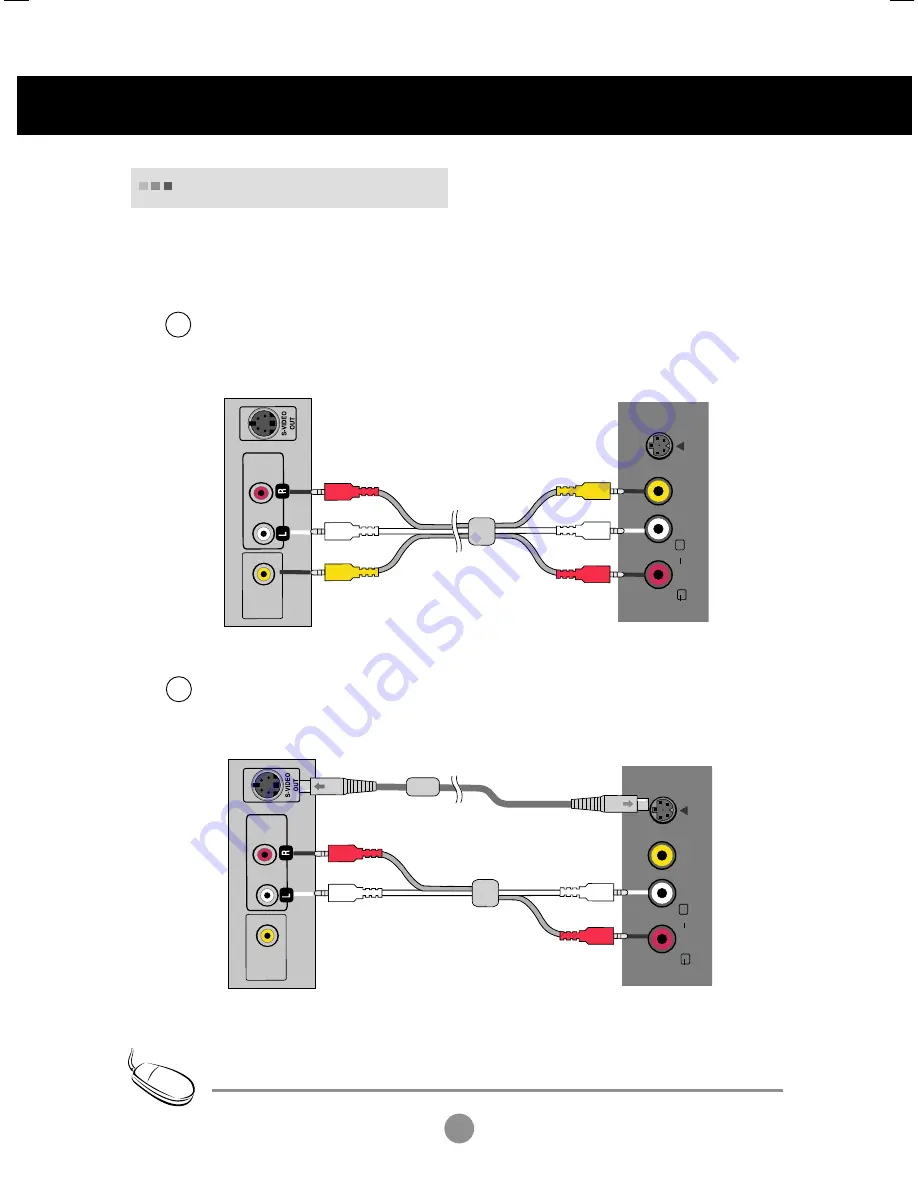
When using the RCA cable.

• 

Connect the input terminal with a proper colour match.

When using the S-Video cable.

• 

Connect to the S-Video input terminal to watch high image quality movies.

VIDEO

AUDIO

(MONO)

S-VIDEO

L

R

VIDEO

OUT

AUDIO

OUT

Connect the video/audio cable as shown in the figure below and then connect the power
cord (See page 13).

Connecting to VCR/DVD

B

A

S-Video Cable

VCR/DVD

Rear side of the Product

(Not included)

1.

• In case the RCA cable is connected simultaneously as S-Video cable is connected, S-Video cable is first.

Note

RCA Cable

(Not included)

VIDEO

AUDIO

(MONO)

S-VIDEO

L

R

VIDEO

OUT

AUDIO

OUT

VCR/DVD

Rear side of the Product

RCA Cable

(Not included)

Содержание M197WA

Страница 1: ... Precautions before using the product Keep the User s Guide CD in an accessible place for furture reference See the label attached on the product and give the information to your dealer when you ask for service M197WA User s Guide ...

Страница 2: ...stem and other attached devices is turned off 1 2 3 Carefully place the product screen side down on a cushioned surface that will protect product and screen from damage Insert the stand base into the product Attach the monitor to the Stand Base by turning the screw to the right Turn the screw by using the screw handle Screw ...

Страница 3: ...e that the power supply the computer system and other attached devices is turned off 1 2 3 Place the set screen side down on a cushion or soft cloth Detach the monitor to the Stand Base by turning the screw to the left Turn the screw by using the screw handle 4 Pull the stand base 5 ...

Страница 4: ... Adjust the position of the panel in various ways for maximum comfort Tilt Range Warning When adjusting the angle of the screen do not put your finger s in between the head of the monitor and the stand body You can hurt your finger s Locking Device Use this locking cable This has to be purchased separately if required to prevent theft Theft prevention locking device 6 2 12 18 ...

Страница 5: ...For proper ventilation allow a clearance of 4 inches on each side and from the wall Detailed installation instructions are available from your dealer see the optional Tilt Wall Mounting Bracket Installation and Setup Guide 4 inches 4 inches 4 inches 4 inches 4 inches ...

Страница 6: ...tereo sound signals with stereo or Nicam stereo transmission select mono reception Each time you press the Input button it will change to TV AV Component RGB DVI HDMI If nothing is inputted for several seconds the screen will automatically move to the selected menu Number buttons Able to directly select and change channel MUTE Switches the sound on or off PSM Picture Status Memory Button Press rep...

Страница 7: ...r the left and right loudspeakers Repeatedly press the I II button to select the sound output L R Audio signal from audio L input is sent to left loud speaker and audio signal from audio R input is sent to right loud speaker L L Audio signal from audio L input is sent to left and right loud speakers R R Audio signal from audio R input is sent to left and right loud speakers POWER INPUT PR PR OK MU...

Страница 8: ...isplay menu SLEEP SLEEP Timer You can set a time period after which the TV AV RGB Component DVI HDMI should switch itself to standby Press the key repeatedly to select the number of minutes ARC To select the image size of the screen When TV AV mode Spectacle Original 4 3 16 9 14 9 Zoom1 Zoom2 When RGB DVI HDMI Component mode 4 3 16 9 10 20 30 60 240 180 120 90 _ _ _ off PR PR OK MENU SLEEP UPDATE ...

Страница 9: ... of the screen To hold or change the sub page press the RED GREEN or NUMBER buttons Press again to exit this function Remote Control Using the Teletext function If you don t the teletext may not appear correctly on the screen PR PR OK LIST MENU Q VIEW SLEEP UPDATE SIZE HOLD INDEX TEXT TIME MIX REVEAL MODE VOL VOL M X i ARC Name and Function of the Parts Yellow key Favourite Program On Rotate favou...

Страница 10: ... mode UPDATE Press the button to appear the TV programme At the top of screen indicates that you are still in the teletext mode Before interrupting teletext you may select a page number When the page has been found the information line appears briefly on your screen Press the button again to reappear teletext Remote Control Using the Teletext function Name and Function of the Parts MENU SLEEP UPDA...

Страница 11: ... PR L R DVI D IN PC HDMI IN AC IN ANTENNA CABLE IN L R RGB IN PC AC IN Power Connector Connect the power cord HDMI Digital Signal Connector RGB DVI Sound Jack Connect to the jack in the PC sound card Component Input Terminal AV Input Terminal DVI Digital Signal Connector D Sub Analog Signal Connector TV Tuner Jack Connect the antenna ...

Страница 12: ...11 Name and Function of the Parts AV Input Terminal VIDEO AUDIO MONO S VIDEO L R Audio Input Terminal Video Input Terminal S Video Input Terminal ...

Страница 13: ...e of the product Connect the audio cable Make sure to check the sound card connection terminal in the PC before connecting to the product If the PC sound card supports both Speaker Out and Line Out change it to Line Out by setting the jumper or the PC application For more details refer to the sound card user s guide Speaker Out The terminal connected to the speaker that is not equipped with an amp...

Страница 14: ...ANTENNA CABLE IN L R RGB IN PC 3 4 5 INPUT OK Each time you press the Input button it will change to TV AV Component RGB DVI HDMI If nothing is inputted for several seconds the screen will automatically move to the selected menu INPUT OK Connecting to External Devices Input TV AV Component RGB DVI HDMI OK A B Select DVI Input TV AV Component RGB DVI HDMI OK PC Mode Preset Mode Preset mode Horizont...

Страница 15: ...IDEO OUT AUDIO OUT Connect the video audio cable as shown in the figure below and then connect the power cord See page 13 Connecting to VCR DVD B A S Video Cable VCR DVD Rear side of the Product Not included 1 In case the RCA cable is connected simultaneously as S Video cable is connected S Video cable is first Note RCA Cable Not included VIDEO AUDIO MONO S VIDEO L R VIDEO OUT AUDIO OUT VCR DVD Re...

Страница 16: ... connecting with a RCA cable Select AV When connecting with a S Video cable Select AV B A 2 INPUT OK INPUT OK Connecting to External Devices Input TV AV Component RGB DVI HDMI OK Each time you press the Input button it will change to TV AV Component RGB DVI HDMI If nothing is inputted for several seconds the screen will automatically move to the selected menu ...

Страница 17: ... 480i 576i Set top Box DVD Connect the input terminal with a proper colour match 1 Audio Cable Not included Select an input signal Press the INPUT button on the remote control to select the input signal Or press the INPUT button at the top side of the product Select Component 2 INPUT OK INPUT OK Input TV AV Component RGB DVI HDMI OK Each time you press the Input button it will change to TV AV Comp...

Страница 18: ...ally move to the selected menu HDMI OUTPUT HDMI IN DVI OUTPUT AUDIO R L AUDIO IN RGB DVI HDMI IN Rear side of the Product Rear side of the Product Set top Box DVD Set top Box DVD HDMI cable not included HDMI to DVI cable not included RCA Stereo cable not included Select HDMI HDMI Input does not support PC mode If it is connected PC the screen may not be displayed properly Note DTV Timming Preset m...

Страница 19: ...PUT button at the top side of the product Select TV AUDIO IN RGB DVI VIDEO COMPONENT IN AV IN VIDEO AUDIO MONO S VIDEO AUDIO Y PB PR L R DVI D IN PC HDMI AC IN AC IN ANTENNA CABLE IN L R RGB IN PC ANTENNA CABLE IN 1 2 INPUT OK INPUT OK Connecting to External Devices Input TV AV Component RGB DVI HDMI OK Each time you press the Input button it will change to TV AV Component RGB DVI HDMI If nothing ...

Страница 20: ...19 To arrange cables using cable management 1 Tie cables together with a cable management as shown in the illustration Cable management ...

Страница 21: ...creen Volume 30 Use this button to turn the product on and off Power Button INPUT MENU VOL PR OK OK Button OK button is usually used in choosing the MENU When there is no MENU on the screen pushing the OK button will give the information about the current input source Power Indicator This Indicator lights up blue when the display operates normally On Mode If the display is in Sleep Energy Saving M...

Страница 22: ...I Digital signal HDMI HDMI Digital signal INPUT Button Each time you press the Input button it will change to TV AV Component RGB DVI HDMI If nothing is inputted for several seconds the screen will automatically move to the selected menu Input TV AV Component RGB DVI HDMI OK Use this button to show hide the OSD On Screen Display menu screen MENU Button ...

Страница 23: ... presentation Note OSD On Screen Display Menu Icon Function Description Station Picture Sound Time Adjusting the time function Adjusting the screen function Adjusting the sound function Adjusting the picture function Set Select the channel when using the TV Special Selecting the special function Screen Adjusting the Screen ...

Страница 24: ...ress the OK Button Use the Buttons to adjust the item to the desired level Accept the changes by pressing the OK Button Exit the OSD by pressing the MENU Button repeatedly 1 2 3 4 5 6 Use the remote control to adjust the OSD screen Pop up the menu screen Move where you want to adjust Select a menu icon Adjust the status Save adjustment Exit from the menu screen MENU MENU PR PR OK VOL VOL PR PR OK ...

Страница 25: ... stored automatically To stop auto programming press the MENU button When auto programming is completed the programme list menu appears System Storage from Search Autoprogramme Press the buttons to select the channel number or enter the programme number with the number buttons in where you want to store channel Press the buttons to select the TV system of the country or part of the world from wher...

Страница 26: ...n blue Delete Copy Move Skip Press the buttons to select VHF UHF for aerial channels or Cable for cable channels To select the channel reception type VHF UHF Cable If you know the channel number enter it directly with the digit buttons 0 to 9 In case of poor reception you can improve the reception by fine tuning Use the buttons to fine tune for the best picture and sound Use the buttons to search ...

Страница 27: ...lect a channel Yellow key remote control Favourite Program On Rotate favourite channel Favourite Program Off To display the previously selected TV channel Adjusting the Screen Station OK MENU Auto programme Manual programme Programme edit Favourite programme Off _ _ _ _ _ _ _ _ _ _ _ _ _ _ _ _ _ _ _ _ _ _ _ _ _ _ _ _ _ _ _ _ _ _ _ _ _ _ _ _ _ _ _ _ _ _ _ _ _ _ _ _ _ _ _ _ ...

Страница 28: ...ing a game User Select this option to use the user defined settings The CSM function automatically adjusts the screen colour set 9300K Slightly purplish white 6500K Slightly bluish white sRGB Slightly lower brightness User Select this option to use the user defined settings Red Green Blue Set your own colour levels Picture OK MENU PSM CSM XD Cinema Reset Dynamic Standard Mild Game User CSM Picture...

Страница 29: ...lue Set your own colour levels PICTURE ID adjust the picture function TV AV Component HDMI XD is LG Electronics unique picture improving technology to display a real HD source through an advanced digital signal processing algorithm It s not available to use this function in RGB PC or DVI PC modes Manual is activated after selecting the user of PSM Adjusting the Screen Picture OK MENU PSM CSM XD Ci...

Страница 30: ...he original sound when listening to the music Movie Select this option to enjoy sublime sound Sports Select this option to watch sports broadcasting User Select this option to use the user defined audio settings To adjust uneven sound volumes across all channels or signals automatically to the most appropriate level To use this feature select On Use this function to balance sound from the left and...

Страница 31: ...tton and then use button to set the hour 00 23 4 Press button and then use button to set the minutes 00 59 The default value is 5 Press the OK MENU button to save The Off time automatically switches the set to off mode at the pre set time 1 Press the MENU button and then use button to select the TIME menu 2 Press the button and then use button to select Off time or On time 3 Press the button and t...

Страница 32: ...choose the language in which the control names are displayed Special OK MENU Language Child lock DDC CI XD Demo Use it to see the difference between XD demo on and XD Demo off XD Demo function is not available in RGB PC DVI PC mode DDC CI Display Data Channel Command Interface is communication protocol for communications between PC and monitor DDC CI makes it possible to adjust and setup detailed ...

Страница 33: ...izontal screen size will also change Phase It is not working In DVI PC mode To adjust the focus of the display This item allows you to remove any horizontal noise and clear or sharpen the image of characters To select the image size of the screen When TV Video mode Spectacle Original 4 3 16 9 14 9 Zoom1 Zoom2 When RGB DVI HDMI Component mode 4 3 16 9 Use this function to reset the product to the f...

Страница 34: ...e Maximum resolution 1366 X 768 60 Hz The signal cable between PC and product is not connected Check the signal cable Press the INPUT button in the remote control to check the input signal Is the product s power cord connected Is the power indicator turning on Power is on power indicator is blue but the screen appears extremely dark Does the power indicator look amber Does the Out of range message...

Страница 35: ...Do thin lines appear on the background screen Horizontal noise appears or the characters look blurred The screen image looks abnormal Adjust the Position menu in OSD See if the video card resolution and frequency are supported by the product If the frequency is out of range set to the recommended resolution in the Control Panel Display Setting menu Adjust the Clock menu in OSD Adjust the Phase men...

Страница 36: ... malfunction of the LCD Screen has poor colour resolution 16 colours Screen colour is unstable or mono colour Do black spots appear on the screen Screen colour is abnormal Check if the audio cable is connected properly Adjust the volume Check if the sound is set properly Adjust the volume No sound Sound is too low The audio function does not work See if you have selected the proper channel mode Us...

Страница 37: ...60 Hz Horizontal Frequency 30 61 kHz Vertical Frequency 56 75 Hz Synchronization Type Separate Sync Digital S Video Composite video TV D Sub Analog DVI D HDMI PC Audio In Headphone Earphone component Rated Voltage AC 100 240V 50 60Hz 0 6A Power Consumption On Mode 35 W Typ Sleep Mode 1 W Off Mode 1 W Tilt Range 5 15 Size WxLxH 454 7 mm x 193 2 mm x 362 8 mm Weight excl package 3 8 kg 8 38 Ibs Oper...

Отзывы: