background image

A10

ENGLISH

Make sure to check the sound card connection terminal in the PC before connecting to the product.

If the PC sound card supports both Speaker Out and Line Out, change it to Line Out by setting the jumper
or the PC application. (For more details, refer to the sound card user’s guide.)

Speaker Out :

The terminal connected to the speaker that is not equipped with an amplifier.

- *

Line Out :

The terminal connected to the speaker equipped with an amplifier.

If Audio Out in the PC sound card has only Speaker Out, reduce the PC volume. This product is integrated
with an amplifier.

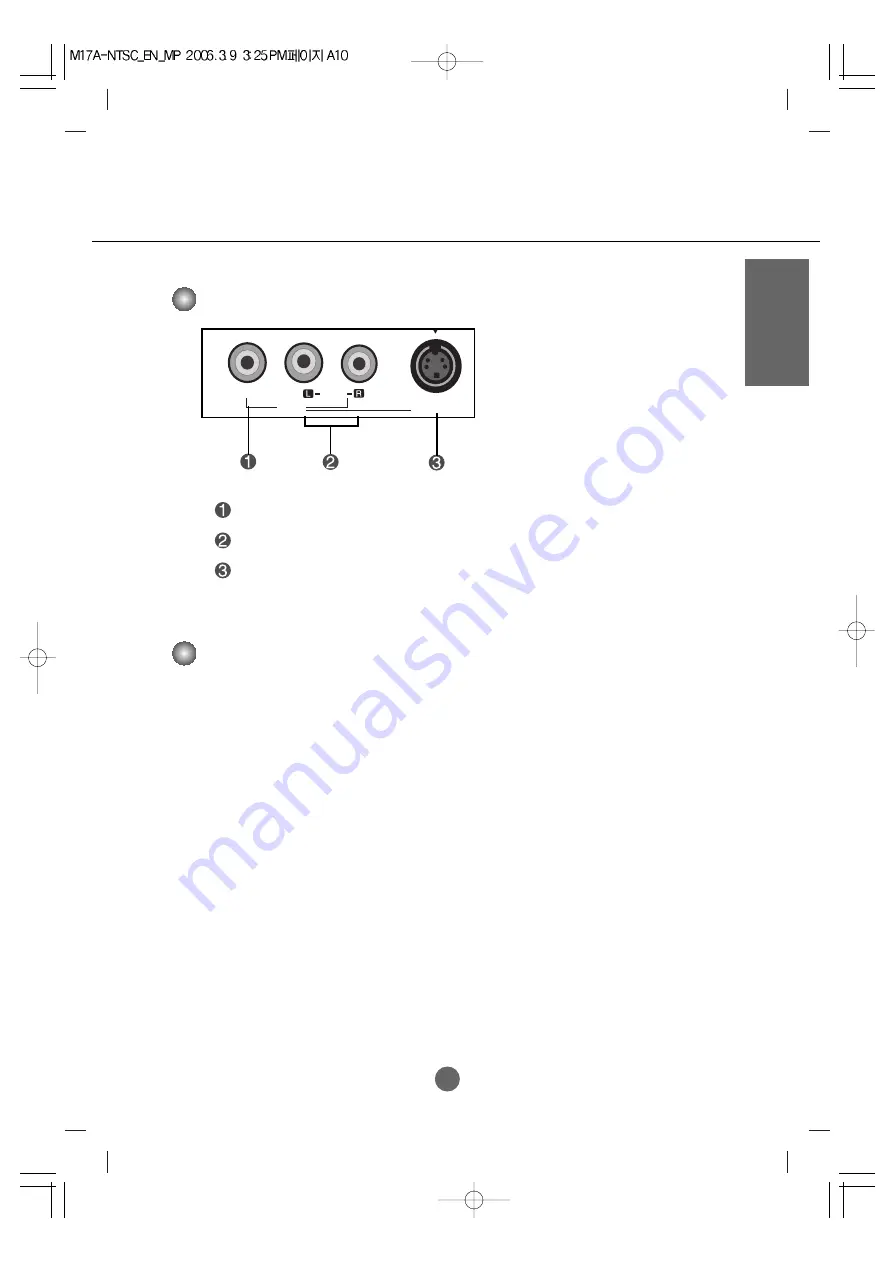
AV Input Terminal

Connecting the sound card output terminal

S-Video

Video

AV IN

Audio

[MONO]

S-Video Input Terminal

Audio Input Terminal

Video Input Terminal

Содержание M1717A-BM.AWH

Страница 1: ...ound unplug the power cord and contact the service center If you continue to use without taking proper measures electrical shock or fire can occur If you dropped the product or the case is broken turn off the product and unplug the power cord If you continue to use without taking proper measures electrical shock or fire can occur Contact the service center Do not drop metallic objects such as coin...

Страница 2: ...oration can cause electric leakage electric shock or fire Fix the power cable completely If the power cable is not fixed completely a fire can break out Hold the plug when pulling out the power cable Do not bend the power cord with excessive force or put heavy objects on the power cord The power line can be damaged which may cause electric shock or fire Do not insert a conductor like a metal chops...

Страница 3: ...k by referring to the User s Guide Your vision can be impaired Use authorized detergent only when cleaning the product Do not use benzene thinner or alcohol Product can be deformed Caution Do not shock the product when moving it You may be electrocuted or the product can be damaged Do not dispose the product packing box Use it when you move Make the panel face forward and hold it with both hands t...

Страница 4: ...eft right within the receiving unit scope Dispose of used batteries in the recycle bin to prevent environmental pollution Inserting batteries into remote control Remote Control Batteries CD ROM Cards Power Cable Audio Cable PC Please check the accessories in the product package The product and the accessories can be different from the figures shown here D Sub Signal Cable Stand base ...

Страница 5: ...t the power to the product the computer system and other attached devices is turned off Connecting the stand base 1 Place the product with its front facing downward on a soft cloth 2 Align the hooks on the stand base with the matching slots in the base ofthe product 3 Insert the hooks into slots Important Once you connect the stand base try not to disconnect it Do not carry the product upside down...

Страница 6: ...he product ensure that the power to the product the computer system and other attached devices is turned off Positioning your display 1 Adjust the position of the panel in various ways for maximum comfort Tilt Range 3 25 Swivel 345 ...

Страница 7: ...adjusts the image Press this button repetitively to set the intended screen CC Button Select a closed caption EXIT Button MENU Button Channel Number Select Button Operational at the TV mode only Set Button AUDIO Button Use this button to select the sound tone Press repeatedly to select Flat Music Movie Sports User sound tone MUTE Button Name of the Remote Control Buttons MTS Sound Mode Select Butt...

Страница 8: ...EO SLEEP FLASHBK CH VOL VOL ENTER Input Select Button Each time you press the Input button it will change to TV Video RGB DTV RGB PC If nothing is inputted for several seconds the screen will automatically move to the selected menu Input TV Video RGB DTV RGB PC MENU ...

Страница 9: ...o MONO Audio H P ANTENNA RGB PC DTV Rear View Power Connector Connect the power cord AV Input Terminal D Sub Analog Signal Connector TV Tuner Jack Connect the antenna PC Sound Jack Connect to the jack in the PC sound card Headphone Earphone Connection Terminal ...

Страница 10: ...e sound card user s guide Speaker Out The terminal connected to the speaker that is not equipped with an amplifier Line Out The terminal connected to the speaker equipped with an amplifier If Audio Out in the PC sound card has only Speaker Out reduce the PC volume This product is integrated with an amplifier AV Input Terminal Connecting the sound card output terminal S Video Video AV IN Audio MONO...

Страница 11: ... off Then connect the signal input cable When connecting with the D Sub signal input cable When connecting with the D Sub signal input cable Rear side of the product Connecting to External Devices B A PC Macintosh Macintosh Adapter Use the standard Macintosh adapter since an incompatible adapter is available in the market Different signaling system B A 1 Audio cable ...

Страница 12: ...te control to select the input signal Or press the INPUT button at the front side of the product CH TV MTS INPUT FAV MENU EXIT CH VOL VOL ENTER Turn on power by pressing the power button on the product Power button Select RBG PC 2 3 4 Each time you press the Input button it will change to TV Video RGB DTV RGB PC If nothing is inputted for several seconds the screen will automatically move to the s...

Страница 13: ...udio MONO VIDEO OUT AUDIO OUT Rear side of the Product RCA Cable Yellow White Red Connect the video audio cable as shown in the below figure and then connect the power cord See page A12 When watching VCR DVD VCR DVD W R Y Not included S Video Video AV IN Audio MONO VIDEO OUT AUDIO OUT RCA Cable S Video Cable VCR DVD Rear side of the Product White W Not included Not included 1 Red R In case the RCA...

Страница 14: ...n connecting with a RCA cable Select AV When connecting with a S Video cable Select AV CH TV MTS INPUT FAV MENU EXIT CH VOL VOL ENTER 2 INPUT OK INPUT OK Each time you press the Input button it will change to TV Video RGB DTV RGB PC If nothing is inputted for several seconds the screen will automatically move to the selected menu Input TV Video RGB DTV RGB PC MENU B A ...

Страница 15: ...C audio cable Not Included When watching DVD SET TOP BOX with a D Sub cable W R Select an input signal Press the INPUT button on the remote control to select the input signal Or press the INPUT button at the front side of the product Select RGB DTV 2 1 INPUT OK INPUT OK CH TV MTS INPUT FAV MENU EXIT CH VOL VOL ENTER Each time you press the Input button it will change to TV Video RGB DTV RGB PC If ...

Страница 16: ...NPUT button on the remote control to select the input signal Or press the INPUTbutton at the front side of the product Select TV ANTENNA 1 2 INPUT OK INPUT OK CH TV MTS INPUT FAV MENU EXIT CH VOL VOL ENTER Each time you press the Input button it will change to TV Video RGB DTV RGB PC If nothing is inputted for several seconds the screen will automatically move to the selected menu Input TV Video R...

Страница 17: ...A17 To arrange cables in order Video Cable Holder Connect the signal cable power cord and the audio cable to use in order to arrange in the cable holder as shown in the following figure ...

Страница 18: ...screen MENU Button Use this button to select an icon or adjust the setting in the OSD screen OSDSelect AdjustButton Selecting and Adjusting the Screen CH INPUT Volume 0 This Indicator lights up blue when the display operates normally On Mode If the display is in Sleep Energy Saving Mode this indicator color changes to amber Press the button to turn on the power Press the button again to turn it of...

Страница 19: ...he unit that receives the signal from the remote control RGB PC Information IR Receiver 1280 X 1024 60 Hz Select the icon to adjust on the OSD screen For PC Analog signal Input TV Video RGB DTV RGB PC MENU Each time you press the Input button it will change to TV Video RGB DTV RGB PC If nothing is inputted for several seconds the screen will automatically move to the selected menu ...

Страница 20: ...hical presentation Note OSD On Screen Display Menu Icon Function Description CHANNEL PICTURE SOUND TIMER Adjusting the time function Adjusting the screen function RGB PC RGB DTV only Adjusting the sound function Adjusting the picture function Set Select the channel when using the TV SPECIAL Selecting the setup function SCREEN ...

Страница 21: ...Save adjustment Exit from the menu screen MENU MENU ENTER ENTER CH CH VOL VOL ENTER CH CH VOL VOL ENTER Press the MENU Button then the main menu of the OSD appears To access a control use the Buttons When the icon you want becomes highlighted press the ENTER Button Use the Buttons to adjust the item to the desired level Accept the changes by pressing the ENTER Button Exit the OSD by pressing the M...

Страница 22: ...nels are searched and stored automatically To stop auto CH progess press the MENU or ENTER button Wait for auto CH progess to complete the channel search cycle before choosing a channel The TV scans for over the air channels and then channels are provided by a cable service This function lets you select your favourite channels directly Press the buttons to select a channel number FAV Button remote...

Страница 23: ...tory setting color set Cool Slightly purplish white Normal Slightly bluish white Warm Slightly reddish white User Select this option to use the user defined settings Red Green Blue Set your own color levels PICTURE EZ Video ACC Contrast Brightness Color Sharpness Tint Clear Optimum Soft User PICTURE EZ Video ACC Contrast Brightness Color Sharpness Tint Cool Normal Warm User MENU MENU Contrast To a...

Страница 24: ...C Selecting a factory setting color set Cool Slightly purplish white Normal Slightly bluish white Warm Slightly reddish white User Select this option to use the user defined settings Red Green Blue Set your own color levels Contrast To adjust the contrast of the screen Brightness To adjust the brightness of the screen MENU ...

Страница 25: ...manding and natural audio Music Select this option to enjoy the original sound when listening to the music Movie Select this option to enjoy sublime sound Sports Select this option to watch sports broadcasting User Select this option to use the user defined audio settings To adjust uneven sound volumes across all channels or signals automatically to the most appropriate level To use this feature s...

Страница 26: ...ff 3 Press the enter menu button to save In the event of power interruption disconnection or power failure the Clock must be reset Two hours after the set is switched on by the On timer function it will automatically switch back to off mode unless a button has been pressed Once the On or Off timer is set these functions operate daily at the preset time Off timer function overrides On timer functio...

Страница 27: ... variety of information on all kind of subjects ex captioned program lists weather forecasts stock exchange topics news for hearing impaired on up to half of the TV screen But not all stations offer text services even though they might offer captioning In the event you are receiving a poor signal an empty black box may appear and disappear even when the text mode is selected This is a normal when ...

Страница 28: ...ows a user to control various blocks will be enabled The initial password is set for 0000 and it can be changed through Set password menu This function is used to block program viewing based on the ratings sent by the broadcast station The default setting is to allow all programs to be viewed Viewing can be blocked by the type of program and by the categories chosen to be blocked It is also possib...

Страница 29: ...lt password is 0000 You can change the password to any four digit number 3 Press the buttons to select the Set password sub menu then press the button to change the setting Use the number button pad to enter a new four digit password when prompted 4 Re enter the new four digit password when prompted Setting a password Lock On Off To select the VCHIP function On Off Enter code Ent Code Rep Code Sel...

Страница 30: ...pplies to TV PG Above TV 14 Above TV MA F Violence fantasy violence Applies only to TV Y7 Content block MOVIE Ratings G Above General audience PG Above Parental guidance suggested PG 13 Above 13 years and up R Above Restricted NC 17 Above 17 years and up X Adult Unblocked If you set PG 13 Above G and PG movies will be available PG 13 R NC 17 and X will be blocked Parental Lock Set password MPAA Ag...

Страница 31: ...ting and categories Canadian Rating System Rating guidelines are provided by broadcast station Most television programs and television movies can be blocked by TV rating and or individual categories Parental Lock Set password MPAA Age block Content block Aux block Canadian To set Canadian Parental Lock Set password MPAA Age block Content block Aux block Canadian Unblocked Blocked v Selecting the s...

Страница 32: ...ption signals on the same channel By selecting From CC1 CC4 TEXT1 TEXT4 you can choose which signal you view CC1 is usually the signal with the captions while Another mode might show demonstration or programmimg information 3 Your TV might not receive caption signals normally in the following situations Poor reception conditions are encountered IGNITION Picture may flutter drift suffer from black ...

Страница 33: ...and Phase H Position To move image left or right V Position To move image up or down Clock To minimize any vertical bars or stripes visible on the screen background The horizontal screen size will also change Phase To adjust the focus of the display This item allows you to remove any horizontal noise and clear or sharpen the image of characters Use this function to reset the product to the factory...

Страница 34: ...inch 1280 x 1024 60Hz The signal cable between PC and product is not connected Check the signal cable Press the INPUT button in the remote control to check the input signal Is the product power cord connected Does the power indicator is turned on Power is on power indicator is blue but the screen appears extremely dark Does the power indicator look amber Does the Out of range message appear Does t...

Страница 35: ...g Do thin lines appear on the background screen Horizontal noise appears or the characters look blurred If adjustment is not satisfactory use the Position menu in OSD See if the video card resolution and frequency are supported by the product If the frequency is out of range set to the recommended resolution in the Control Panel Display Setting menu If adjustment is not satisfactory use the Clock ...

Страница 36: ...nel It is not a malfunction of the LCD Screen has poor color resolution 16 colours Screen color is unstable or mono coloured Do black spots appear on the screen Screen color is abnormal See if the audio cable is connected properly Adjust the volume See if the sound is set properly Adjust the volume No sound Sound is too low The audio function does not work See if you have selected the proper chann...

Страница 37: ...uency 30 70 kHz Vertical Frequency 56 75 Hz Synchronization Type Separate S Video Composite video TV D Sub Analog Headphone PC Audio In Rated Voltage AC 100 240V 50 60Hz 1 0A Power Consumption On Mode 40 W Sleep Mode 1 W Off Mode 1 W Tilt Range 3 25 Swivel 345 Size WxLxH 389 5 mm x 232 mmx 437 9 mm Weight excl package 5 28 kg 12 9 Ibs Operational Condition Temperature 10 C 35 C Humidity 10 80 Stor...

Страница 38: ... 30 70 kHz Vertical Frequency 56 75 Hz Synchronization Type Separate S Video Composite video TV D Sub Analog Headphone PC Audio In Rated Voltage AC 100 240V 50 60Hz 1 0A Power Consumption On Mode 45 W Sleep Mode 1 W Off Mode 1 W Tilt Range 3 25 Swivel 345 Size WxLxH 443 6 mm x 232 0 mm x 475 6 mm Weight excl package 6 0 kg 13 23 Ibs Operational Condition Temperature 10 C 35 C Humidity 20 80 Storag...

Страница 39: ...8 31 469 37 500 37 879 46 875 49 725 70 70 59 75 60 75 74 VGA VGA VGA VESA VESA VESA MAC 8 9 10 11 12 1024 x 768 1024 x 768 1152 x 870 1152 x 900 1280 x 1024 48 363 60 123 68 681 61 805 63 981 VESA VESA MAC VESA VESA 60 75 75 65 60 17 inch 19 inch Power Indicator Mode Product On Mode Sleep Mode Off Mode Blue Amber Off Locking Device Use this locking cable This has to be purchased separately if req...

Страница 40: ...r to the VESA Wall Mounting Instruction Guide VESA wall mounting This product meets VESA compliant mounting interface pad specifications 1 Separate the Hinge Cover using a screwdriver as shown in the picture 2 Please the product on a piece of cloth or other soft surface with the front side facing downward 3 Separate the stand base using a screwdriver as shown in the picture 4 Install the VESA stan...

Отзывы: