background image

Regulatory Notices  

For U.S.A

This equipment has been tested and found
to comply with the limits for a Class A digital
device, pursuant to Part 15 of the FCC
Rules. These limits are designed to provide
reasonable protection against harmful inter-
ference in a residential installation! This
equipment generates, uses and can radiate
radio frequency energy and, if not installed
and used in accordance with the instruc-
tions, may cause harmful interference to
radio communications.
However, there is no guarantee that interfer-
ence will not occur in a particular installation.
If this equipment does cause harmful inter-
ference to radio or television reception,
which can be determined by turning the
equipment off and on, the user is encour-
aged to try to correct the interference by one
or more of the following measures:
• Reorient or relocate the receiving antenna.
• Increase the separation between the

equipment and receiver.

• Connect the equipment into an outlet on a

circuit different from that to which the
receiver is connected.

• Consult the dealer or an experienced radio/TV

technician for help.

This Class A digital apparatus meets all
requirements of the Canadian Interference-
Causing Equipment Regulations.

This symbol is intended to alert
the user to the presence of 
uninsulated “dangerous voltage”
within the product’s enclosure
that may be of sufficient 
magnitude to constitute a risk
of electric shock to persons.

The exclamation point within an
equilateral triangle is intended
to alert the user to the presence
of important operating and 
maintenance (servicing) 
instructions in the literature
accompanying the product.

CAUTION TO REDUCE THE RISK OF

ELECTRIC SHOCK,

DO NOT REMOVE COVER (OR BACK).

NO USER SERVICEABLE PARTS

INSIDE,

REFER SERVICING TO QUALIFIED SER-

VICE PERSONNEL. 

CAUTION

RISK OF ELECTRIC SHOCK

DO NOT OPEN

Warning

To prevent fire or shock hazard, do not expose
the unit to rain or moisture.
To avoid electrical shock, do not open
the cabinet Refer servicing to qualified
personnel only.

Wiring methods shall be in accordance with
the National Electric Code, ANSI/NFPA 70.

This product is manufactured to comply with the radio interference
requirements of EEC DIRECTIVE 89/336/EEC, 93/68/EEC and
73/23/EEC.

Содержание LVC-D200HM

Страница 1: ...e installing and using the camera please read these instructions thorough ly and retain them for later reference P NO 3834RS0068R LVC D200HM HP NM NP LVC D201HM HP NM NP LVC D202HM HP NM NP LVC D203HM HP NM NP LVC D204HM HP NM NP ...

Страница 2: ...receiver is connected Consult the dealer or an experienced radio TV technician for help This Class A digital apparatus meets all requirements of the Canadian Interference Causing Equipment Regulations This symbol is intended to alert the user to the presence of uninsulated dangerous voltage within the product s enclosure that may be of sufficient magnitude to constitute a risk of electric shock to...

Страница 3: ...isas semble the camera To prevent electric shock do not remove screws or covers There are no user serviceable parts inside Ask a qualified service personnel for servicing Handle the camera with care Do not abuse the camera Avoid striking shaking etc The camera could be dam aged by improper handling or storage Do not expose the camera to rain or moisture This product is designed for indoor use or l...

Страница 4: ...2 What s in the box Camera Body Adapter DC 12V 300mA Optional M4 Tapping Screws 2EA Pan Lock Screw Video Cable ...

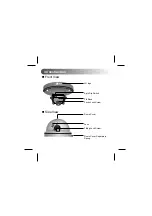
Страница 5: ...3 Construction Front View Side View LG logo 4 pin Dip Switch Tilt Base Focus Lock Screw Dome Cover Lens Tilting Lock Screw Dome Cover Separatory Spring ...

Страница 6: ...4 Construction Rear View Dome Cover Separatory Spring Power In Video Out N C Option Ext Sync or Audio GND Pan Base Base Fixing Hole ...

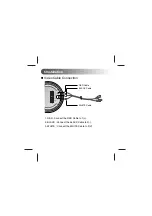
Страница 7: ...5 Installation Video Cable Connection 1 RED Connect the RED Cable to 1 2 BLACK Connect the BLACK Cable to 2 3 WHITE Connect the WHITE Cable to 3 V RED Cable BLACK Cable WHITE Cable ...

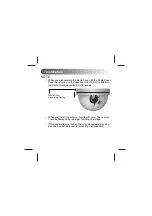
Страница 8: ...hten the M4 Tapping Screws after adjustment 3 Loosen the Tilting Lock Screw Adjust the Tilt Up Down by moving the Tilt Base then tighten Tilting Lock Screw 4 Loosen the Focus Lock Screw Adjust the Focus by moving the Focus Lens then tighten Focus Lock Screw 5 Install the Dome Cover to the main body by turning it coun terclockwise to the end Pan Base Tilting Lock Screw Tilt Base M4 Tapping Screw Fo...

Страница 9: ...side of LG Logo and turn the Dome Cover clockwise simultaneously When you install the camera handle with care The camera could be damaged by improper handling or storage If this camera is mounted on the other places except ceiling you need an extra bracket for mounting not supplied Dome Cover Separatory Spring ...

Страница 10: ...8 Installation Camera Connection Connect the Power Adapter 12V 300mA optional to the Power Input Jack of the camera as shown below Power Input Jack Adapter Jack Adapter Rear Panel BNC Monitor ...

Страница 11: ...ult setting is OFF 3 Y DC IRIS When you use Video Lens or DC IRIS Lens The default setting of D200 s is DC using the fixed lens 4 ALC ELC ELC Electronic IRIS ALC Auto IRIS The default setting of D200 s is ELC NOTE No 3 and 4 must be set as a default mode Depending on the conditions No 1 and 2 are adjustable Backlight Compensation refer to the next page OFF OFF DC ELC ABL BLC Y ALC ...

Страница 12: ...You can select the mode for adjusting the iris lens There are two mode as follows 1 BLC Set the BLC to ON The lens iris is manually fixed at the value that you have set regardless of an object 2 ABL Set the ABL to ON The lens iris is automatically adjusted according to the brightness of an object OFF OFF DC ELC ABL BLC Y ALC OFF OFF DC ELC ABL BLC Y ALC ...

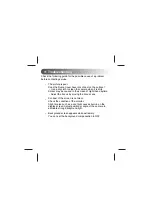
Страница 13: ...en it is dirty Smear may be caused to the screen of night than daytime Adjust the Focus by moving the Focus Lens Contrast of the screen is not clear Check the condition of the monitor Alight source such as a spot light causes burn in on the display screen Adjust position or angle of the camera to eliminate strong background light Background screen appears white extremely You can set the background...

Страница 14: ...12 Dimension ø100 76 5mm 26 5mm ø120 ø 9 0 ...

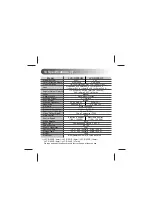
Страница 15: ... VD 50Hz VD Resolution 480 Line H 470 Line H S N Ratio More than 48dB Standard Illuminance 2000Lux 3200 K Sensitivity 1 3 output 0 5 Lux F1 2 Video Output Signal 1Vp p Composite 75Ω Gain Control Auto Shutter Speed Electronic Shutter Electronic Shutter 1 60 1 10000 1 50 1 10000 White Balance Auto Back Light Compensation ON OFF AUTO Power Source DC12V Power Consumption 2 3W Operating Temp 10 C 50 C ...

Страница 16: ... VD 50Hz VD Resolution 330 Line H 320 Line H S N Ratio More than 48dB Standard Illuminance 2000Lux 3200 K Sensitivity 1 3 output 0 1 Lux F1 2 Video Output Signal 1Vp p Composite 75Ω Gain Control Auto Shutter Speed Electronic Shutter Electronic Shutter 1 60 1 10000 1 50 1 10000 White Balance Auto Back Light Compensation ON OFF AUTO Power Source DC12V Power Consumption 2 3W Operating Temp 10 C 50 C ...

Отзывы: