background image

14

INSTALLATION

Installing the range

Unpacking and Moving the range

CAUTIOn


You should use two or more people to move 
and install the range. (Excessive Weight 
Hazard)

 Failure to do so can result in back or 

other injury.


Do not use the door handles to push or 
pull the range during installation or when 
moving the range out for cleaning or 
service. 

Doing so can result in serious damage 

to the door of the range.

Remove packing material, tape and any temporary 
labels from your range before using. Do not remove 
any warning-type labels, the model and serial number 
label, or the Tech Sheet that is located on the back of 
the range.
To remove any remaining tape or glue, rub the area 
briskly with your thumb. Tape or glue residue can also 
be easily removed by rubbing a small amount of liquid 
dish soap over the adhesive with your fingers. Wipe 
with warm water and dry.
Do not use sharp instruments, rubbing alcohol, 
flammable fluids, or abrasive cleaners to remove tape 
or glue. These products can damage the surface of 
your range.
Your range is heavy and can be installed on soft 
floor coverings such as cushioned vinyl or carpeting. 
Use care when moving the range on this type of 
flooring. Use a belt when moving the range to prevent 
damaging the floor. Or slide the range onto cardboard 
or plywood to avoid damaging the floor covering.

Choosing the Proper Location

Do not locate your range where it may be subject to 
strong drafts. Any openings in the floor or wall behind 
the range should be sealed. Make sure the openings 
around the base of the range that supply fresh air 
for combustion and ventilation are not blocked by 
carpeting or woodwork.
Your range, like many other household units, is heavy 
and can be installed on soft floor coverings such as 
cushioned vinyl or carpeting. Use care when moving 
the range on this type of flooring. 

This appliance must not be installed with a ventilation 
system that blows air downward toward the range.  
This type of ventilation system may cause ignition and 
combustion problems with the gas cooking appliance 
resulting in personal injury or unintended operation.
When the floor covering ends at the front of the 
range, the area that the range will be installed on 
should be built up with plywood to the same level 
or higher than the floor covering. This will allow the 
range to be moved for cleaning and servicing, as well 
as provide proper air flow to the range.
Also, make sure the floor covering can resist 
temperatures of at least 167 °F (75 °C). See the 
Installation Safety Instructions included in this 
manual.
Make sure the wall coverings around your range 
can resist the heat generated up to 194 °F (90 °C) 
by the range. See the Installation Safety Instructions 
included in this manual.

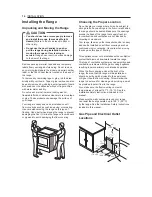
Gas Pipe and Electrical Outlet 
Locations

30" 

(76.2 cm)

7


14

/

16

"


(20 cm)

11


13

/

16

"


(30 cm)

3


6

/

16

"


(8.5 cm)

      3" 

(7.6 cm)

17


15

/

16

(45.6 cm)

5


14

/

16

"


(15 cm)

6


11

/

16

(17 cm)

Содержание LSG4513BD

Страница 1: ...as connector it must not exceed 3 feet in length Preparing for Installation Tools needed Phillips screwdriver Open end or adjustable wrench Pencil and ruler Level Flat blade screwdriver Pipe wrench 2 one for support Materials You May need Gas line shut off valve Pipe joint sealant that resists action of natural and LP gases Flexible metal appliance connector 3 4 or 1 2 NPT x 1 2 I D Never use an o...

Страница 2: ...ing the Proper Location Do not locate your range where it may be subject to strong drafts Any openings in the floor or wall behind the range should be sealed Make sure the openings around the base of the range that supply fresh air for combustion and ventilation are not blocked by carpeting or woodwork Your range like many other household units is heavy and can be installed on soft floor coverings...

Страница 3: ...djusted to meet specific requirements The range may be placed with 0 clearance flush at the back wall Installation Clearances 30 76 2 cm 30 76 2 cm Minimum 15 38 1 cm 36 91 4 cm 13 33 0 cm Maximum depth for cabinets above coutertops Front edge of the range side panel forward from cabinet 0 To cabinets below cooktop and at the range back 1 4 Dimensions 28 3 4 73 0 cm Height 37 59 64 96 3 cm Depth w...

Страница 4: ...idge the opening at the rear wall the rear filler kit that is provided with the slide in range will be needed nOTE If the countertop depth is greater than 25 there will be a gap between the filler kit and the back wall If the countertop depth is less than 24 the control panel will not sit flush with the countertop Installing the rear Filler 1 Using a screwdriver remove the upper four screws that a...

Страница 5: ...tion nOTE The gas pressure regulator valve is open when shipped If the range does not work properly after installation make sure the regulator valve is still open 3 Connect a flexible metal appliance connector to the adapter on the range Position the range to permit connection at the shut off valve 4 When all connections have been made be sure all range controls are in the OFF position and the pre...

Страница 6: ...h off power when a threshold leakage level is detected These devices must be manually reset by the consumer The National Electrical Code requires the use of GFCI s in kitchen receptacles installed to serve countertop surfaces Performance of the range will not be affected if operated on a GFCI protected circuit but the occasional resetting of the circuit can become an annoyance Ensure proper ground...

Страница 7: ...ld ignite within 4 seconds After the burner ignites rotate the knob out of the Lite position Try each burner in succession until all burners have been checked Quality of Flames The combustion quality of the burner flames needs to be confirmed visually A Yellow flames Call for service B Yellow tips on outer cones This is normal for LP gas C Soft blue flames This is normal for natural gas nOTE With ...

Страница 8: ...ersions The range comes from the factory with the air shutters adjusted for proper air flow for natural gas If converted to LP follow the instructions provided in the conversion kit to properly adjust the air shutters LP conversion must be performed by a qualified technician Leveling the range Level the range by adjusting the leveling legs Extending the legs slightly may also make it easier to ins...

Отзывы: