background image

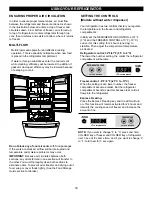
Both the refrigerator and freezer sections defrost
automatically. However, clean both sections about once 
a month to prevent odors. Wipe up spills immediately.

GENERAL CLEANING TIPS

Unplug refrigerator or disconnect power.

Remove all removable parts, such as shelves, 
crispers, etc.

Use a clean sponge or soft cloth and a mild detergent in
warm water. Do not use abrasive or harsh cleaners.

Hand wash, rinse and dry all surfaces thoroughly.

Plug in refrigerator or reconnect power.

OUTSIDE

Waxing external painted metal surfaces helps provide rust
protection. Do not wax plastic parts. Wax painted metal
surfaces at least twice a year using appliance wax (or
auto paste wax). Apply wax with a clean, soft cloth.

For products with a stainless steel exterior, use a clean
sponge or soft cloth and a mild detergent in warm water.
Do not use abrasive or harsh cleaners. Dry thoroughly
with a soft cloth.

INSIDE WALLS (allow freezer to warm up so
cloth won’t stick)

To help remove odors, you can wash the inside of the
refrigerator with a mixture of baking soda and warm water.
Mix 2 tablespoons baking soda to 1 quart of water (26 g
soda to 1 liter water.) Be sure the baking soda is
completely dissolved so does it not scratch the surfaces 
of the refrigerator.

DOOR LINERS AND GASKETS

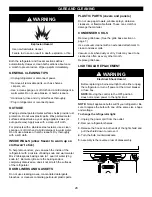
Do not use cleaning waxes, concentrated detergents,
bleaches, or cleaners containing petroleum plastic parts.

PLASTIC PARTS (covers and panels)

Do not use paper towels, window sprays, abrasive
cleansers, or flammable fluids. These can scratch or
damage the material.

CONDENSER COILS

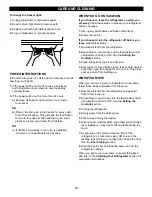
Remove grille base. (See the grille base section on 
page 7.)

Use a vacuum cleaner with an extended attachment to
clean condenser coils.

Vacuum coils when dusty or dirty. Coils may need to be
cleaned as often as every other month.

Replace grille base.

LIGHT BULB REPLACEMENT

NOTE:

Not all appliance bulbs will fit your refrigerator. Be

sure to replace the bulb with one of the same size, shape
and wattage.

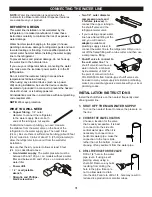
To change the refrigerator light:

1.

Unplug the power cord from the outlet.

2.

Remove refrigerator shelves.

3.

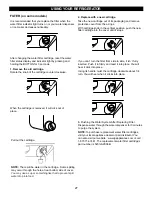
Release the hooks on both ends of the light shield and
pull the shield down to remove it.

4.

Turn the bulb counterclockwise.

5.

Assembly is the reverse order of disassembly.

CARE AND CLEANING

WARNING

Electrical Shock Hazard

Before replacing a burned-out light bulb, either unplug
the refrigerator or turn off power at the circuit breaker
or fuse box.

NOTE:

Moving the control to the OFF position 

does not remove power to the light circuit.

28

WARNING

Explosion Hazard

Use non-flammable cleaner.

Failure to do so can result in death, explosion, or fire.

Содержание LRFD22850 series

Страница 1: ...R Guide d Utilisation et d Entretien Veuillez lire ce manuel en entier avant de mettre en marche l unité et conservez le à portée de la main pour le consulter à tout moment REFRIGERADOR CON CONGELADOR INFERIOR Guía para el Uso y Cuidado Lea detenidamente estas instrucciones antes de usar el refrigerador y guárdelas como referencia para el futuro Models Modèles Modelos LRFD22850 LRFC22750 ...

Страница 2: ... settings 19 Food storage guide 20 Storing frozen food 20 Refrigerator Section 21 Refrigerator shelves 21 Chef Fresh 22 Crisper humidity control 22 Optibin Crisper 22 Crisper cover with lattice on inner surface 23 Design A Door 24 Dairy Bin 24 Can Dispenser 24 Egg Box 24 Water Dispenser 24 Freezer Section 25 Ice Bin 25 Wire Durabase 25 Drawer tray 25 Tilting Door 25 Pull out drawer basket 26 Filte...

Страница 3: ... warranty lasts so these limitations or exclusions may not apply to you This warranty gives you specific legal rights and you may also have other rights which vary from state to state THE ABOVE WARRANTY DOES NOT APPLY TO 1 Service trips to your home to deliver and pickup install instruct or replace house fuses or correct house wiring or plumbing or correction of unauthorized repairs 2 Damage to th...

Страница 4: ...CTRONICS NO SE HACE RESPONSABLE POR LA PERDIDA EN EL USO DEL PRODUCTO POR INCONVENIENCIA O CUALQUIER OTRO DAÑO DIRECTO O CONSECUENTE QUE PROVENGA DEL USO Y O NO USO DE ESTE PRODUCTO O POR ALGUNA VIOLACION A LAS GARANTIAS IMPLEMENTADAS INCLUYENDO LA GARANTIA DE COMPRA APLICADA A ESTE PRODUCTO Algunos estados no permiten la exclusión o limitación de daños incidentales o consecuenciales o limitacione...

Страница 5: ...nne des droits légaux et l on peut en avoir d autres qui varient d un état à un autre ou d une province à une autre LA GARANTIE CI DESSUS NE S APPLIQUE PAS 1 Les déplacements de service à domicile pour la livraison ou la cueillette l installation le remplacement de fusibles ou de câblage résidentiel approprié plomberie ou correction de réparations non autorisées 2 Dommage au produit causé par acci...

Страница 6: ...RODUCT Some provincesdo not allow the exclusionor limitationof incidentalor consequentialdamagesor limitationson how long an impliedwarrantylasts so these limitationsor exclusionsmay not apply to you This warrantygives you specificlegal rightsand you may also have other rightswhich vary from provinceto province THEABOVEWARRANTYDOES NOTAPPLY TO 1 Servicetrips to your home to deliverand pickup insta...

Страница 7: ...lb unplug the refrigerator or turn off power at the circuit breaker or fuse box in order to avoid contact with a live wire filament A burned out light bulb may break when being replaced NOTE Setting either or both controls to the OFF position does not remove power to the light circuit Read all instructions before using this appliance Use this appliance only for its intended purpose as described in...

Страница 8: ... extension cord However if you still elect to use an extension cord it is absolutely necessary that it be a UL listed in the United States 3 wire grounding type appliance extension cord having a grounding type plug and outlet and that the electrical rating of the cord be 15 amperes minimum and 120 volts Use of an extension cord will increase the clearance needed for the back of the refrigerator WA...

Страница 9: ...re Durabase Filter inside Dairy Bin Egg Box Design A Door Bins Freezer Light Wire Basket 9 B C D A F E Use this section to become more familiar with the parts and features NOTE This guide covers several different models The refrigerator you have purchased may have some or all of the items listed below The locations of the features shown below may not match your model PARTS AND FEATURES G H I J K M...

Страница 10: ...turned easily by tipping the cabinet slightly Turn the leveling screws clockwise to raise the unit counterclockwise to lower it 3 Install this appliance in an area where the temperature is between 55 F 13 C and 110 F 43 C If the temperature around the appliance is too low or high cooling ability may be adversely affected NEXT 1 Clean your refrigerator thoroughly and wipe off all dust accumulated d...

Страница 11: ... Door Handle Align keyhole slots 1 on the top and bottom of the back of the handle with the screws 2 mounted on the front of the door Press the handle against the door front making sure that the screws 2 go into the keyhole slots 1 Holding the handle with both hands press it firmly against the front of the door and slide the handle down 3 11 ...

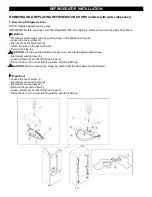
Страница 12: ...r Loosen the cover screw 1 Disconnect door switch wire 2 Loosen hinge bolts 3 Lift off the top hinge 4 Place the door on a non scratching surface with the inside up Right Door CAUTION When removing top hinge be careful that the door does not fall forward Loosen the cover screw 1 Disconnect door switch wire 2 Loosen hinge bolts 3 Lift off the top hinge 4 Place the door on a non scratching surface w...

Страница 13: ...oors is even across the front Install the ground screw 6 Connect the door switch wire 2 Tighten the cover screw 1 Left Door 7 5 REFRIGERATOR INSTALLATION 13 Lower the door onto the middle hinge pin 5 Make sure the door is aligned with the cabinet Replace the top hinge 4 installing hinge screws 3 to secure it Make sure the gasket on the door is flush against the cabinet and is not folded Support th...

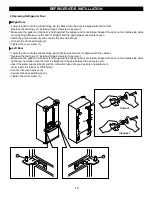
Страница 14: ... switch wire 2 Attach the tube on the door with door Pull out the tube 4 CAUTION If a tube end is deformed or worn out cut the damaged portion away Disconnect wire harness 5 Loosen screws 6 and lift off the top hinge 7 Place the door on a non scratching surface with the inside up CAUTION When removing top hinge be careful that the door does not fall forward Right Door Loosen the cover screw 1 Disc...

Страница 15: ...oor switch wire 2 Tighten the cover screw 1 Left Door Lower the door onto the middle hinge pin 8 Make sure the door is aligned with the cabinet Replace the top hinge 7 installing hinge screws 6 to secure it Make sure the gasket on the door is flush against the cabinet and is not folded Support the door on the handle side while tightening And make sure the door is straight and the gap between the d...

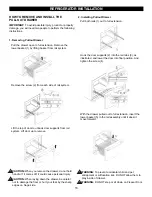
Страница 16: ...ve the drawer do not hold handle If it comes off it could cause personal injury CAUTION 2 Installing Pullout Drawer When laying down the drawer be careful not to damage the floor or hurt your feet by the sharp edges on hinge side Pull both rails 1 out to full extension Hook the door supports 2 into the rail tabs 3 as illustrated and lower the door into final position And tighten the screw 4 With t...

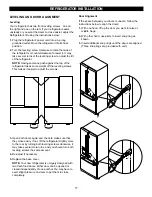
Страница 17: ...s This makes it easier to adjust the screws 3 Open both doors again and check to make sure that they close easily If not tilt the refrigerator slightly more to the rear by turning both leveling screws clockwise It may take several more turns and you should turn both leveling screws the same amount 4 Re adjust if necessary 5 Replace the base cover NOTE Your new refrigerator is uniquely designed wit...

Страница 18: ...r cover foods tightly See the Food Storage Guide section for details SETTING THE CONTROLS Your refrigerator has two controls that let you regulate the temperature in the freezer and refrigerator compartments Initially set the REFRIGERATOR CONTROL at 37 F 3 C and the FREEZER CONTROL at 0 F 18 C Leave it at this setting for 24 hours one day to stabilize Then adjust the compartment temperature as des...

Страница 19: ...ion should be correct for normal household refrigerator usage The controls are set correctly when milk or juice is as cold as you like and when ice cream is firm The refrigerator control functions as the thermostat for the entire appliance refrigerator and freezer sections The higher the number setting the longer the compressor will run to keep the temperature colder The freezer control adjusts th...

Страница 20: ...allow air or moisture in or out If you do you could have food odor and taste transfer throughout the refrigerator and also dry out frozen food Packaging recommendations Rigid plastic containers with tight fitting lids Straight sided canning freezing jars Heavy duty aluminum foil Plastic coated paper Non permeable plastic wraps Specified freezer grade self sealing plastic bags Follow package or con...

Страница 21: ... the front of the shelf in the direction of 1 and lift it in the direction of 2 Pull the shelf out To replace a shelf Tilt the front of the shelf up and guide the shelf hooks into the slots at a desired height Then lower the front of the shelf so that the hooks drop into the slots NOTE Make sure that shelves are level from one side to the other Failure to do so may result in the shelf falling or s...

Страница 22: ...pen 2 Using your finger press the plastic hinge toward the center of the door flap 3 Lift the door out of its place 4 Replacement is the opposite of removal USING YOUR REFRIGERATOR 22 CRISPER HUMIDITY CONTROL You can control the amount of humidity in the moisture sealed crispers Store vegetables or fruits requiring more or less humidity in separate crispers Adjust the control to any setting betwee...

Страница 23: ...risper then pull it out to remove 3 Replace the crisper by sliding it back in fully past the drawer stop To remove the lattice on inner surface 1 Remove crisper cover as illustrated above 2 Hold the glass cover and turn the crisper cover over 3 For each lattice hold lattice and pull sides of the cover outward to remove lattice To replace lattice on inner surface 1 For each lattice insert middle ta...

Страница 24: ...down until it stops CAN DISPENSER The Can Dispenser slides out from underneath the shelf The Can Dispenser holds up to twelve 12 ounce beverage cans 1 T o remove the can dispenser pull it out as far as it comes Tilt the front up and pull it straight out 2 T o Install the can dispenser place it into the shelf frame rails and push it into place EGG BOX Store Egg Box on interior shelf not on door she...

Страница 25: ...AWER TRAY The drawer tray prevents small food items from falling between the basket rungs To remove wire durabase open freezer drawer until it stops The freezer basket rest on a frame inside the freezer drawer Lift the basket up at the back Lift the front up and lift the entire basket up and out of the drawer TILTING DOOR on some models The tilting door provides easy access for stored foods How to...

Страница 26: ...EFRIGERATOR 26 2 To Install pull both rails out to full extension Hook the basket supports into the rail tabs and push to the back of compartment PULL OUT DRAWER 1 To remove lift basket up and pull straight out 1 2 ...

Страница 27: ...artridges visit your local appliance dealer or part distributor You can also visit our website www lgappliances com or call 1 877 714 7481 The replacement water filter cartridge s part number is 5231JA2006B FILTER on some models It is recommended that you replace the filter when the water filter indicator light turns on or your water dispenser or ice maker decreases noticeably After changing the w...

Страница 28: ...t not scratch the surfaces of the refrigerator DOOR LINERS AND GASKETS Do not use cleaning waxes concentrated detergents bleaches or cleaners containing petroleum plastic parts PLASTIC PARTS covers and panels Do not use paper towels window sprays abrasive cleansers or flammable fluids These can scratch or damage the material CONDENSER COILS Remove grille base See the grille base section on page 7 ...

Страница 29: ...ou leave follow these steps 1 Remove all food from the refrigerator 2 Depending on your model set the thermostat control refrigerator control to OFF See the Setting the Controls section 3 Clean refrigerator wipe it and dry well 4 T ape rubber or wood blocks to the tops of both doors to prop them open far enough for air to get in This stops odor and mold from building up WHEN YOU MOVE When you are ...

Страница 30: ...ter the 5th step WHEN YOU SHOULD SET THE ICEMAKER POWER SWITCH TO O OFF When the water supply will be shut off for several hours When the ice storage bin is removed for more than a minute or two When the refrigerator will not be used for several days NORMAL SOUNDS YOU MA Y HEAR The icemaker water valve will buzz as the icemaker fills with water If the power switch is in the I on position it will b...

Страница 31: ...ater filter and between 40 and 120 p s i on models with a water filter Power drill or adjustable wrench Straight and Phillips blade screwdriver Two 1 4 outer diameter compression nuts and 2 ferrules sleeves to connect the copper tubing to the shutoff valve and the refrigerator water valve If your existing copper water line has a flared fitting at the end you will need an adapter available at plumb...

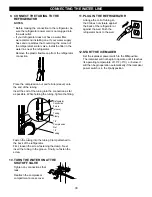
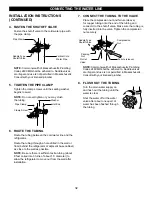
Страница 32: ...o 3 turns of about 10 diameter to allow the refrigerator to move out from the wall after installation 7 CONNECT THE TUBING TO THE VALVE Place the compression nut and ferrule sleeve for copper tubing onto the end of the tubing and connect it to the shutoff valve Make sure the tubing is fully inserted into the valve Tighten the compression nut securely NOTE Commonwealth of Massachusetts Plumbing Cod...

Страница 33: ...ten the tubing into the tubing Clamp attached to the back of the refrigerator First loosen the screw fastening the clamp Next insert the tubing in the groove Finally re fasten the screw 10 TURN THE WATER ON AT THE SHUTOFF VALVE Tighten any connections that leak Reattach the compressor compartment access cover 11 PLUG IN THE REFRIGERATOR Arrange the coil of tubing so that it does not vibrate agains...

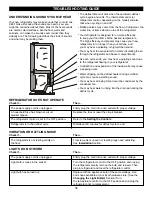
Страница 34: ...ew refrigerator may make sounds that your old one didn t make Because the sounds are new to you you might be concerned about them Most of the new sounds are normal Hard surfaces like the floor walls and cabinets can make the sounds seem louder than they actually are The following describes the kinds of sounds and what may be making them The defrost timer will click when the automatic defrost cycle...

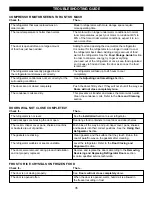
Страница 35: ...ow The condenser coils are dirty This prevents air transfer and makes the motor work harder Clean the condenser coils Refer to the Care and Cleaning section 35 FROST OR ICE CRYSTALS ON FROZEN FOOD The door is not closing properly See Doors will not close completely above The door is opened often When the door is opened warm humid air is allowed in the freezer resulting in frost DOORS WILL NOT CLOS...

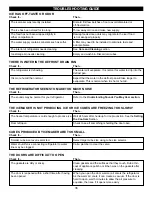
Страница 36: ...E The sounds may be normal for your refrigerator Refer to the Understanding Sounds You May Hear section THE ICEMAKER IS NOT PRODUCING ICE OR ICE CUBES ARE FREEZING TOO SLOWL Y The freezer temperature is cold enough to produce ice Wait 24 hours after hook up for ice production See the Setting the Controls Section Door left open Check to see if something is holding the door open THE DOORS ARE DIFFIC...

Страница 37: ...r too warm move the dial one number at a time A large amount of food has just been added Adding food warms the refrigerator It can take a few hours to the refrigerator or freezer for the refrigerator to return to normal temperature The food is not packaged correctly Wrap food tightly and wipe off damp containers prior to storing in the refrigerator to avoid moisture accumulation If necessary repac...

Страница 38: ......
Отзывы: