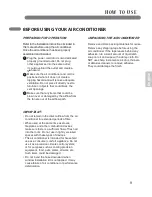
background image

I M P O R T A N T   S A F E T Y   I N S T R U C T I O N S

4

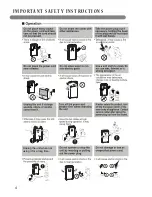
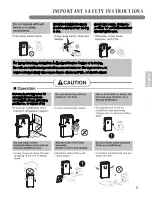
Unplug the unit when not 

using it for a long time.

Wax

Thinner

Содержание LP1013WNR

Страница 1: ...WNER S MANUAL AIR CONDITIONER Please read this manual carefully before operating your air conditioner and retain it for future reference www lgappliances com TYPE PORTABLE AIR CONDITIONER MODEL LP1013WNR ...

Страница 2: ...f Installation Location Attaching the Hose and Diffuser PARTS AND FEATURES Key Parts and Components 8 22 Cleaning the Case 21 Cleaning the Air Filter 21 HOW TO USE Before Using Your Air Conditioner Control Panel and Remote 11 12 Preparing for Installation 14 14 15 23 24 25 2 Congratulations on your purchase and welcome to the LG family Your new LG Air Conditioner combines high efficiency operation...

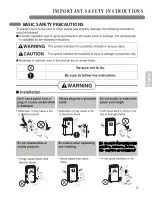
Страница 3: ...IMPORTANT SAFETY INSTRUCTIONS 3 English English Do not store flammables like gasoline benzene thinner etc near the air conditioner BASIC SAFETY PRECAUTIONS ...

Страница 4: ...IMPORTANT SAFETY INSTRUCTIONS 4 Unplug the unit when not using it for a long time Wax Thinner ...

Страница 5: ...ut not the cable when taking For inner cleaning contact an Authorized Service Center or a dealer Do not use harsh detergent that causes corrosion or damage on the unit Harsh detergent may also cause failure of product fire or electric shock Do not use this appliance for special purposes such as cooling pets foods precision machinery or objects of art ...

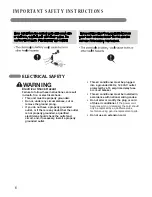
Страница 6: ...ut or remove the ground prong If you do not have a properly grounded outlet or if there is any doubt that the outlet is not properly grounded a qualified electrician should check the outlet and circuit and if necessary install a properly grounded outlet This air conditioner must be plugged into a grounded 60 Hz 120 VAC outlet protected by a 15 amp time delay fuse or circuit breaker This air condit...

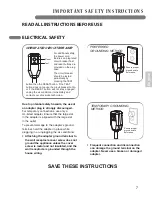
Страница 7: ...ter plug is strongly discouraged For temporary connections use only a UL listed adapter Ensure that the large slot in the adapter is aligned with the large slot in the outlet To prevent damage to the adapter s ground terminal hold the adapter in place while plugging in or unplugging the air conditioner Attaching the adapter ground terminal to the wall receptacle cover screw does not ground the app...

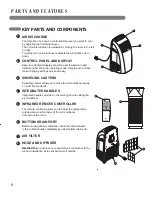
Страница 8: ...L AND DISPLAY Easy to read digital display shows the set temperature and indicator lights show the operating mode Simple push buttons make changing settings quick and easy The direction of air can be controlled wherever you want to cool by adjusting the horizontal louver 8 6 BOTTOM DRAIN PORT Before moving the air conditioner drain the internal water in the collection tank completely by using bott...

Страница 9: ...at the same time as stoves fireplaces and other combustion devices make sure there is a sufficient flow of fresh air into the room Do not use in tightly enclosed spaces with these types of devices This air conditioner is intended for household use as a consumer comfort appliance Do not use it as a precision climate control system or for purposes such as cooling precision equipment food pets plants...

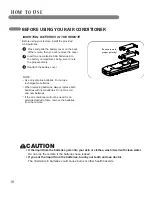
Страница 10: ...e rechargeable batteries When replacing batteries always replace both batteries with new batteries Do not mix old and new batteries If the air conditioner will not be used for an extended period of time remove the batteries from the remote HOW TO USE 10 Be sure to note proper polarity 1 2 3 English CAUTION If the liquid from the batteries gets onto your skin or clothes wash it well with clean wate...

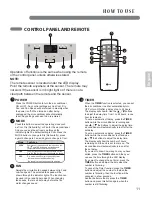
Страница 11: ...y of up to 24 hours The display will show 0 Use the buttons to adjust the delay time from 1 to 24 hours in one hour increments To set an automatic off delay press the TIMER button while the air conditioner is running and use the buttons to adjust the delay time air conditioner will automatically turn off after the set delay To set an automatic on delay press the TIMER button while the air conditio...

Страница 12: ...ements The temperature can be switched between degrees Fahrenheit and degrees Celsius pressing the button and button at the same time or pressing F C button on the remote When the TIMER function is selected use the buttons to adjust the delay time from 1 to 24 hours in one hour increments If you press and hold the buttons the set temperature or time will change automatically after a few seconds NO...

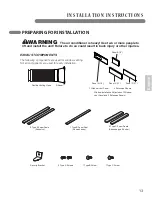
Страница 13: ...s Flexible Venting Hose 2 Type A Foam Seals Adhesive Diffuser Security Bracket 1 Type B Foam Seal Non adhesive 2 Type C Foam Seals Adhesive type Shorter English INSTALLATION INSTRUCTIONS PREPARING FOR INSTALLATION WARNING The air conditioner is heavy Use two or more people to lift and install the unit Failure to do so could result in back injury or other injuries 1 Window Vent Panel Panel A 18 3 E...

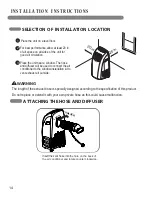
Страница 14: ... according to the specification of this product Do not replace or extend it with your own private hose as this could cause malfunction WARNING 14 Place the unit near a window The hose and diffuser will be used to connect the air conditioner to the window installation kit to vent exhaust air outside 3 ATTACHING THE HOSE AND DIFFUSER LOCK UNLOCK Insert the vent hose into the hole on the back of the ...

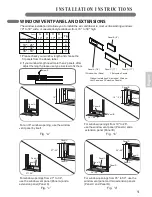
Страница 15: ...and two extension panels Panel C and Panel D Panel A Panel A 18 18 Panel A 19 26 19 26 Panel B Panel A English Fig a Fig b 27 34 Fig c Fig d 3 o t 7 2 m o r f s g n i n e p o w o d n i w r o F 4 A B C D 18 9 17 17 18 a 19 26 b c d Fig Panel Window Length 1 1 Please check your window length and choose the fit panels from the above tabel 2 If your window length need more than 2 panels after adjust t...

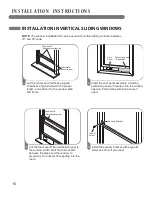
Страница 16: ...f 1 Cut the foam seal A adhesive type C adhesive type shorter to the proper length and attach it to the window sash and frame 2 Insert the vent panel assembly including extension panels if needed into the window opening Extend the extension panels if used Foam seal B Non adhesive type 3 Cut the foam seal B Non adhesive type to the window width Stuff the foam seal B between the glass and the window...

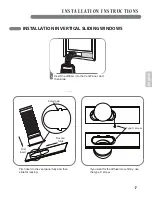
Страница 17: ...INSTRUCTIONS 17 5 English If you want fix the diffuser more firmly use the type C screw Small gap First Insert Second Slide First insert to the vent panel fully and then slide for locking Type C screw Insert the diffuser into the Vent Panel And then slide ...

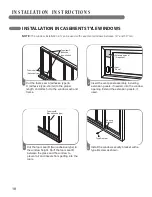
Страница 18: ...to the window height Stuff the foam seal B between the glass and the window to prevent air and insects from getting into the room Vent Panel INSTALLATION IN CASEMENT STYLE WINDOWS NOTE The window installation kit can be used with casement windows between 18 and 50 tall INSTALLATION INST RUCTIONS Extension panel if required Joints en Mousse C plus court de type adhésif Sellado con espuma A tipo adh...

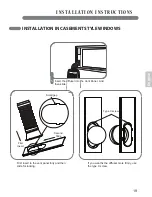
Страница 19: ...NSTRUCTIONS 19 English 5 If you want fix the diffuser more firmly use the type C screw Small gap First Insert Second Slide First insert to the vent panel fully and then slide for locking Type C screw Insert the diffuser into the Vent Panel And then slide ...

Страница 20: ... no need of using the upper drain port During DRY dehumidifying mode remove the drain plug and the exhaust hose from the back of the unit Install a drain hose 12mm 1 2 inside diameter and place the open end of the hose at a suitable drain location or outdoors Unplug the air conditioner disconnect the exhaust hose from the back and move the air conditioner to a suitable drain location or outdoors Y...

Страница 21: ...out the air filter by the handle 1 Use a vacuum cleaner to clean the filter If the filter is heavily soiled it can be washed in warm water using a mild detergent Do not use harsh cleaners or very hot water Do not wash in a dishwasher Allow the filter to dry completely before reinstalling Reinsert the filter 2 3 4 English 1 To prevent damage to the finish do not use gasoline benzene thinner etc or ...

Страница 22: ...p Remove and clean the filter allow it to dry completely then reinstall it Store the air conditioner in a cool dry location away from direct sunlight extreme temperatures and excessive dust Remove the batteries from the remote Before using the air conditioner again Make sure the filter and drain cap are in place Check the power cord to make sure it is in good condition with no cracks or damage Pla...

Страница 23: ... The room may have been hot The cooling coils are iced over The air filter is dirty Make sure there are no curtains blinds or furniture blocking the front of the air conditioner In COOL model press the DECREASE pad Clean the filter at least every 2 weeks See the Care and Cleaning section When the air conditioner is first turned on you need to allow time for the room to cool down Ice may block the ...

Страница 24: ...hort or open circuit in the indoor air thermistor Unplug the air conditioner and contact your authorized LG service center E1 Short or open circuit in the indoor pipe thermistor Unplug the air conditioner and contact your authorized LG service center E2 E4 24 The coil sensor temperature is low the unit will stop and display E4 to defrost After defrost the unit will re start ...

Страница 25: ... by accidents pests and vermin lightning wind fire floods or acts of God 5 Damage or failure resulting from misuse abuse improper installation repair or maintenance Improper repair includes use of parts not approved or specified by LG 6 Damage or failure caused by unauthorized modification or alteration to the product 7 Damage or failure caused by incorrect electrical current voltage or plumbing c...

Страница 26: ...1 800 243 0000 LG Customer Information Center Register your product Online www lgappliances com LG ELECTRONICS INC 1000 Sylvan Ave Englewood Cliffs NJ 07632 ...

Отзывы: