-39-
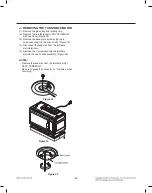
J. REMOVING THE TURNTABLE MOTOR
(1) Remove the glass tray and rotating ring.
(2) Remove the turntable shaft VERY CAREFULLY
with one hand. (Figure 18)
(3) Remove the base plate by removing the 8
screwssecuring it to the oven cavity. (Figure 19)
(4) Disconnect the lead wire from the turntable
motorterminals.
(5) Remove the 1 screw securing the turntable
motorto the oven cavity assembly. (Figure 20)
NOTES:
• Remove the lead wire from the turntable motor
VERY CAREFULLY.
• Be sure to grasp the connector, not the wires, when
removing.
Figure 18
Figure 19
Figure 20
Содержание LMVM2033BM
Страница 7: ... 7 4 Operation 4 1 Control Panel 9 10 11 12 13 14 8 7 6 5 4 3 2 1 21 22 23 24 25 15 16 17 18 19 20 ...
Страница 16: ... 16 Keypad Failure ...
Страница 41: ...DOOR PARTS 1004 1002 1000 1005 1009 1007 1006 1381 W262 1034 EV MODELS Customer Model Product Code SVC Model ...
Страница 42: ...2004 2381 W262 2008 2006 EV CONTROLLER PARTS MODELS Customer Model Product Code SVC Model ...
Страница 43: ...OVEN CAVITY PARTS 6000 3025 3026 3026 3011 3028 3010 3001 3034 3036 303R 3018 3036 303L 3024 3029 3029 3005 EV ...
Страница 44: ...W102 4000 4001 4004 4002 4003 4002 LATCH BOARD PARTS EV ...
Страница 47: ...6011 6010 6009 6008 VINYL BAG MBM5 MBM4 INSTALLATION PARTS EV ...
Страница 48: ......

