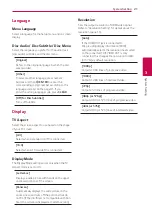
background image

System Setting

22

Syst
em Setting

3

Audio

Speaker Setup

Make the following settings for the built-in 4.2 
channel surround decoder.
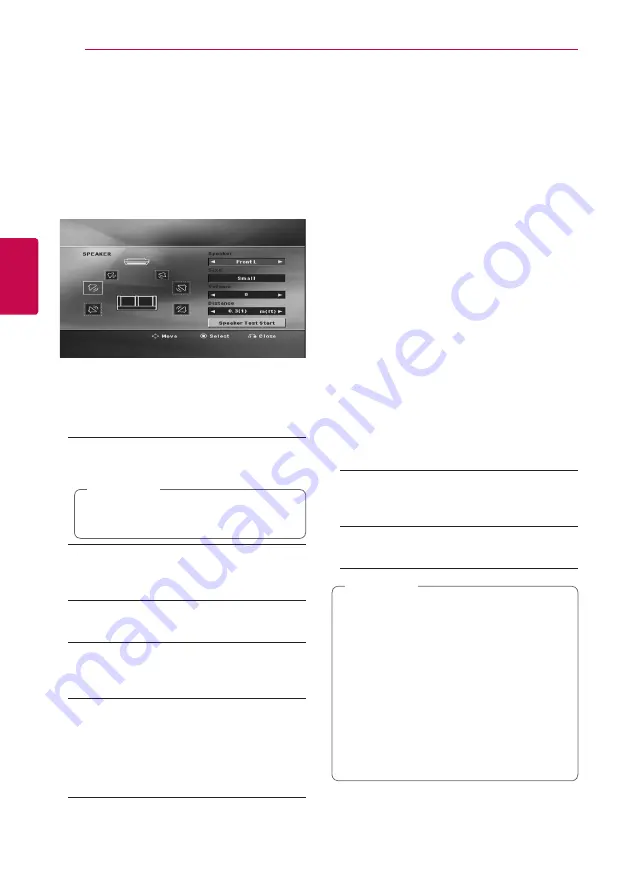
1.  Select [Speaker Setup] on the [Audio] menu.
2.  Press 

b


ENTER

The [SPEAKER] appears.

3.  Use 

AD

 to select the desired speaker.

4.  Adjust options using 

WSAD

 buttons.

5.  Returns to the previous menu by pressing 


x


RETURN

.

[Speaker]

Select a speaker that you want to adjust.

Certain speaker settings are prohibited by 
the Dolby Digital licensing agreement.


,

Note

[Size]

Since the speaker settings are fixed, you cannot 
change the settings.

[Volume]

Adjust the output level of each speaker.

[Distance]

Adjust the distance between each speaker and 
the listening position.

[Speaker Test Start]

Select [Speaker Test Start] by using the 

WS


and press 

b


ENTER

.  

Press 

b


ENTER

 again to stop. 


Adjust the volume to match the volume of test 
signals memorized in the system.

DRC (Dynamic Range Control) 

Make the sound clear when the volume is turned 
down (Dolby Digital only). Set to [On] for this effect.

Vocal

Select [On] to mix karaoke channels into normal 
stereo.
This function is effective for multi-channel karaoke 
DVDs only.

HD AV Sync

Sometimes Digital TV encounters a delay between 
picture and sound. If this happens you can 
compensate by setting a delay on the sound so that 
it effectively ‘waits’ for the picture to arrive: this is 
called HD AV Sync. Use 

WS

 (on the remote control) 

to scroll up and down through the delay amount, 
which you can set at anything between 0 and 
300ms.

Semi Karaoke 

When a chapter/ title/ track is fully finished, this 
function shows the score in the screen with a fanfare 
sound.

[On]

When you finished singing a score will appear on 
the screen.

[Off]

Fanfare and score do not appear on the screen.


y

 DVD, DVD Karaoke discs with more than 2 
tracks are available discs for the this function.


y

 When you watch movies, “off ” the Semi 
Karaoke at the SETUP menu or enjoy it 
without connecting the MIC if the fanfare or 
score appears during changing a chapter.


y

 This function operate on the DVD/CD mode.


y

 The Semi Karaoke function is available only 
when a microphone is connected. 


y

If you do not use the microphone, turn down 
the volume and disconnect the microphone.


,

Note

Содержание LHD687

Страница 1: ...Theater System 2002_Rev01 www lg com Copyright 2020 LG Electronics Inc All Rights Reserved Please read this manual carefully before operating your set and retain it for future reference MODEL LHD687 LHD687 S60T1 S MFL71688104 ...

Страница 2: ... other similar surface This product shall not be placed in a built in installation such as a bookcase or rack unless proper ventilation is provided or the manufacturer s instruction has been adhered to CAUTION This product employs a Laser System To ensure proper use of this product please read this owner s manual carefully and retain it for future reference Shall the unit require maintenance conta...

Страница 3: ...e refer to the main label on the bottom or the other surface of the product CAUTION No naked flame sources such as lighted candles should be placed on the apparatus Symbols Refers to alternating current AC 0 Refers to direct current DC Refers to class II equipment 1 Refers to stand by Refers to ON power Refers to dangerous voltage ...

Страница 4: ...eakers to the unit 13 Positioning the system 14 Connections to Your TV 14 HDMI Out Connection 15 What is SIMPLINK 16 Video Connection 16 Resolution Setting 17 Video Output Resolution 17 Optional Equipment Connection 17 AUX L R INPUT Connection 18 PORT IN Portable Input Connection 18 Listening to music from your portable player or external device 18 USB Connection 19 OPTICAL IN connection 19 Home t...

Страница 5: ...ct Optional 29 Adjust the speaker level settings 29 VOCAL FADER 29 Auto power down 30 Radio Operations 30 Listening to the radio 30 Presetting the Radio Stations 30 Deleting all the saved stations 30 Deleting a saved station 30 Improving poor FM reception 31 Sound adjustment 31 Setting the surround mode 31 Setting the USER EQ 32 Advanced Operations 32 Recording to USB 33 Using a Bluetooth wireless...

Страница 6: ...to your USB device Full HD up scaling Views Full HD picture quality with simple setup Home Theater Speaker ez Setup Listen to sounds from TV DVD and Digital device with vivid 4 2 ch mode Bluetooth Listens to music stored on your Bluetooth device LG Sound Sync Controls volume level of this unit by the remote control of your LG TV that is compatible with LG Sound Sync ...

Страница 7: ...ar on your TV display during operation and indicates that the function explained in this owner s manual is not available on that specific media Symbols Used in this Manual r DVD Video DVD R RW in Video mode and finalized t Audio CDs y Video files contained in the USB Disc u Audio files contained in the USB Disc i Photo files contained in the USB Disc Note Indicates special notes and operating feat...

Страница 8: ...y y File extensions jpg y y CD ROM file format ISO9660 JOLIET Video file requirement Video file compatibility with this unit is limited as follows y y Available resolution within 720 x 576 W x H pixels y y The file name of the Video subtitle should be entered within 45 characters y y If there is impossible code to express in the Video file it may be displayed as _ mark on the display y y Frame rat...

Страница 9: ...DVD title has a menu the title menu appears on the screen Otherwise the disc menu may not appear c Z STOP Stops playback d PLAY MONO STEREO Starts playback Selects Mono Stereo M PAUSE STEP Pauses playback C V SKIP Goes to the next or previous chapter track file c v SCAN Searches backward or forward d SPEAKER LEVEL Sets the sound level of desired speaker SOUND EFFECT Selects a sound effect mode VOL...

Страница 10: ... to a portable player with audio outputs e USB Port Connects a USB device f R Open Close Opens or closes the disc tray g T Play Pause Starts playback Pauses playback temporarily press again to exit pause mode h I Stop Stops playback i F Function Changes the input source or function j Volume Adjusts speaker volume k 1 Standby On Switches the unit ON or OFF ...

Страница 11: ...OUT TO TV Connects to TV with HDMI inputs Interface for digital audio and video d AUX L R INPUT Connects to an external source with 2 channel audio outputs e VIDEO OUT Connects to a TV with video inputs f ANTENNA FM FM Connects the FM wired antenna g OPTICAL IN Connects to optical audio equipment Rear panel ...

Страница 12: ...terminals marked plus Connect a woofer cord to the unit When connecting a woofer cord to the unit insert the connector until it clicks Color Speaker Position Grey SURR R Rear Front right Red FRONT R Orange SWF R Orange SWF L Front left White FRONT L Blue SURR L Rear y y Be careful to make sure children do not put their hands or any objects into the speaker duct speaker duct A hole for plentiful ba...

Страница 13: ...tion F B A A B C Front and Surround Rear speaker with built in subwoofer L Front and Surround Rear speaker with built in subwoofer R Place the speakers to the sides of the monitor or screen and as flush with the screen surface as possible Unit y y Do not stack the speakers and be careful that the speaker should not fall down Otherwise it may result in the speaker malfunction and causing personal i...

Страница 14: ...n If you have a HDMI TV or monitor you can connect it to this unit using a HDMI cable Type A High Speed HDMI Cable Connect the HDMI OUT jack on the unit to the HDMI IN jack on a HDMI compatible TV or monitor Set the TV s source to HDMI refer to TV s Owner s manual y y You can fully enjoy digital audio and video signals together with this HDMI connection y y When you use HDMI connection you can cha...

Страница 15: ...n is changed to black or green screen or the snow noise may occur on the screen y y If there is noise or lines on the screen please check the HDMI cable and use a higher version cable than High Speed HDMI Cable y y If you use LG TV Bluetooth or AUX OPT Function of the unit the audio is not output to HDMI Note What is SIMPLINK Some functions of this unit are controlled by the TV s remote control wh...

Страница 16: ...ing Setup menu 1 Press nHOME 2 Use A D to select the Setup and press b ENTER The Setup menu appears 3 Use W S to select Display option then press D to move to the second level 4 Use W S to select the Resolution option then press D to move to the third level 5 Use W S to select the desired resolution then press b ENTER to confirm your selection If your TV does not accept the resolution you have set...

Страница 17: ...T 1080p 1080i 720p and 480p or 576p and 480i or 576i VIDEO OUT 480i or 576i Optional Equipment Connection AUX L R INPUT Connection Connect an Output of auxiliary device to the AUX L R INPUT Connector Red White To the audio output jacks of your component TV VCR etc If your TV has only one output for audio mono connect it to the left white audio jack on the unit Note ...

Страница 18: ...ess Z STOP twice in a row 2 Remove the USB device from the unit Note Compatible USB Devices y y MP3 Player Flash type MP3 player y y USB Flash Drive Devices that support USB2 0 or USB1 1 y y The USB function of this unit does not support some USB devices USB device requirement y y Devices which require additional program installation connected to a computer are not supported y y Do not extract the...

Страница 19: ...n power off mode if you press OPTICAL then power is on and automatically changed to AUX OPT mode 1 Connect the unit s OPTICAL IN jack to jack on optical out of your TV or Digital Device etc 2 Select the AUX OPT by using the OPTICAL on the remote control to select the AUX OPT directly Or To select the AUX OPT function press P RADIO INPUT on the remote control 3 Listen sound with 4 2 ch speaker 4 To...

Страница 20: ...ed as the initial language 1 Press 1 POWER to turn the unit on The language setup menu will appear on the screen 2 Use WSAD to select a language then press b ENTER The confirm menu will appear 3 Use AD to select the Enter then press b ENTER to finish the language setup To display and exit the Setup menu 1 Press nHOME Displays the Home Menu 2 Select an Setup by using AD 3 Press b ENTER Displays the...

Страница 21: ... setting works only when the TV Aspect mode is set to 4 3 Letterbox Displays a wide picture with bands on the upper and lower portions of the screen Panscan Automatically displays the wide picture on the entire screen and cuts off the portions that do not fit If the disc file is not compatible with Pan Scan the picture is displayed at Letterbox ratio Resolution Sets the output resolution of HDMI v...

Страница 22: ...cal Select On to mix karaoke channels into normal stereo This function is effective for multi channel karaoke DVDs only HD AV Sync Sometimes Digital TV encounters a delay between picture and sound If this happens you can compensate by setting a delay on the sound so that it effectively waits for the picture to arrive this is called HD AV Sync Use WS on the remote control to scroll up and down thro...

Страница 23: ... eight 8 is the least restrictive Unlock If you select unlock parental control is not active and the disc plays in full 4 Press b ENTER to confirm your rating selection Password You can enter or change password 1 Select Password on the Lock menu and then press D 2 Press b ENTER 3 Input a password and press b ENTER To change the password press b ENTER when the Change option is highlighted Input a p...

Страница 24: ...o Do this Stop Press Z STOP Playback Press d PLAY MONO STEREO Pause Press M PAUSE STEP Frame by Frame playback Press M PAUSE STEP repeatedly to play title Frame by Frame DVD Movie only Skipping to the next previous chapter track file During playback press C V SKIP to go to the next chapter track file or to return to the beginning of the current chapter track file Press C SKIP twice briefly to step...

Страница 25: ... menu by pressing WSAD 3 Press d PLAY MONO STEREO to confirm 1 5 times speed playback r The 1 5 speed allows you to watch the pictures and listen to the sound quicker than playing at a normal speed 1 During playback press d PLAY MONO STEREO to play at 1 5 times speed dX1 5 appears on the screen 2 Press d PLAY MONO STEREO again to exit Screen Saver The screen saver appears when you leave the unit i...

Страница 26: ... folder MP3 WMA only Moving to the previous or next file list Selecting all tracks files Deselecting all tracks files File information will be displayed according to the ID3TAG information on the appropriate music file MP3 only 2 Select a desired music on the List by using the WS then press MARKER to appears the mark on the list 3 Press b ENTER Displays the play mode 4 Select the play mode by usin...

Страница 27: ...ose x RETURN Returning to the Home Menu About help menu in the full screen Menu Buttons Operation Menu m INFO DISPLAY Displaying the Option menu a d Prev Next A D Moving to another file x List x RETURN Returning to the Photo menu Options while viewing a photo You can use various options during viewing a photo in full screen 1 While viewing a photo in full screen press m INFO DISPLAY to display the...

Страница 28: ...example to answer the telephone appears the MUTE in the display window To cancel it press again MUTE or change the volume level Last Scene Memory r This unit memorizes last scene from the last disc that is viewed The last scene remains in memory even if you remove the disc from the unit or switch off the unit If you load a disc that has the scene memorized the scene is automatically recalled Power...

Страница 29: ...f music in the various source MP3 WMA CD etc Press the VOCAL FADER and FADE ON will appear in display window To cancel it press VOCAL FADER again The quality of the VOCAL FADER may be different depending on the recording conditions of music files y y This function is available to use only when a microphone is connected y y It is not available on the MONO source Note Auto power down This unit will ...

Страница 30: ...ing TUNING 3 Press b ENTER a preset number will flash in the display window 4 Press PRESET to select the preset number you want 5 Press b ENTER The station is stored 6 Repeat the steps 2 to 5 to store other stations 7 To listen a preset station press PRESET or 0 to 9 numerical buttons on the remote control Deleting all the saved stations 1 Press and hold CLEAR for two seconds ERASEALL will flash u...

Страница 31: ...rce the treble bass and surround sound effect USER EQ You can adjust the sound effect FOOTBALL You can enjoy more dynamic sound as watching sports game in the stadium y y In some of surround modes some speakers there s no sound or low sound It depends on the mode of surround and the source of audio it is not defective y y This function is not operated when the microphone is connected to the unit N...

Страница 32: ...off the unit during USB recording If does not an incomplete file may be made and not deleted on PC y y Recording through microphones is not available y y If USB recording does not work the message like NO USB ERROR USB FULL or NO REC is displayed on the display window y y Multi card reader device or external HDD can not be used for USB recording y y A file is recorded by 128 Mbyte about 2 hours wh...

Страница 33: ... user guide Once a pairing operation is performed it does not need to be performed again 1 Select the Bluetooth function by using the P RADIO INPUT Appears BT READY in display window 2 Operate the Bluetooth device and perform the pairing operation When searching for this unit with the Bluetooth device a list of the devices found may appear in the Bluetooth device display depending on the type of B...

Страница 34: ...alfunction due to devices using same frequency such as Medical equipment Microwaves or wireless LAN devices the connection will be disconnected y y When someone stands and interrupts communication between Bluetooth device and the unit the connection will be disconnected y y If the gotten away of the distance between Bluetooth and the unit the sound quality is lower and lower the connection will di...

Страница 35: ...t and the connection in the cases below when using LG Sound Sync The unit is turned off Changing the function to the others Disconnecting the wireless connection caused by interference or a distance y y Bluetooth connection is unavailable after connecting LG TV y y Bluetooth and LG Sound Sync connection are unavailable during recording Note With wireless connection 1 Turn on the unit by pressing 1...

Страница 36: ...n Off This unit automatically turns on by an input source LG TV or Bluetooth This unit automatically turns off when you turn off the LG TV after the unit is connected to LG TV by AUTO POWER function When you turn on your TV or an external device connected to this unit this unit recognizes the input signal and select the suitable function You can hear the sound from your device If you try to connec...

Страница 37: ...e disc using a soft cloth with outward strokes A DVD CD will not play y y Insert a disc y y Insert a playable disc check the disc type colour system and regional code y y Place the disc with the label or printed side facing upwards y y Enter your password or change the rating level Humming noise heard while a DVD or CD is playing y y Clean the disc using a soft cloth with outward strokes y y Move ...

Страница 38: ...ce y y Depending on the connected device this function may not operate LG Sound Sync does not work y y Check whether your LG TV supports LG Sound Sync y y Check connection of LG Sound Sync Wireless y y Check sound setting of your TV and this unit USB is not recognized y y Format the USB device and connect it again When formatting the USB device select the available file system Page 18 ...

Страница 39: ...the surface of the unit Maintaining the Unit The unit is a high tech precision device If the optical pick up lens and disc drive parts are dirty or worn the picture quality could be diminished For details please contact your nearest authorized service center Notes on Discs Handling Discs Do not touch the playback side of the disc Hold the disc by the edges so that fingerprints do not get on the su...

Страница 40: ...GL Hong Kong HK Hungary HU India IN Indonesia ID Israel IL Italy IT Jamaica JM Japan JP Kenya KE Kuwait KW Libya LY Luxembourg LU Malaysia MY Maldives MV Mexico MX Monaco MC Mongolia MN Morocco MA Nepal NP Netherlands NL Antilles AN New Zealand NZ Nigeria NG Norway NO Oman OM Pakistan PK Panama PA Paraguay PY Philippines PH Poland PL Portugal PT Romania RO Russian Federation RU Saudi Arabia SA Sen...

Страница 41: ...an 7285 Icelandic 7383 Indonesian 7378 Interlingua 7365 Irish 7165 Italian 7384 Japanese 7465 Kannada 7578 Kashmiri 7583 Kazakh 7575 Kirghiz 7589 Korean 7579 Kurdish 7585 Laothian 7679 Latin 7665 Latvian Lettish 7686 Lingala 7678 Lithuanian 7684 Macedonian 7775 Malagasy 7771 Malay 7783 Malayalam 7776 Maori 7773 Marathi 7782 Moldavian 7779 Mongolian 7778 Nauru 7865 Nepali 7869 Norwegian 7879 Oriya ...

Страница 42: ...ny use of such marks by LG Electronics is under license Other trademarks and trade names are those of their respective owners Notes on Copyrights y y This product incorporates copyright protection technology that is protected by U S patents and other intellectual property rights Use of this copyright protection technology must be authorized by Rovi and is intended for home and other limited viewin...

Страница 43: ...ture 5 C to 35 C Operating humidity 5 to 60 RH Bus Power Supply 5 V 0 500 mA Inputs Outputs VIDEO OUT 1 0 V p p 75 Ω sync negative RCA jack x 1 HDMI OUT video audio 19 pin Type A HDMI Connector x 1 ANALOG AUDIO IN 2 0 Vrms 1 kHz 0 dB 600 Ω RCA jack L R x 1 DIGITAL IN OPTICAL 3 V p p Optical jack x 1 PORT IN 0 5 Vrms 3 5 mm stereo jack x 1 Tuner FM Tuning Range 87 5 to 108 0 MHz or 87 50 to 108 00 ...

Страница 44: ...bwoofer 1 Way 1 Speaker Impedance Front Speaker 3 Ω Surround Rear Speaker 3 Ω Subwoofer 3 Ω Rated Input Power Front Speaker 208 W RMS 3 Ω at 1 kHz THD 25 Surround Rear Speaker 208 W RMS 3 Ω at 1 kHz THD 25 Subwoofer 208 W RMS 3 Ω at 60 Hz THD 25 Net Dimensions W x H x D 233 x 998 x 300 mm y y Design and specifications are subject to change without notice ...

Страница 45: ......

Отзывы: