background image

17 

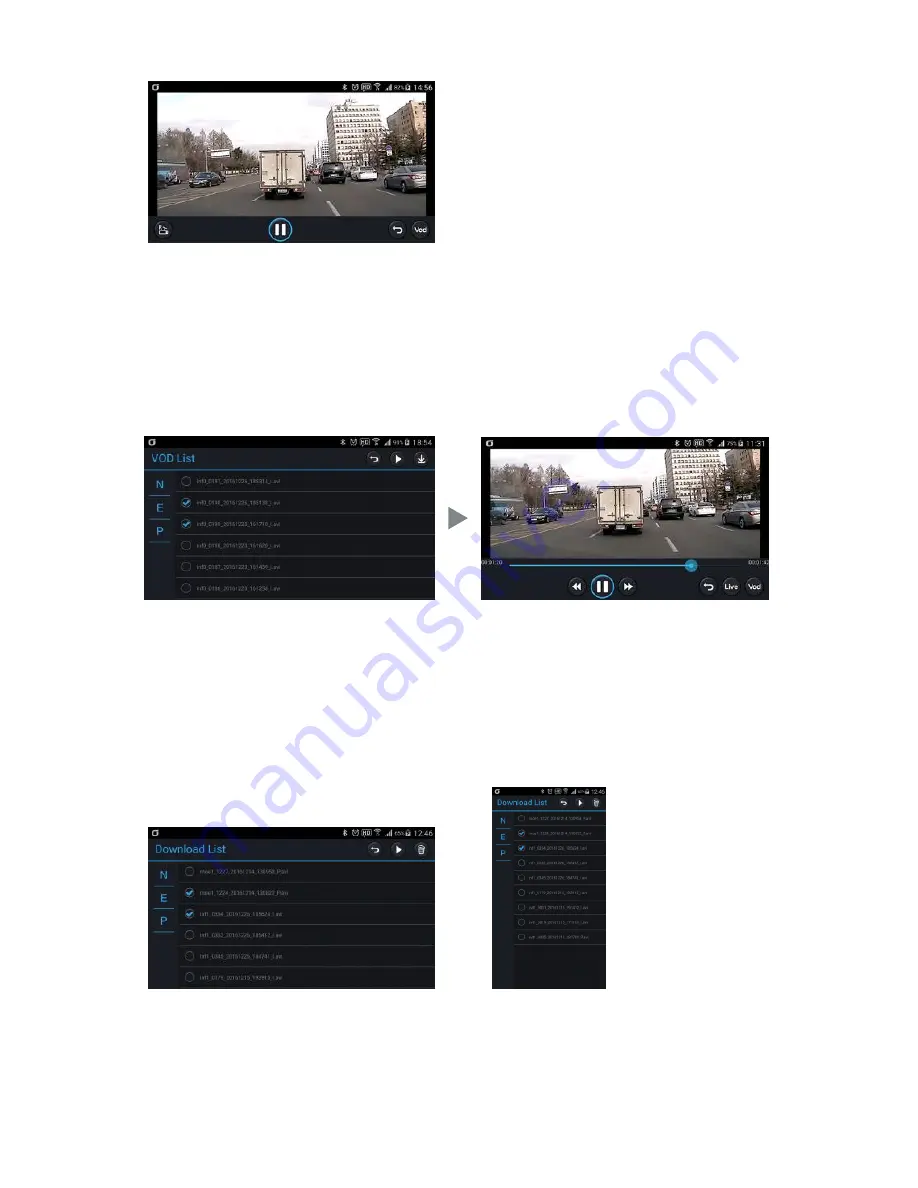
▶ Live View 

※ Touch "Live View" to start live view with a ringing sound in the black box. The screen definition of the recording saved 

in the black box switches to 4 Mbytes for front and 2 Mbytes for rear. 

※ 30 seconds after the live view ends, the screen definition switches back to the standard definition with a ringing 

sound. This applies to both parking and normal modes. 

1) Touch the screen to display the control menu at the bottom. 

2) R : Switch to the rear view (F : Switch to the front view). 
3) VOD : Move to the VOD list.


▶ 

VOD  View 

1) To play a stored video, select a video and press the Play button. 

2) Select a channel to play (front/rear) to start playing. 

3) Touch the VOD Play screen to display the control menu at the bottom. 

4) When playing a VOD video, you cannot adjust the seek bar using the control menu.  

The total time will be displayed as 5 minutes if the video is currently being recorded or ended abnormally. 

5) Press the Download button to download the selected video to your smartphone. 

▶ 

Download View 

1) It displays videos downloaded to your smartphone. You can play the video in the same way as VOD play. 

2) When playing a downloaded video, you can adjust the seek bar using the control menu.  

The total time will be displayed based on the actual video duration even for abnormally recorded videos.


Содержание LGD521

Страница 1: ...User Manual 2CH Front Full HD Rear HD High Resolution Front 30FPS Rear 30FPS Format free recording Low battery and high temperature shutdown Security LED Audio prompts Wireless Connectivity LGD521 ...

Страница 2: ...use the product in places in high temperature humidity Do not exert excessive force to the product especially to buttons and to bracket as it may cause breakdown Check for correct recording before each use Extended exposure to sunlight and high temperature in the summer may cause malfunction Do not turn off power or remove the MicroSD card during firmware upgrading as it may cause malfunction Do n...

Страница 3: ...e damaged Park your vehicle in the shade in the summer When validating an accident or car damage please remove the MicroSD card and keep separate Due to overwrite important data may be deleted When turning off the power of the product and remove the MicroSD card before LED is turned off the last recording file may not be saved so please be careful When driving a car do not remove the MicroSD card ...

Страница 4: ...ex A7 CPU Flash Memory 1Gb RAM 2Gb Video Recording 2 channels Camera Front 4M pixels Rear 1M pixels Recording Resolution Front FHD 1920 x 1080P Rear HD 1280 x 720P Memory Device micro SD Card up to 128GB opt View Angle Front 110 H X 60 V X 130 D OV4689 Rear 89 9 H X 64 9 V X 120 3 D HDX10 GPS External GPS optional Input Power DC 12V 24V Power Consumption Up to 350 mA 13V Auxiliary Power Super Capa...

Страница 5: ...mponents The components of the product mentioned in this Quick Manual are subject to change without prior notice to improve its performance Bracket Clip Main Body LGD521 Consumable MicroSD Card Adapter Cigarette Lighter Adapter Power Cord CLA Rear HD Camera Rear Camera Video Cable Quick Manual GPS Module Option Hardwire Cable Option Manual 3 Package 5 ...

Страница 6: ... HD DASHCAM Front Camera How to remove the bracket Security LED WLAN Button Multi Key Power Button GPS LED REC LED Mic Speaker Power Connection Rear Camera Connection GPS Connection SD Card Slot 4 Product Parts 6 ...

Страница 7: ...iles on the MicroSD card or TV OUT The video splitter cable has to be connected when checkingTV OUT After checking recording operation well arrange the cable If you embed cable to car wall please check cable connection Also after embedded double checkif the product can record properly 3 Adjust the Rear Camera Angle 6 Arrange the Front Rear Camera Cable Adjust the angle with the rear camera attache...

Страница 8: ...140120 eeeeee Time created Description Remarks hhmmdd 091603 f Recording mode Description Remarks I Normal recording Turned on when ACC is on E Event recording It can be set in Menu Storage Setting Normal Recording Event Recording P Parking recording Turned on when ACC is off Properties of Recorded Video Bitrate bits per second Definition FHD Video HD Video Ultra high definition 11 Mbps 6 Mbps Hig...

Страница 9: ...definition Front Rear 72 30 45 154 61 92 310 124 290 Standard definition Front Rear 96 39 58 196 78 117 394 158 373 By time When the memory capacity runs out recorded files will be automatically deleted beginning with the oldest one By type The percentage of allowed memory usage is set per recording type When the memory capacity for a recording type runs out recorded files of the recording type wi...

Страница 10: ...pact event Once an event happens and a new file is created the second event will not be recognized for 10 seconds after occurrence of the first event Recording of a motion event in the parking mode A buffer video of 10 seconds will be included in the video when a motion event occurs in the parking mode Recording of multiple motion events in the parking mode If another motion event occurs during mo...

Страница 11: ...anguage is set to others Japanese English Spanish and French the Security LED is turned off If you change the LED settings through WLAN or PC Viewer the changed settings apply Note 1 If you select 1 Channel in the settings when 2 channels are connected the product follows the scenario for 2 channel connection Power Management 11 Low Voltage Cut off You can set the constant power cut off voltage to...

Страница 12: ... button for 9 seconds until the product rings three times If you release the button when it rings three times the product repeats ringing three times for 20 seconds If you press the multi key button once again within 20 seconds the product is reset with a message Turning off If you do not press the button again within 20 seconds the product rings once differently and the reset is cancelled Changin...

Страница 13: ... is completed When you hear a voice message asking whether to format the card release the multi key button Then press the button once again to format the card To exit the format mode without formatting the card turn off the power switch 15 SD Card 16 Time Settings Setting the Time Zone GPS connected You can change the time zone in the Time Zone option under System Settings of your smartphone app T...

Страница 14: ...in 30 seconds Wi Fi bitrate maintained Entering the parking mode in the live view Live view ends without switching to the parking mode Bitrate switches to the standard bitrate 30 seconds later After additional 10 seconds the product switches to the parking mode Entering the parking mode within 30 seconds after ending the live view Live view ends without switching to the parking mode Bitrate switch...

Страница 15: ...nternet Service Check menu is On on wireless setting try again after changing to Off Try again after all setting on wireless Signal Sensitivity Setting Wireless disconnection can occur depending on a receiving sensitivity and interference Stable wireless connection can be used in the vehicle During wireless connection FPS can be different depending on the type of Smartphone Auto recovery will be o...

Страница 16: ... connection is carried out successfully the black box rings once and sets the system time of your phone to the black box time and the screen changes to the menu screen Since an iPhone starts the app after connecting to WLAN manually iPhone does not display the connection screen and the list of connected access points AP and goes to the main menu screen directly 1 Connect instantly if a recently co...

Страница 17: ...ideo select a video and press the Play button 2 Select a channel to play front rear to start playing 3 Touch the VOD Play screen to display the control menu at the bottom 4 When playing a VOD video you cannot adjust the seek bar using the control menu The total time will be displayed as 5 minutes if the video is currently being recorded or ended abnormally 5 Press the Download button to download t...

Страница 18: ...oots and the WLAN app switches to the home screen 4 After the black box reboots you need to turn on WLAN in the black box again to reconnect 5 The changed password is saved in the smartphone and you can reconnect to the black box without re entering the password 6 You can reset the black box password without using the WLAN app by resetting the black box to the factory default In this case you need...

Страница 19: ...s file 2 Viewer settings 16 Move 5 seconds backward 3 Black box settings 17 Play or pause 4 Print the video 18 Stop 5 Capture the video 19 Move 5 seconds forward 6 Zoom 20 Play the next file 7 Separate the files 21 Adjust voice volume 8 Switch between the video list and the map screen 22 Total file duration play time 9 Find file location 23 Brightness Saturation 10 Screen for switching between the...

Страница 20: ...p of a video Product Model Select the product model Video Adjustment Show the brightness contrast saturation of the Viewer play screen Volume Show the video volume of the Viewer play screen Viewer Settings 20 21 Using the PC Viewer Video Adjustment Brightness Contrast Saturation Volume JPEG Storage Path Select Language Play Mode Repeated Play Always at the Top Yes Yes No No Flip Vertically Flip Ho...

Страница 21: ...LED Output Set the front security LED lighting Cut off Voltage Set the cut off voltage when using the constant power Select Recording Channel Set the recording channels Apply Time Settings Apply the time changed in the Time Settings option You must select Yes to apply the changed time Time Settings Set the time of the recorded file Language Settings Set the guide voice language 21 Settings 1 21 Us...

Страница 22: ...each recording file type Time Zone If GPS is used it automatically synchronizes with the time zone for the region Daylight Saving Time Set whether to apply the daylight saving time 22 Settings 2 21 Using the PC Viewer Reset OK Cancel Basic Settings System Settings Camera Sensor Settings Reset the Sensor Brightness Color Adjust Percentage of SD Card Folders Some files may be deleted when the black ...

Страница 23: ...SD card format canceled automatically 23 Firmware Update 1 Power off dshcam and separate SD card from Dashcam 2 Insert SD card to PC and copy firmware file to SD card 3 Insert SD Card Dashcam and Power on 4 Dashcam will update firmware file automatically and LED indicator will be bli nked while updating 5 Once firmware update completed Dashcam will be rebooted automatically Dow nloaded firmware al...

Страница 24: ...red with charges for parts or labor in the following cases 1 The warranty period of one year has expired 2 The warranty period has not expired but any of the following cases applies 1 The failure results from any disassembly repair or modification made by an unauthorized service provider a user or any third party 2 The failure results from the use of the product in conjunction with components not ...

Страница 25: ... Warranty period One year from the purchase date of the product In the event of defects within 1 month from the date of purchase Free repair or replacement Exception For Micro SD card it is 3 months from the date of purchase see the table below Paid service period For 1 year after the expiration of the warranty period see the table below This product records and saves videos of vehicle accidents b...

Страница 26: ...Non LCD FHD HD DASHCAM 26 LGD521 ...

Отзывы: