


10
CAR CD/MP3/WMA Receiver
Listening a CD - more you can do
Pause or restart a CD
Press
B
B[]
on the player (
B
B
/
[]
on the remote control) during playback. Press this
button again to resume play.
Search for a section within a track / file
Press and hold
< / >
on the player (
.bb
/
BB>
on remote control) for
about 1 second during playback and then release at the point you want.
Skip to another track / file
Press
< / >
on the player (
.bb
/
BB>
on remote control.) To skip to previous
track, press briefly
<
within 3 seconds of playing time.
Press [
#
] and a number
you want to move on remote control to move the files/track.
Intro scan
Press or press and hold
SCAN
on the player (
SCAN
on remote control). Each
files in the current selected folder (
SCAN
) or the first 10 seconds of each
tracks/files (
SCAN
) on the disc are played. To cancel it, press the button again.
Repeat
Press or press and hold
RPT
on the player (
RPT
on the remote control). The
current selected tracks/files (
1 RPT
) or folder (
RPT
) on the disc is played
repeatedly. To cancel it, press the button again.
Shuffle
Press or press and hold
SHF
on the player (
SHF
on the remote control). Each
files in the current selected folder (
SHF
) or all of the tracks/files (
SHF
) on
the disc is played randomly. Press
SHF
again to cancel it.
Note
During random playback, if you press < (
?m m
on remote control), you won’t
go back to the previous track.
MP3/WMA Track -10 / +10
(If there is no folder or one folder.) During playback press
u
u
/PS
to go back 10
tracks, and press
U
U/
/
AS
to go forward 10 tracks.
MP3/WMA Folder UP/DOWN
(If there are more than two folders.) During playback, press
u
u
/PS
to go back to
the previous folder, and press
U
U/
/
AS
to go forward to the next folder.
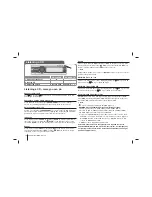
See information about your music
MP3/WMA files often come with tags. The tag gives the Title, Artist or Album.
Press
DISP
repeatedly during MP3/WMA/CD TEXT file playback. If there is no
information, “NO TEXT” will be shown in the display window.
Note
•
: The icon is displayed during MP3/WMA playback.
• MP3/WMA Disc compatibility with this unit is limited as follows:
1. Sampling Frequency / 8 - 48kHz (MP3) 22.05 - 48kHz (WMA)
2. Bit rate / within 8 - 320kbps (include VBR) (MP3) 32 -320kbps (WMA)
3. CD-R/CD-RW file system should be “ISO 9660”
4. If you record MP3/WMA files using software which cannot create a FILE
SYSTEM, for example “Direct-CD” etc., it will not be possible to playback
MP3/WMA files. We recommend that you use “Easy-CD Creator” which
creates an ISO9660 file system.
5. WMA decoder is supported until “Class 2A”.
Customers should also note that permission is required in order to
download MP3/WMA files and music from the Internet. Our company has
no right to grant such permission. Permission should always be sought
from the copyright owner.
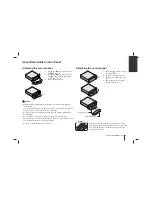
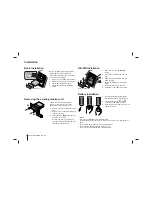
Listening a CD
ON PLAYER
ON REMOTE
1. Open the Front Panel.
2. Insert a CD.
3. Adjust the volume.
-
Rotate PWR
-
-
VOLUME


