background image

A7

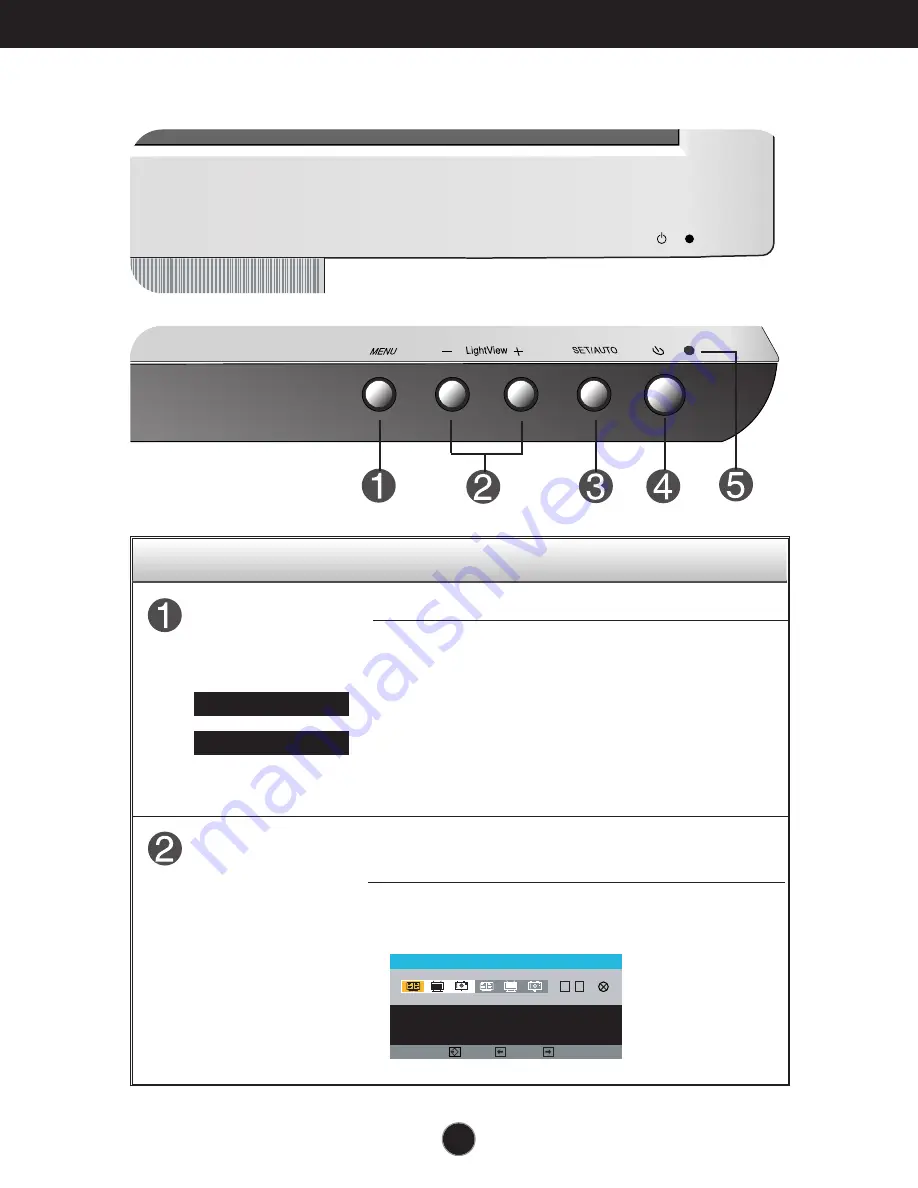
Control Panel Functions

MENU

SET/AUTO

LightView

-

+

Front Panel Controls

Buttons

Use these buttons to select or adjust functions in the On
Screen Display.

MENU Button

Use this button to enter or exit the On Screen Display.

LightView hot key

For more information, refer to page A14

- +

Control

Function

O S D   V E R R O U I L L A G E

O S D   D E V E R R O U I L L A G E E

OSD LOCKED/UNLOCKED

This function allows you to lock the current control
settings, so that they cannot be inadvertently changed.
Press and hold the 

MENU button

for 5 seconds. The

message 

"OSD LOCKED"

should appear.

You can unlock the OSD controls at any time by pushing
the 

MENU button

for 5 seconds. The message 

"OSD

UNLOCKED"

should appear.

L I G H T   V I E W

D A Y     T E X T

1

2

MENU

-

+

SET

Bottom

Содержание L1530S**H Series

Страница 1: ...tions before using the product Keep the User s Guide CD in an accessible place for furture reference See the label attached on the back cover and quote this information to your dealer when you require service User s Guide L1530S L1730S H H ...

Страница 2: ...e what type of power supply you have in your home consult with your dealer Overloaded AC outlets and extension cords are dangerous So are frayed power cords and broken plugs They may result in a shock or fire hazard Call your service technician for replacement Do not Open the Display There are no user serviceable components inside There are Dangerous High Voltages inside even when the power is OFF...

Страница 3: ... Active Matrix LCD with anything hard as this may scratch mar or damage the Active Matrix LCD permanently Do not press the LCD screen with your finger for a long time as this may cause some afterimages Some dot defects may appear as Red Green or Blue spots on the screen However this will have no impact or effect on the display performance If possible use the recommended resolution to obtain the be...

Страница 4: ...is turned off Connecting the stand base 1 Place the monitor with its front facing downward on a cushion or soft cloth 2 Align the hooks on the stand base with the matching slots in the base of the monitor 3 Insert the hooks into slots Important This illustration depicts the general model of connection Your monitor may differ from the items shown in the picture Once you connect the stand base try n...

Страница 5: ... Tilt Range 5 20 To adjust height of monitor Height Range maximun 2 76 inch 70 0mm 70 0mm Push down the top of monitor While pressing the PUSH button Adjust the height PUSH Button Ergonomic It is recommended that in order to maintain an ergonomic and comfortable viewing position the forward tilt angle of the monitor should not exceed 5 degrees ...

Страница 6: ...hten the thumbscrews to secure the connection 3 Connect the power cord into a proper power outlet that is easily accessible and close to the display Wall outlettype PC outlettype PC MAC Analog signal Variesaccordingtomodel 1 2 Macadapter ForAppleMacintoshuse aseparateplugadapterisneededto changethe15pinhighdensity 3row D subVGAconnector onthesuppliedcabletoa15pin2rowconnector Sliding Door ...

Страница 7: ...me this function automatically adjusts the display to optimal settings for individual input signals If you want to adjust the monitor while in use or wish to manually run this function once again push the AUTO button on the front panel of the monitor Otherwise you may execute the FACTORY RESET option on the OSD adjustment menu However be aware that this option initializes all the menu items except...

Страница 8: ...r to page A14 Control Function O S D V E R R O U I L L A G E OSD DEVERROUILLAGEE OSD LOCKED UNLOCKED This function allows you to lock the current control settings so that they cannot be inadvertently changed Press and hold the MENU button for 5 seconds The message OSD LOCKED should appear You can unlock the OSD controls at any time by pushing the MENU button for 5 seconds The message OSD UNLOCKED ...

Страница 9: ...ton to enter a selection in the On Screen Display SET AUTO Button AUTO IMAGE ADJUSTMENT When adjusting your display settings always press the SET AUTO button before entering the On Screen Display OSD This will automatically adjust your display image to the ideal settings for the current screen resolution size display mode The best display mode is 15 inch monitor 1024x768 17 inch monitor 1280x1024 ...

Страница 10: ...ss a control use the or Buttons When the icon you want becomes highlighted press the SET AUTO Button Use the Buttons to adjust the image to the desired level Use the SET AUTO Button to select other sub menu items Push the MENU Button once to return to the main menu to select another function Push the MENU Button twice to exit from the OSD Automatic save With the OSD open once you have made an adju...

Страница 11: ...in menu Sub menu Reference The following table indicates all the On Screen Display control adjustment and setting menus PRESET RED GREEN BLUE To adjust the position of the screen To restore the default settings To customize the color of the screen To customize the screen status for a user s operating environment To select or customize desired image settings To improve the clarity and stability of ...

Страница 12: ... the all items shown on the Menu Press the MENU Button then the main menu of the OSD appears Menu Name Icons Sub menus P I C T U R E 50 50 0 MENU SET NOTE OSD On Screen Display menu languages on the monitor may differ from the manual MENU Exit Adjust Decrease Increase SET Enter Select another sub menu On Screen Display OSD Selection and Adjustment Button Tip ...

Страница 13: ... 0 MENU SET PICTURE Select the screen color 9300K Slightly bluish white 6500K Slightly reddish white Set your own red color levels Set your own green color levels Set your own blue color levels P R E S E T 50 50 50 6500K 9300K MENU SET COLOR H POSITION V POSITION To move image left and right To move image up and down H P O S I T I O N 50 50 MENU SET POSITION MENU Exit Decrease Increase SET Select ...

Страница 14: ...vel of the video card in order to provide the optimal image Activate this function when white and black colors are present in the screen For example If this does not improve the screen image restore the factory default settings If necessary perform the white balance function again This function will be enabled only when the input signal is an analog signal If you want to adjust select the YES and ...

Страница 15: ...he SET button and save the YES value using the buttons This is under normal operating conditions On Screen Display OSD Selection and Adjustment L I G H T V I E W D A Y T E X T 1 2 MENU SET L I G H T V I E W U S E R 1 1 2 MENU SET B R I G H T N E S S 50 50 0 MENU SET 6500K 9300K N O Main menu Sub menu Description DAY NIGHT USER 1 USER 2 NORMAL LIGHTVIEW To adjust the USER1 USER2 sub menu function P...

Страница 16: ...y is in power saving mode try moving the mouse or pressing any key on the keyboard to bring up the screen Make sure if the power is on Try to turn on the PC This message appears when the signal from the PC video card is out of horizontal or vertical frequency range of the display See the Specifications section of this manual and configure your display again This message appears when the signal cab...

Страница 17: ... setting If the results are unsatisfactory decrease the vertical bars or stripes using the CLOCK icon in the on screen display Press the SET AUTO button to automatically adjust your display image to the ideal setting If the results are unsatisfactory decrease the horizontal bars using the PHASE icon in the on screen display Check Control Panel Display Settings and adjust the display to the recomme...

Страница 18: ...you can also download the driver from our web site http www lge com Make sure to check if the video card supports Plug Play function PICTUREandCOLORmenuscannotbeactivatedfromtheOSDmenu Are you unable to open the PICTURE or COLOR menus from the OSD menu Ensure that the NORMAL setting is selected for LIGHTVIEW If LIGHTVIEW is set to DAY TEXT MOVIE PHOTO NIGHT TEXT MOVIE PHOTO or USER1 USER2 the PICT...

Страница 19: ...25W Stand by Suspend 1W DPMS Off 1W Width 36 75 cm 14 47 inches Height 39 89 cm 15 70 inches Min 46 89 cm 18 46 inches Max Depth 21 00 cm 8 27 inches Net 4 6 kg 10 14 lbs Tilt 5 20 Height 2 76 inch 70 0mm AC 100 240V 50 60Hz 0 6A Operating Conditions Temperature 10 C to 35 C Humidity 10 to 80 non Condensing Storage Conditions Temperature 20 C to 60 C Humidity 5 to 95 non Condensing Attached Detach...

Страница 20: ...x 1024 60Hz DDC 2B Normal 43W Stand by Suspend 1W DPMS Off 1W Width 39 80 cm 15 67 inches Height 41 84 cm 16 47 inches Min 48 84 cm 19 23 inches Max Depth 21 00 cm 8 27 inches Net 6 10 kg 13 45 lbs Tilt 5 20 Height 2 76 inch 70 0mm AC 100 240V 50 60Hz 1 0A Operating Conditions Temperature 10 C to 35 C Humidity 10 to 80 non Condensing Storage Conditions Temperature 20 C to 60 C Humidity 5 to 95 non...

Страница 21: ...A VESA VESA VESA VESA MAC VESA VESA VESA Recommended Unlike CRT monitors which require a high refresh rate to minimize flickering TFT technology is inherently flicker free If possible configure your computer for 1024 x 768 addressability at 60Hz vertical refresh rate Display Modes Resolution Horizontal Freq kHz Vertical Freq Hz 1 2 3 4 5 6 7 8 9 10 11 12 13 640 x 350 720 x 400 640 x 480 640 x 480 ...

Страница 22: ...A21 Specifications Indicator Normal Stand by Suspend DPMS Off green amber amber LED Color MODE ...

Страница 23: ...arate the stand base using a screwdriver as shown in the picture 4 Install the VESA standrad wall mounting VESA wall mounting Connected to another object stand type and wall mounted type This monitor accepts a VESA compliant mounting interface pad optional For further information refer to the VESA Wall Mounting Instruction Guide Kensington Security Slot optional Connected to a locking cable that c...

Страница 24: ...Digitally yours ...

Отзывы: