background image

22

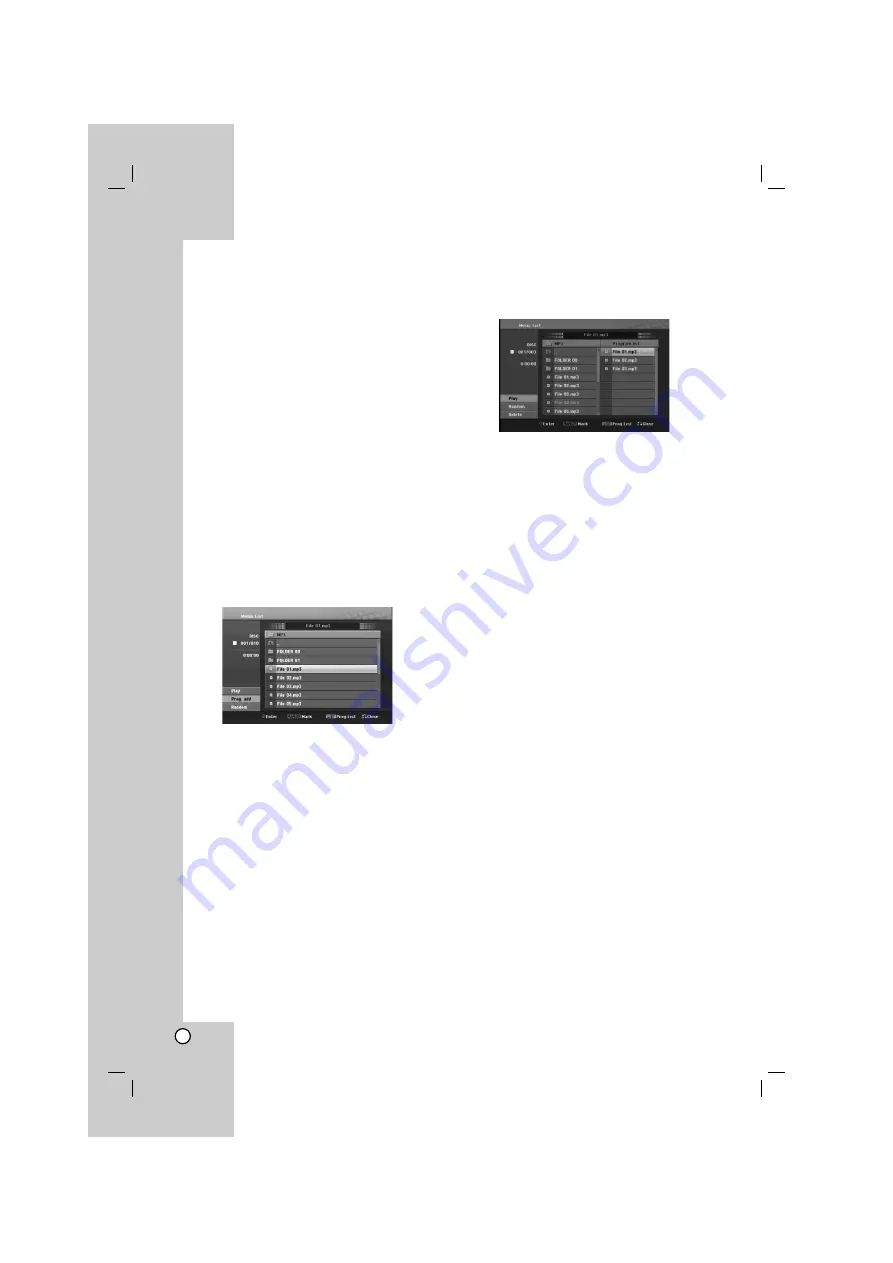
Program Playback with Audio
CD and MP3/WMA file

Program Playback enables you to make custom
playlists of Audio CD or MP3/WMA tracks. Programs
can contain up to 99 Audio CD tracks or 256
MP3/WMA files.
1. Use 

v

V

to select a track/file (or folder) on the

Audio CD or Music menu.

Selecting multiple files/tracks (folders)

1. Press MARKER.

A check mark appears on the file/track or
folder. Press MARKER again to cancel the
marked file/track or folder. 

2. Repeat step 1 to mark additional file/track

(folders).

2. Press ENTER.

The options appear on the left side of the menu.

3. Use 

v

V

to select the [Prog. add] option then

press ENTER.

4. Repeat steps 1-3 to mark additional tracks.

Note:

If you select a folder for Programmed Playback, all
tracks/files in the folder are added to the Program List. 

5. Use 

B

to move to the Program list.

The programmed track you selected last is
highlighted on the Program list.

6. Use 

v

V

to select the track you want to start

playing.

7. Press 

B

(PLAY) to start.

Playback stops after playing the last programmed
track in the Program list.

8. To exit Program Playback and resume normal

playback, select a track on the original list by
pressing 

and 

v

/

and press 

B

(PLAY). 

Tips:

You can access or remove the Program list screen
by pressing MENU/LIST.
You can not remove the Program list screen during
the programmed playback and the programmed 

Xx

x

.

Program list menu options

1. Press 

v

/

V

to select a track/file on the Program

list then press ENTER. 
The menu options appear.

2. Use 

v

V

to select an option then press ENTER

to confirm your selection.

[Play] Playback begins in the order in which you
programmed the tracks from the selected track.

[Random] Start or cancel random playback.

[Delete] Deletes the track(s) from the Program
list menu.

Repeat Programmed Tracks 

Press REPEAT to select the desired Repeat mode.

[TRACK] Repeats the current track.
[ALL] Repeats all tracks on the Program List.
[OFF] Cancels Repeat mode (no display).

Erasing a Track from the Program list

1. Select the track you wish to erase from the

Program list. Use MARKER button to select
multiple tracks.

2. Press ENTER. The menu options appears
3. Select [Delete] option then press ENTER.

Содержание J10D-SA

Страница 1: ...ase read this instruction booklet carefully and completely Internet address http ua lge com Customer Information Center LG 380 44 490 7777 8 800 303 0000 J10D X_JA8ULLK_ENG_1055 2 1CH Home Theater System OWNER S MANUAL MODEL J10DX SPEAKERS J10D SF J10D SA USB ...

Страница 2: ... conditions could result in electric shock or fire Periodically examine the cord of your appliance and if its appearance indicates damage or deterioration unplug it discontinue use of the appliance and have the cord replaced with an exact replacement part by an authorized servicer Protect the power cord from physical or mechanical abuse such as being twisted kinked pinched closed in a door or walk...

Страница 3: ...r TV with the Supplied Remote Control 27 Language Codes 28 Area Codes 28 Troubleshooting 29 Specifications 30 Copyright Recording equipment should be used only for lawful copying and you are advised to check carefully what is lawful copying in the area in which you are making a copy Copying of copyright material such as films or music is unlawful unless permitted by a legal exception or consented ...

Страница 4: ...les About the Symbol Display may appear on your TV display during operation and indicates that the function explained in this owner s manual is not available on that specific media Notes on Discs Handling Discs Do not touch the playback side of the disc Hold the disc by the edges so that fingerprints do not get on the surface Never stick paper or tape on the disc Storing Discs After playing store ...

Страница 5: ...if it is recorded in a compatible format there are cases in which it may not play because of the settings of the application software used to create the disc Check with the software publisher for more detailed information This unit requires discs and recordings to meet certain technical standards in order to achieve optimal playback quality Pre recorded DVDs are automatically set to these standard...

Страница 6: ...requiring installation of a driver is not supported 3 USB Flash Drive Devices that support USB2 0 or USB1 1 Notes Do not extract the USB device in operating play copy move etc A back up demands to prevent a data damage If you use a USB extension cable or USB hub the USB device might not be recognized This unit can support USB 2 0 or USB 1 1 A device using NTFS file system is not supported Only FAT...

Страница 7: ...to a moderate level before you plug in the headphones Connecting headphones will switch off the speakers f USB Connect to a USB port of multimedia USB memory etc g 1 1 I Switches the unit ON or OFF h Remote Sensor Point the unit remote control here i HOME Accesses or removes the HOME menu j PLAY Starts playback k STOP Stops playback l PAUSE Pauses playback temporarily m CD slot loader Notes Do not...

Страница 8: ...nal depending on how you connect the unit to the TV x EURO AV Connect to a TV with SCART jack y FM ANTENNA Connect the FM antenna to this terminal z AM ANTENNA Connect the AM antenna to this terminal Active Subwoofer Touch pad This unit has touch sensitive controls that respond to the touch of your fingers Notes Do not place objects on the top panel of the main unit Do not touch the touch pad hard...

Страница 9: ...d or forward SKIP Go to next or previous chapter or track d DISPLAY Accesses On Screen Display MENU LIST Accesses menu on a DVD disc HOME Accesses or removes the HOME menu SETUP Accesses or removes the Setup menu RETURN O Removes the menu PRESET Select programme of Radio TUN Tunes in the desired radio station b B v V left right up down Selects an option in the menu ENTER Confirms menu selections V...

Страница 10: ...aker cable S2 into the rear jack of the right speaker Note Make sure cable connectors are fully inserted and seated firmly in the speaker jacks Connecting the supplied antennas The rear of the active subwoofer provides jacks for the AM and FM antennas included with your system Note An outdoor antenna may be used in place of the supplied indoor antennas To add an outdoor antenna consult a qualified...

Страница 11: ...ection Connect an optical output of digital device into the OPTICAL IN jack on the rear of the active subwoofer using optical cable O Caution When you use HDMI connection the VIDEO OUT and EURO AV connections are not available Connecting an additional appliance There are two options for connecting an additional appliance to the unit Option A AUX IN L R jacks e g VCR Laser disc player Option B MOBI...

Страница 12: ...n Contents Protection HDCP is used to protect digital content transmitted and received HDMI has the capability to support standard enhanced or high definition video plus standard to multi channel surround sound audio HDMI features include uncompressed digital video a bandwidth of up to 5 gigabytes per second one connector instead of several cables and connectors and communication between the AV so...

Страница 13: ...f three levels to set up the options but some require greater depth for the variety of settings General Operation 1 Press SETUP or select SETUP from the HOME Menu screen and the setup menu appears 2 Use v V to select the desired option 3 While the desired item is selected press B to move to the second level 4 Use v V to select the second desired option 5 Press B to move to the third level 6 Use v ...

Страница 14: ...resentation possible thanks to digital audio technology However you may wish to compress the dynamic range of the audio output the difference between the loudest sounds and the quietest ones Then you may listen to a movie at a lower volume without losing clarity of sound Set DRC to ON for this effect Vocal Set Vocal to ON only when a multi channel karaoke DVD is playing The karaoke channels on the...

Страница 15: ...t 8 is the least restrictive No Limit If you select No Limit parental control is not active and the disc plays in full 4 Press ENTER to confirm your rating selection Note If you set a rating for the unit all disc scenes with the same rating or lower are played Higher rated scenes are not played unless an alternate scene is available on the disc The alternative must have the same rating or a lower ...

Страница 16: ...essing b B For details about each item see the pages in parentheses Title Current title or track number total number of titles or tracks Chapter Current chapter number total number of chapters Time Elapsed playing time See page 19 Audio Selected audio language DVD VIDEO only or audio channel See page 18 Subtitle Selected subtitle See page 18 Angle Selected angle total number of angles See page 19 ...

Страница 17: ...ly to play Frame by Frame SKIP During playback press or to return to the beginning of the current chapter track or to go to the next chapter track Press twice briefly to step back to the previous chapter track Tips To go directly to any chapter during DVD playback press DISPLAY and press v V to select the chapter icon Then input the chapter number or use b B On an Audio CD to go directly to any tr...

Страница 18: ... to select point A and point B and repeats a sequence from point A Starting point to point B End point TITLE If the current DVD title has a menu the title menu appears on the screen Otherwise the disc menu may appears MENU LIST The disc menu appears on the screen SUBTITLE During playback press SUBTITLE then press b B repeatedly to select a desired subtitle language AUDIO Press AUDIO then press b B...

Страница 19: ...he disc during playback The Marker icon appears on the TV screen briefly Repeat to enter up to nine markers To Recall or Clear a Marked Scene 1 During disc playback press SEARCH The marker search menu appears on the screen 2 Within 5 seconds press b B to select a marker number that you want to recall or clear 3 Press ENTER and playback starts from the marked scene Or press CLEAR and the marker num...

Страница 20: ...anguage code until the subtitle is displayed properly 4 Press B PLAY to continue playback Movie List menu options 1 Press v V to select a folder file on the Movie List menu then press ENTER Movie List menu options appear The menu options displayed differ depending on the selected media 2 Press v V b B to select an option and press ENTER Play Start playback the selected title Open Opens the folder ...

Страница 21: ...nu options appear The menu options displayed differ depending on the selected media 2 Press v V b B to select an option and press ENTER Play Start playback the selected title Random Start or cancel random playback Open Opens the folder and a list of files in the folder appears Prog add Adds the track s to Program list page 22 Random 1 Press v V to select a file then press ENTER The menu options ap...

Страница 22: ... Playback stops after playing the last programmed track in the Program list 8 To exit Program Playback and resume normal playback select a track on the original list by pressing b and v V and press B PLAY Tips You can access or remove the Program list screen by pressing MENU LIST You can not remove the Program list screen during the programmed playback and the programmed Xx x Program list menu opt...

Страница 23: ...st menu appears Photo List menu options 1 Press v V to select a file on the Photo List menu then press ENTER The menu options appear The menu options displayed differ depending on the selected media Selecting multiple files folders 1 Press MARKER A check mark appears on the file or folder Press MARKER again to cancel the marked file or folder 2 Repeat step 1 to mark additional file folders 2 Use v...

Страница 24: ...enu 2 Press ENTER The Slide Show menu appears 3 Use b B v V to set the options Object option Selected Views slide show only selected files with MARKER button Use the MARKER button to select multiple files All Views slide show all files Speed option Sets the Slide Show speed to Slow Normal or Fast 4 Select the Start option then press ENTER to start the Slide Show 5 Press STOP to stop the Slide Show...

Страница 25: ...E Using Apple iPod You can perform the basic operations of your iPod using the supplied remote control with this unit Notes You need an Apple iPod universal dock with a built in infrared IR receiver and an audio cable with a 3 5 millimeter stereo miniplug It works with all iPod models that have a dock connector Depending on the type of iPod you may need to insert one of the dock adapters into the ...

Страница 26: ...tions have already been entered the FULL message will appear in the display window for a moment and then a preset number will flash To change the preset number follow the steps 5 6 as above Listening to the Radio Preset radio stations in the unit s memory first see Presetting the radio stations on the left 1 Press TUNER until AM MW or FM appears in the display window The last received station is t...

Страница 27: ... off Virtual sound Press VSM to set the virtual sound 3D STEREO Realtime 3D positioned sound rendering technology with stereo sources optimized for stereo speakers Listeners may experience amazing virtual surround effects with their own multimedia players Virtual sound A pending downmix technology converts 5 1 channel to 2 channel sound having directional information of audio And it makes a 2 chan...

Страница 28: ...6669 Cambodian 7577 Catalan 6765 Chinese 9072 Corsican 6779 Croatian 7282 Czech 6783 Danish 6865 Dutch 7876 English 6978 Esperanto 6979 Estonian 6984 Faroese 7079 Language Code Fiji 7074 Finnish 7073 French 7082 Frisian 7089 Galician 7176 Georgian 7565 German 6869 Greek 6976 Greenlandic 7576 Guarani 7178 Gujarati 7185 Hausa 7265 Hebrew 7387 Hindi 7273 Hungarian 7285 Icelandic 7383 Indonesian 7378 ...

Страница 29: ...nto the wall outlet securely Select the appropriate video input mode on the TV so the picture from the unit appears on the TV screen Connect the video cable securely Turn on the TV Adjust the volume Disconnect the headphones Switch off MUTE Clean the disc Insert a playable disc Check the disc type color system and regional code Place the disc with the playback side down Clean the disc Cancel the R...

Страница 30: ...eo audio output 19 pin HDMI standard Type A Amplifier Output power Front 75W 75W 4Ω at 1 kHz THD 10 Subwoofer 150W 3Ω at 60 Hz THD 10 Tuner Specifications Tuning Range FM 65 74 MHz 87 5 108 MHz Intermediate Frequency FM 10 7 MHz Signal to noise ratio 60 dB Mono Tuning Range AM 522 1 620 kHz Intermediate Frequency AM 450 kHz Antenna Wire antenna FM Loop antenna AM Notice the date of the production ...

Страница 31: ...P NO MFL38591055 ...

Отзывы: