

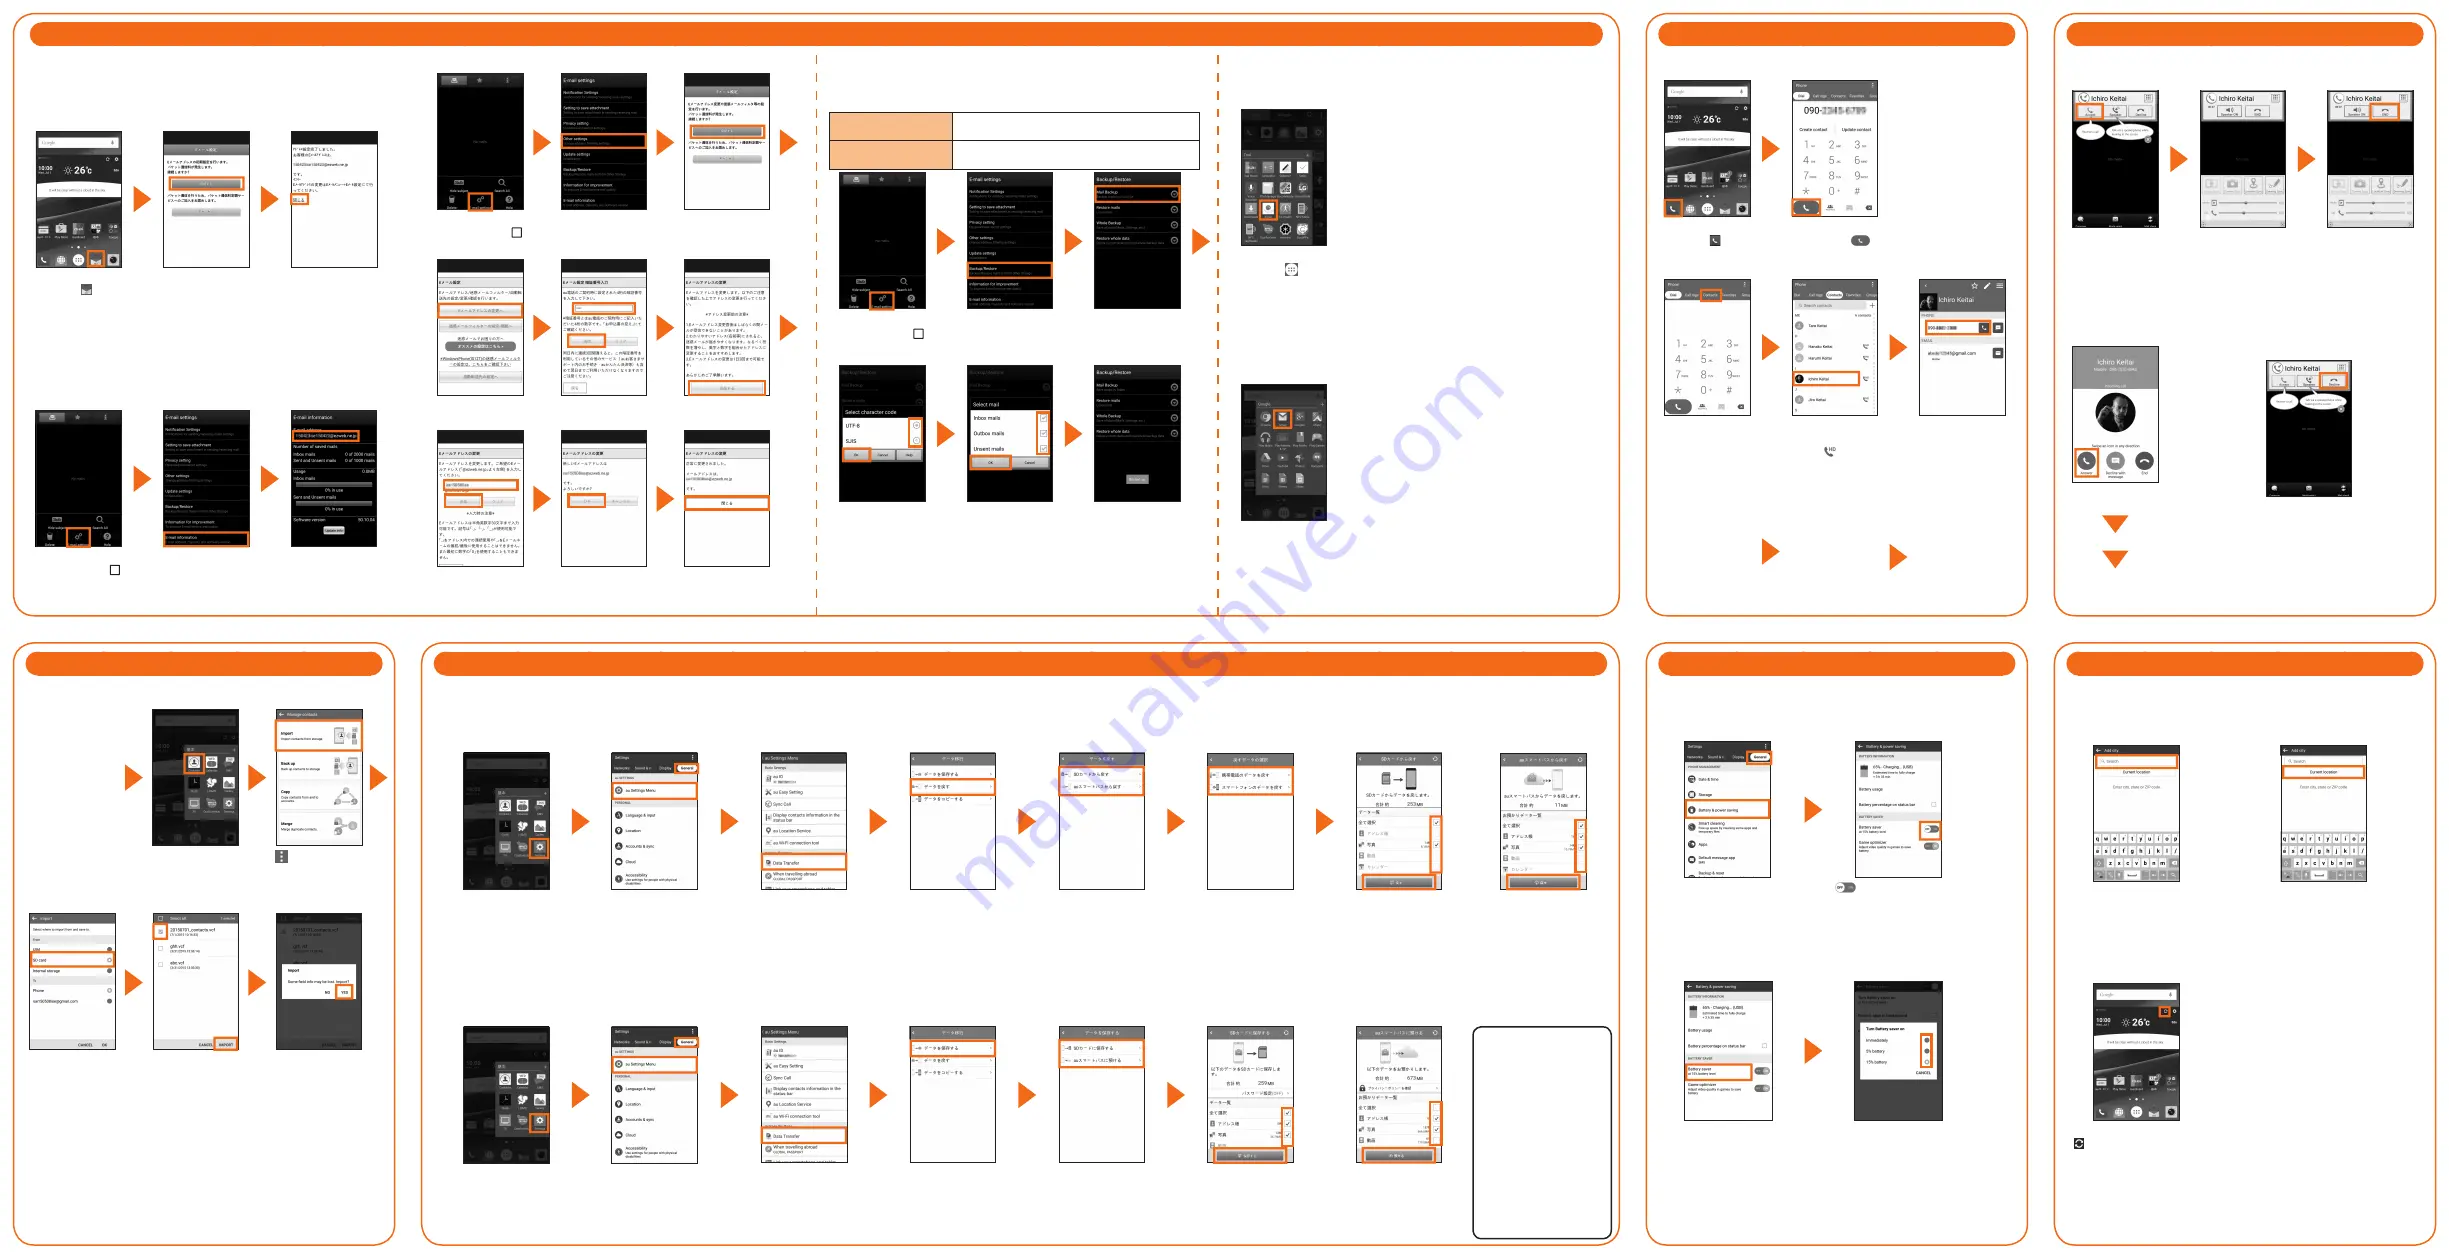
ReducingBatteryConsumption
■
Using Battery Saver
Set up to switch to Battery Saver Mode automatically when the
battery is running low.
On the home screen, "基
本 (Basic)" → "Settings"
→ "General" tab →
"Battery & power saving"
"
" on "Battery saver"
* Confirm the status such
battery etc. on "BATTERY
INFORMATION.
■
Set Battery saver on timing
On the Battery & power
saving screen, "Battery
saver"
"Turn Battery saver on"
→ Tap timing
SettingUpWeatherInformation
Display weather information for the set city.
Multiple cities can be set.
E-mailSettingsandBackup
E-mail (@ezweb.ne.jp) is a service that enables you to exchange e-mails
with other cell phones, which support e-mail, and with PCs. Your e-mail
address is decided automatically after the initial settings.
The e-mail address in the initial settings can be changed.
■
Initial Settings
On the home
screen, " "
Confirm the contents
→ "接続する
(Connect)"
Once the initial
settings for e-mail are
completed, your e-mail
address appears.
Confirm E-mail
address → "閉じる
(Close)"
* When "Information
for improvement"
appears, confirm the
content and follow the
onscreen instructions.
■
Confirming your e-mail address
On the E-mail screen,
touch and hold " "
→ "E-mail settings"
"E-mail information"
Your e-mail address
appears in the e-mail
address field.
■
Changing your e-mail address
On the E-mail screen,
touch and hold " "
→ "E-mail settings"
"Other settings"
"接続する (Connect)"
"Eメールアドレスの変更へ (To
Change E-mail address)"
Enter the security
code → "送信 (Send)"
Confirm the contents
→ "承諾する (Accept)"
Enter e-mail address
→ "送信 (Send)"
"OK"
"閉じる (Close)"
■
Backing up e-mails
You can back up your e-mails to the product or a microSD memory card.
The product can also retrieve the backup data that has been saved.
The save destination is as follows.
Internal storage in
the product
/storage/emulated/0/private/au/email/BU
microSD memory
card
/storage/external_SD/private/au/email/BU
On the E-mail screen,
touch and hold " "
→ "E-mail settings"
"Backup/Restore"
"Mail Backup" →
"OK"
Select character
code to make
backup data → "OK"
Place checkmarks
on a mail type to
back up → "OK"
"Backed up." appears
when the backup is
complete.
■
PC mail
PC mail can be used to send/receive e-mail from this product by
setting a mail account that you normally use on your PC.
●Using PC mail for the first time
Setup a PC mail account.
On the PC mail screen, select an
e-mail provider → enter a PC mail
address and password → "Next" →
enter an account name → "Done".
* If you need to manually enter the settings,
contact your service provider or system
administrator for the correct PC mail
account settings.
On the home
screen, " " →
"Tool" → "Email"
■
Gmail
Gmail is a mail service provided by Google. You can send/receive
Gmail from this product.
You can also use Gmail from the PC or the browser on this product
and share mail information.
On the home
screen, "Google"
→ "Gmail"
HowtotransferdatafromtheauSettingsmenu
You can restore/backup data from your previous au phone to this product using a microSD memory card or au Smart Pass servers.
• You need to setup an au ID to restore or save data using au Smart Pass servers.
• If you use a microSD memory card to restore data, save the data from your previous au phone to a microSD memory card.
■
How to restore data from the au Settings menu
ReceivingCalls
You can receive a call in the following steps.
* "Display the popup on an incoming call" is set to ON in Sync call
settings by default.
"Accept" during an
incoming call
The call starts.
"END" to end the
call
TransferringContacts
You can transfer data from your previous phone to this product
using a microSD memory card.
Save the contacts
(address book)
from your previous
phone to a microSD
memory card, and
insert the card into
the product
Refer to the instruction
manual of your previous
phone, etc. on how to
save the contacts.
On the home screen,
"基本 (Basic)" →
"Contacts"
" " → "Manage
contacts" →
"Import"
"SD card"
*
→ "OK"
Place checkmarks
on the item to
be imported →
"IMPORT"
"YES"
* Select the account or location that you want to import data to select if a
saving location screen does appear.
MakingCalls
■
Entering a phone number to make a call
On the home
screen, " "
Enter a phone
number → "
"
■
Calling from Contacts
On the phone
screen, tap
"Contacts" tab
Tap the other
party to be called
* Tap " " to
skip the contact
details screen
and directly make
a call.
Tap a phone number
■
Calling from Call logs
On the phone
screen, tap "Call
logs" tab
Tap the other
party to be called
Tap a phone number
On the home screen,
"基本 (Basic)" →
"Settings"
"General" tab → "au
Settings Menu"
"Data Transfer"
"データを戻す (Restore
data)"
Select restore data from
* You need to setup an au ID to
restore data using "auスマート
パスから戻す (Restore data from
au Smart Pass)" (data backed
up on au Smart Pass servers).
If you selected "SDカードから戻す
(Restore data from an SD card)",
select your previous au phone model
* This screen is not displayed if you
selected "auスマートパスから戻す
(Restore data from au Smart Pass)"
on the restore data method screen.
Place checkmarks on the
data to be restored, "戻す
(Restore)" → "完了 (Done)"
* This screen is displayed if
you selected "スマートフォ
ンのデータを戻す (Restore
smartphone data)".
Place checkmarks on the
data to be restored, "戻す
(Restore)" → "完了 (Done)"
■
How to save data from the au Settings menu
On the home screen,
"基本 (Basic)" →
"Settings"
"General" tab → "au
Settings Menu"
"Data Transfer"
"データを保存する (Save
data)"
Select save data to
* You need to setup an au ID
to save data from "auスマート
パスに預ける (Save data to au
Smart Pass)" (saving data to
au Smart Pass servers).
Place checkmarks on
the data to be saved,
"保存する (Save)" → "完
了 (Done)"
Place checkmarks on the
data to be saved, "預ける
(Save)" → confirm the details,
follow the instructions on the
screen → "完了 (Done)"
■
Receiving a call
during sleep mode
You can receive a call in the same
manner even when Sync Call is OFF.
Slide "Answer" during
an incoming call
The call starts.
"End" to end the
call
■
Rejecting an
incoming call
When you reject a call, the
caller is informed that there is
no response.
"Decline" during an
incoming call
■
Set a city by entering it
On the Home screen,
"Tap to enter a location"
on Smart Notice → enter
a city name → select a
city from the candidates
■
Set your current city
On the Home screen,
"Tap to enter a location"
on Smart Notice →
"Current location"
■
Manually update weather information
On the Home screen,
" " on Smart Notice
If you selected "SDカードから戻す
(Restore data from an SD card)"
If you selected "SDカードに保存
する (Save data to an SD card)"
If you selected "auスマートパスから戻す
(Restore data from au Smart Pass)"
If you selected "auスマートパスに預け
る (Save data to au Smart Pass)"
If you want to use the
"Data backup" application
to automatically save your
photos and contacts to the
au Smart Pass server, you
can set it up by following
the procedure below.
On the home screen, "基
本 (Basic)" → "Settings"
→ "General" tab → "au
Setting Menu" → "Backup
Setting" → "定期的に自動で
預ける (Periodically save
automatically)"