background image

15

ENG

ENGLISH

CUSTOMIZING SETTINGS

The available program settings are described below.
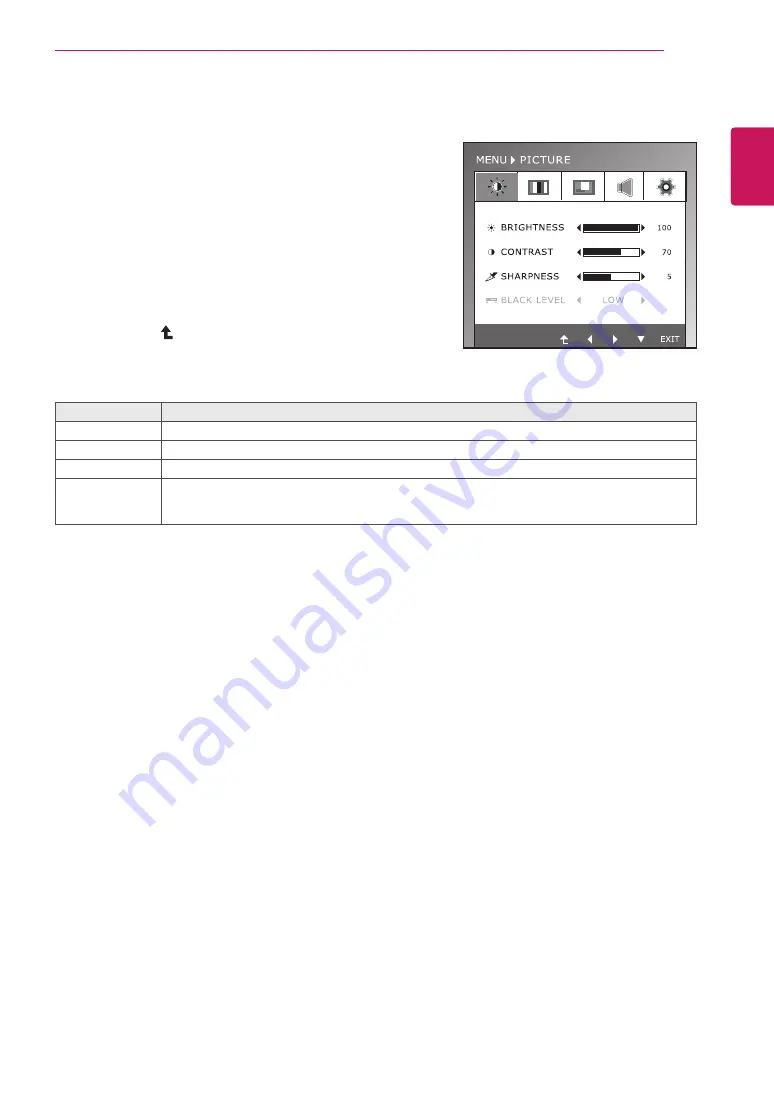
PICTURE

1

  Press any button on the bottom of the Monitor set to display 

the 

MONITOR SETUP

 OSD menu. 


2

  Press the 

MENU

 button to display the options in the OSD 

menu.

3

  Select 

PICTURE

 by pressing the buttons on the bottom of 

the Monitor set and set the options.

4

  Select 

EXIT

 to leave the OSD menu.

To return to the upper menu or set other menu items, use 
the up arrow ( ) button. 


The available picture settings are described below.

Menu

Description

BRIGHTNESS

To adjust the brightness of the screen. 

CONTRAST


To adjust the contrast of the screen.

SHARPNESS

To adjust the clearness of the screen.

BLACK LEVEL

You can set the offset level. If you select'HIGH', the screen will be bright and if you select ‘LOW’, 

the screen will be dark. (only for HDMI input)

* Offset?As the criteria for video signal, it is the darkest screen the monitor can show. 

Содержание IPS225P

Страница 1: ...www lg com OWNER S MANUAL LCD MONITOR IPS225P IPS235P Please read this manual carefully before operating your set and retain it for future reference LCD MONITOR MODEL ENGLISH ...

Страница 2: ...ot function 10 Mounting on a wall 11 USING THE MONITOR SET 11 Connecting to a PC 11 D SUB connection 11 DVI D connection 11 HDMI connection 13 CUSTOMIZING SETTINGS 13 Accessing The Main Menus 14 Customizing Settings 14 Menu Settings 15 PICTURE 16 COLOR 17 DISPLAY 17 VOLUME 18 OTHERS 19 MODE Setting 20 DUAL PACKAGE Setting 21 TROUBLESHOOTING 23 SPECIFICATIONS 23 IPS225P 24 IPS235P 25 Preset Modes R...

Страница 3: ...ries are not covered by the warranty y y The accessories supplied with your product may vary depending on the model y y Product specifications or contents in this manual may be changed without prior notice due to upgrade of product functions y y User must use shielded signal interface cables D sub 15 pin cable DVI D cable with ferrite cores core in the connector to maintain standard compliance for...

Страница 4: ...4 ENG ENGLISH ASSEMBLING AND PREPARING Parts and buttons Power Indicator y y Lighting On Turned on y y Lighting Off Turned off Connection panel See p 11 Button See p 13 Power Button ...

Страница 5: ... menus See p 19 DUAL Use this button to enter DUAL MONITOR and DUAL WEB menus See p 20 AUTO When adjusting your display settings always press the AUTO button on the MONITOR SETUP OSD Only supported in Analog Mode The best display mode 1920 x 1080 INPUT You can choose the input signal When two input signals are connected you can select the input signal D SUB DVI HDMI you want When only one signal i...

Страница 6: ...del of connection Your monitor may differ from the items shown in the picture y y Do not carry the product upside down holding only the stand base The product may fall and get damaged or injure your foot CAUTION CAUTION Detaching the Stand Base 1 Place the Monitor set with the screen side down on a flat and cushioned surface 2 Turn the screw to the left and then pull out the Stand Base from the St...

Страница 7: ...er button on the bottom switch panel to turn the power on 10 cm 10 cm 10 cm 10 cm Unplug the power cord before moving the Monitor to another location Otherwise electric shock may occur Tilt from 15 to 5 degrees up or down to adjust the angle of the Monitor set to suit your view CAUTION NOTE Front Rear 5 5 1 Swivel Range 45 45 2 45 45 2 Height Range maximum 5 12 inch 130 0 mm Please be sure to remo...

Страница 8: ...s optional You can obtain it from most electronics stores NOTE WARNING When adjusting the angle of the screen do not put your finger s in between the head of the monitor and the stand body You can hurt your finger s When adjusting the height of the screen do not put your finger s in between the head of the monitor and the stand base You can hurt your finger s ERGONOMIC It is recommended that in or...

Страница 9: ...to utilize the Pivot function 2 Landscape Portrait You can rotate the panel 90 clockwise Please be cautious and avoid contact between the monitor head and the Stand Base when rotating the screen to access the Pivot function If the monitor head touches the Stand Base then the Stand Base could crack Head section Stand section 3 Be careful with the cables when rotating the screen ...

Страница 10: ...n refer to the instructions supplied with the wall mount CAUTION NOTE Model IPS225P IPS235P VESA A x B 100 x 100 Standard screw M4 Number of screws 4 Mounting on a wall For proper ventilation allow a clearance of 10 cm on each side and from the wall Detailed instructions are available from your dealer see the optional Tilt Wall Mounting Bracket Installation and Setup Guide If you intend to mount t...

Страница 11: ... Macintosh use a separate plug adapter is needed to change the 15 pin high density 3 row D SUB VGA connector on the supplied cable to a 15 pin 2 row connector y y When using a D Sub signal input cable connector for Macintosh y y If you use HDMI PC it can cause compatibility problem NOTE NOTE DVI D connection Transmits a digital video signal from your PC to the Monitor set Connect the PC and the Mo...

Страница 12: ...O Function When you encounter problems such as blurry screen blurred letters screen flicker or tilted screen while using the device or after changing screen resolution press the AUTO function button to improve resolution Only supported in Analog Mode NOTE NOTE y y Connect the signal input cable and tighten it by turning the screws clockwise y y Do not press the screen with your finger for a long t...

Страница 13: ...tor set To return to the upper menu or set other menu items use the up arrow button 4 Select EXIT to leave the OSD menu Monitor set Buttons MENU See p 14 Sets the screen options DUAL See p 20 Sets the screen EXIT Exits the OSD menu INPUT Sets the external input MODE See p 19 Sets the mode AUTO See p 12 Optimizes the resolution Different menu items are enabled depending on the type of input signal ...

Страница 14: ...log Digital HDMI Description PICTURE BRIGHTNESS CONTRAST SHARPNESS To adjust the brightness contrast and sharpness of the screen BLACK LEVEL To set offset level COLOR COLOR TEMP PRESET USER To customize the color of the screen GAMMA COLOR RESET DISPLAY HORIZONTAL VERTICAL To adjust the position of the screen CLOCK PHASE To improve the clarity and stability of the screen OVERSCAN VOLUME To adjust t...

Страница 15: ...u To return to the upper menu or set other menu items use the up arrow button The available picture settings are described below Menu Description BRIGHTNESS To adjust the brightness of the screen CONTRAST To adjust the contrast of the screen SHARPNESS To adjust the clearness of the screen BLACK LEVEL You can set the offset level If you select HIGH the screen will be bright and if you select LOW th...

Страница 16: ... screen to medium color temperature COOL Set the screen to cool color temperature more blue USER SIX COLOR Sets and stores the hue and saturation for six colors RED GREEN BLUE CYAN MAGENTA YELLOW to satisfy the color requirements of a user HUE Adjusts the screen hue SATURATION Adjusts the color sharpness on the screen Lower values make the color sharpness weaker and colors lighter while higher val...

Страница 17: ...ressing the buttons on the bottom of the Monitor set and set the options 4 Select EXIT to leave the OSD menu To return to the upper menu or set other menu items use the up arrow button The available picture settings are described below Menu Description HORIZONTAL To move image left and right VERTICAL To move image up and down CLOCK To minimize any vertical bars or stripes visible on the screen bac...

Страница 18: ...ch to full screen mode according to input image signal ORIGINAL Change the input image signal ratio to original This function works only if input resolution is lower than Monitor set ratio 16 9 SUPER ENERGY SAVING Sets the SUPER ENERGY SAVING function ON Enables SUPER ENERGY SAVING you can save energy with this energy efficient function OFF Disables SUPER ENERGY SAVING RESET Resets the values of t...

Страница 19: ...he upper menu or set other menu items use the up arrow button The available picture settings are described below Menu Description USER It is a mode that the user can adjust each element It can adjust the color mode of the Main Menu MOVIE It is a mode that the screen is adjusted to the best to view the videos TEXT It is a mode that the screen is adjusted to the best for the text works PHOTO It is a...

Страница 20: ... the bottom of the Monitor set 4 Select EXIT to leave the OSD menu To return to the upper menu or set other menu items use the up arrow button Before using below functions please install DUAL PACKAGE programme Only for D SUB DVI D input Menu Description DUAL MONITOR OFF If select OFF DUALMONITOR off EXTENDED By selecting EXTENDED user can use secondary monitor as extended mode of primary monitor C...

Страница 21: ...appears when the signal cable between your PC and your display is not connected Check the signal cable and try again Do you see a OSD LOCKED message on the screen Do you see OSD LOCKED when you push MENU button y y You can secure the current control settings so that they cannot be inadvertently changed You can unlock the OSD controls at any time by pushing the MENU button for several seconds the m...

Страница 22: ...display driver from the display driver CD or diskette that comes with your display Or you can also download the driver from our web site http www lg com y y Make sure to check if the video card supports Plug Play function y y Check Control Panel Display Settings and see if the frequency or the resolution were changed If yes readjust the video card to the recommend resolution y y If the recommended...

Страница 23: ...al 1920 x 1080 60 Hz Recommend VESA 1920 x 1080 60 Hz Plug Play DDC 2B Analog Digital HDMI Power Consumption On Mode 31 W Typ Sleep Mode 0 3 W Off Mode 0 3 W Power Input AC 100 240 V 50 60 Hz 1 0A Dimensions Width x Height x Depth With Stand 51 3 cm x 51 6 cm x 22 2 cm Max 51 3 cm x 38 6 cm x 22 2 cm Min Without Stand 51 3 cm x 31 2 cm x 5 9 cm Weight 5 45 kg Range Tilt 5 to 15 Swivel 45 45 2 Heig...

Страница 24: ...l 1920 x 1080 60 Hz Recommend VESA 1920 x 1080 60 Hz Plug Play DDC 2B Analog Digital HDMI Power Consumption On Mode 35 W Typ Sleep Mode 0 3 W Off Mode 0 3 W Power Input AC 100 240 V 50 60 Hz 1 0 A Dimensions Width x Height x Depth With Stand 54 7 cm x 51 6 cm x 22 2 cm Max 54 7 cm x 38 6 cm x 22 2 cm Min Without Stand 54 7 cm x 33 1 cm x 5 9 cm Weight 5 75 kg Range Tilt 5 to 15 Swivel 45 45 2 Heig...

Страница 25: ...68 48 363 60 1024 x 768 60 123 75 1152 x 864 67 500 75 1280 x 1024 63 981 60 1280 x 1024 79 976 75 1680 x 1050 65 290 60 1920 x 1080 67 500 60 Recommend Mode HDMI TIMING Display Modes Resolution Horizontal Frequency kHz Vertical Frequency Hz 480P 31 50 60 576P 31 25 50 720P 37 50 50 720P 45 00 60 1080i 28 12 50 1080i 33 75 60 1080P 56 25 50 1080P 67 50 60 Recommend Mode Indicator Mode LED Color On...

Страница 26: ......

Страница 27: ...ial number of the SET is located on the back and one side of the SET Record it below should you ever need service As an ENERGY STAR Partner LGE U S A Inc has determined that this product meets the ENERGY STAR guidelines for energy efficiency ENERGY STAR is a set of power saving guidelines issued by the U S Environmental Protection Agency EPA MODEL SERIAL ...

Отзывы: