background image

Introduction

4

Date of Purchase :

Dealer Purchased From  :

Dealer Address :

Dealer Phone No. :

Model No. :

Serial No. :

Introduction

Registration

The model and serial number are found on the rear of
this unit. This number is unique to this unit and not
available to others. You should record requested
information here and retain this guide as a permanent
record of your purchase. Staple your receipt here.

Important Safety Instruction

BASIC SAFETY PRECAUTIONS

This is the safety alert symbol. It alerts you to safety

messages that inform you of hazards that can kill or hurt
you or others or cause damage to the product. All safety
messages will be preceded by the safety alert symbol and
the hazard signal word DANGER, WARNING, or
CAUTION. These words mean:

You will be killed or seriously injured if
you don’t follow instructions.

DANGER

All safety messages will identify the hazard, tell you how
to reduce the chance of injury, and tell you what can
happen if the instructions are not followed.

You can be killed or seriously injured if
you don’t follow instructions.

WARNING

Indicates an imminently hazardous
situation which, if not avoided, may
result in minor or moderate injury, or
product damage only.

CAUTION

This guide contains many important safety messages.
Always read and obey all safety messages.

Содержание freezer

Страница 1: ...igenom denna användar handbok innan du börjar använda kylen frysen och spara den sedan för att kunna ta fram den vid behov BRUGERVEJLEDNING FRYSER Før betjening af enheden skal man læse denne Brugervejledning omhyggeligt igennem og opbevare den på et til enhver tid tilgængeligt sted KÄYTTÖOHJEET PAKASTIN Lue nämä käyttöohjeet huolellisesti ennen laitteen käyttöä ja säilytä niitä käsillä tulevaa ta...

Страница 2: ......

Страница 3: ...rol Display Panel For Temperature Control Power How to adjust the temperature in the freezer compartment Super Freezer Self Test Door Alarm Ice Making Defrosting About Ice How to store food properly Storing Food General Information How to disassemble each component Cleaning Trouble Shooting Refer to Installation Insturction for details 4 4 18 19 19 20 20 21 21 21 22 22 23 23 24 25 26 27 28 ...

Страница 4: ... can kill or hurt you or others or cause damage to the product All safety messages will be preceded by the safety alert symbol and the hazard signal word DANGER WARNING or CAUTION These words mean You will be killed or seriously injured if you don t follow instructions DANGER All safety messages will identify the hazard tell you how to reduce the chance of injury and tell you what can happen if th...

Страница 5: ...ectric shock or injury to persons when using your product basic safety precautions should be followed including the following Read all instructions before using this appliance 1 When connecting the power A dedicated outlet should be used Using several devices at one outlet may cause fire If unit is connected to an earth leakage breaker it may trip resulting in spoiled food Do not allow the power p...

Страница 6: ...en replacing the interior lamp of the fridge freezer make sure that the insulating rubber ring within the socket is not taken off Important Safety Instruction Do not pull out the cord or touch the power plug with wet hands It may cause electric shock or injury Remove water or dust from the power plug and insert it with the ends of the pins securely connected Dust water or unstable connection may c...

Страница 7: ...r be the cause of a fire Important Safety Instruction Copper Flat Ground Wire More than 30 inches Wait for 5 minutes or longer when reconnecting the plug It may cause the operation of the refrigerator to fail 2 When using the fridge freezer Do not lean on or hang from the doors or shelves of the refrigerator This may damage the doors or shelves of the refrigerator or cause it to topple over result...

Страница 8: ...etrate electrical components resulting in fire or electric shock Do not store or use Inflammable materials in or around the refrigerator It may become the cause of an explosion or fire Do not use or place heated or flame based scented products Such as scented candles or incent burners in the fridge to deodorise It may become the cause of an explosion or fire Prevent children from entering the prod...

Страница 9: ...near gas related products It may become the cause of an explosion or fire Important Safety Instruction Do not use any combustible spray near the fridge freezer It may become the cause of an explosion or fire Do not place flower vases cups cosmetics medicine or any container with water on the fridge freezer It may fall leak or spill resulting in possible electric shock or fire In case of a heavy el...

Страница 10: ...service center Continuing to run unit may result in Damage or fire Service Center DO NOT use a water damaged unit until it has been certified safe by a licensed electrician or similarly qualified person It may be the cause of an electric shock or fire When gas is leaked do not touch the fridge freezer or the outlet and ventilate the room immediately The explosion by spark may cause fire or burn Be...

Страница 11: ...or non domestic puposes storing medicine or testing material or use in a mobile application It may cause an unexpected risk such as fire electric shock deterioration of stored material or chemical reaction When disposing the fridge freezer remove the doors from the refrigerator Failure to do so may cause a child to become trapped inside Children should be supervised to ensure that they do not play...

Страница 12: ...or damage to house or contents Always be careful please CAUTION Do not insert hands or a metal object into the exit of cool air the cover the bottom of the fridge freezer the heatproof grill exhaust hole at the back It may cause an electric shock or injury Do not put filled bottles in the freezer It may freeze the contents and break the bottle possibly resulting in injury Install the fridge freeze...

Страница 13: ...pening or closing the door of the fridge freezer may cause injury to other people around it be careful please Opening both doors can result in fingers or hands being crushed in the small gap between the doors Open doors could result in children being hurt by the corners of the doors particularly the freezer door as lower edge might be out of line of site Do not put any living animal in the fridge ...

Страница 14: ...ull out the power plug prior to cleaning the fridge freezer Never damage serverely bend pull out or twist the power cord because power cord damage may cause a fire or electric shock Never place glass products in the freezer because they may be broken when their inner contents are frozen Do not directly spray water inside or outside the fridge freezer There is a risk of explosion or fire Do not ins...

Страница 15: ... or fire Do not modify or extend the Power Cord length If the supply cord is damaged it must be replaced by the manufacturer or its service agent or a similarly qualified person in order to avoid a hazard Don t store or use gasoline or other flammable vapors and liquids in the vicinity of this or any other appliance In the event of an electric short circuit grounding earthing reduces the risk of e...

Страница 16: ...atural gas with high environmental compatibility but it is also combustible When transporting and installing the appliance care should be taken to ensure that no parts of the refrigerating circuit are damaged Refrigerant squirting out of the pipes could ignite or cause an eye injury If a leak is detected avoid any naked flames or potential sources of ignition and air the room in which the applianc...

Страница 17: ...sk of fire Do not put your hands into the bottom area of the appliance Any Sharp edges may cause personal injury After unplugging the appliance wait for at least five minutes before plugging it again to the wall socket Abnormal operation of the freezer may cause material damage If the appliance is not to be used for a long time pull out the power plug Any deterioration in the insulation may cause ...

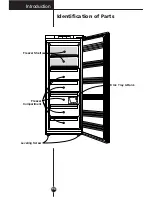
Страница 18: ...Introduction Identification of Parts 18 Freezer Compartment Ice Tray Bank Leveling Screw Freezer Shelf ...

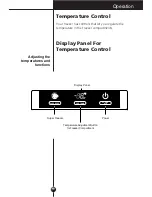
Страница 19: ...re Control Your freezer has controls that let you regulate the temperature in the freezer compartments Adjusting the temperatures and functions FRZ TEMP SUPER FRZ POWER 3SECS Display Panel Super Freezer Power Temperature Adjustment Button for Freezer Compartment ...

Страница 20: ...seconds you can switch on or off the Freezer When you press the temperature control button the temperature of the Freezer part is change by 1 degree Note The actual inner temperature varies depending on the food status as the indicated setting temperature is a target temperature not actual temperature within freezer Refrigeration function is weak in the initial time Please adjust temperature as ab...

Страница 21: ...Z button once more the lamp goes out and the Super Freeze operation stops and the freezer returns to the previous temperature setting Self Test This function allows you to check for operational problems If you think you have a problem with your freezer then press the temperature control button If the indicate lights move up or down then there is no problem with your freezer If the indicate lights ...

Страница 22: ...ce together Ice will be dropped into the ice storage bin by rotating ice separation handle of ice making compartment Defrosting Defrosting takes place automatically The defrosting water flows down to the evaporating tray and is evaporated automatically Note Rotating the ice separation handle before ice is fully frozen may cause the remaining water to drop into the ice storage bin and clump ice tog...

Страница 23: ...aking tray and the ice storing bin are here About Ice 1 Fill water up to the level line of the ice making tray It is hard to remove ice if water is full When you want to freeze ice quickly select Quick freezing 2 Twist the ice making tray to remove ice Do not store the not completely frozen ice Do not bend the ice making tray It may break Do not make ice with the ice storing bin It may break The l...

Страница 24: ...ing Do not store bottles in the freezer compartment Miracle Zone or snack bin they may break when frozen Do not refreeze food that has been thawed This causes loss of taste and nutrition Do not store pharmaceutical products scientific materials or other temperature sensitive products in the freezer Products that require strict temperature controls must not be stored in the freezer If you want to q...

Страница 25: ...on Pipe Take out foods from the freezer and firmly fix the loose shelves draws and accessories with tape Do not move the freezer by sliding The Anti Condensation pipe is installed around the front side of freezer as well as on the partition between freezer compartment to prevent dewing Especially after installation or when ambient temperature is high the freezer may feel hot which is quite normal ...

Страница 26: ... remove It can be possible to disassemble only when the door is opened by 90 or wider Disassembling should be done by the reverse order of assembling 1 3 2 1 2 To Reverse the Doors Caution Your freezer is designed with reversible doors so that they may open from either the left of right hand side to suit your kitchen design However When you want to reverse the doors you must contact a service agen...

Страница 27: ...d and that the power plug is tightly inserted into the outlet Be sure to dry the appliance with a cloth after washing it with water Do not use abrasive petroleum benzene thinner hydrochloride acid boiling water rough brush etc as they may damage parts of the freezer Exterior Clean the outside of the freezer with a hot damp cloth with or without cleaning detergent If you use a detergent be sure to ...

Страница 28: ...osition Refer to Temperature Control section Appliance is placed close to heat source Warm weather frequent door openings Door left open for a long time Package holding door open or blocking air duct in freezer compartment Vibration or Rattling or Abnormal Noise The floor on which the freezer is installed may be uneven or the freezer may be unstable Level refrigerator by adjusting the leveling fee...

Страница 29: ...slight tilt backwards on the refrigerator Interior light does not work No power at outlet Light lamp needs replacing Refer to the Lamp Replacement section DISPOSAL OF YOUR OLD APPLIANCE 1 When this crossed out wheeled bin symbol is attached to a product it means the product is covered by the European Directive 2002 96 EC 2 All electrical and electronic products should be disposed of separately fro...

Страница 30: ...Memo 30 ...

Страница 31: ...Printed in Korea LG Twin Tower 20 Yoido Dong Youngdungpo Gu Seoul 150 721 Korea ...

Страница 32: ...zer Installation Manual Innebygd Kjøleskap Fryser Installasjonshåndbok Inbyggt Kyl Frysskåp Installationshandbok Indbygget køleskab fryser Installeringsvejledning Sisäinen jääkaappi Pakastin Asennusohjeet Model GR N281 254 ...

Страница 33: ......

Страница 34: ... 2 Components to install 4 3 Assembly Disassembly diagram of Built in refrigerator 5 4 Dimension of Built in refrigerator and cabinet 6 5 Installing the built in refrigerator 7 6 Procedure to install 1 Preparing before installing the refrigerator 8 2 Cabinet related work after inserting the refrigerator 11 3 Integrated door panel related work 13 4 Refrigerator door related work 14 5 Installation c...

Страница 35: ...al of sufficient strength to maintain integrity of support screw bolts under the weight of the panels i e don t use material that will allow the screws to be pulled out easily from the weight of the panels Use Cabinet material that is sealed and won t warp or twist from the heat generated by the product or from the moisture produced by opening and closing the refrigerator doors Make sure surroundi...

Страница 36: ...ith integrated cabinet doors after inserting product into cabinet case Parts related with finishing work Top cover Hinge stand Bracket case Depth adjust Bracket hole size 8mm Case cover Bracket case cover Hinge cover Depth adjusting bracket Depth adjusting bracket cover Top bracket cover Top bracket Paper jig 1unit 2units 1unit L 1unit R 1unit L 1unit R 1unit 1unit 1 unit 2units 4 units 1unit 2 un...

Страница 37: ...5 3 Assembly Disassembly diagram of Built in refrigerator 4 4 12 12 1 17 11 14 7 14 10 2 2 18 18 13 13 7 8 5 6 3 15 15 ...

Страница 38: ...ension should comply with the figure Thickness of Cabinet Case 18mm 20mm Dimension of Integrated Door Panel 1836mm or longer 1840mm or longer Caution The dimension of integrated door panels changes if there is a change of cabinet material thickness Both the main body of the cabinet and the integrated door panel must be separated The integrated door panel may sag if it is larger than the specified ...

Страница 39: ...grated Cabinet Doors Shock of opening and closing doors Level The base must be level to assure the uniform downward pressure and distribution of weight to alleviate warping of the base Warping may hinder the operation of the products doors Securely fix the side panel of the cabinet to the wall or adjacent cabinet Because the product is anchored to the cabinet with the screws from the hinge make su...

Страница 40: ...s shown at the figure 1 Installing the top cover of the refrigerator 2 Fix the refrigerator top cover with the wood bolting screw ⓑ 3 places at a point 45mm in from interior edge of cabinet at each end and also in the middle The thickness of the cabinet material determines the way the top cover is cut Please take notice of the below reference for the correct cutting of the top cover 6 Procedure to...

Страница 41: ...igerator Assemblely bracket Assemblely cover Figure 1 Tilt to back Tighten the screw Tighten the screw firmly After separating the double sided tape tighten the screw firmly Figure 2 There is no hole for screw on the outer cabinet Screws need to be tightened firmly ...

Страница 42: ...resulting in a fire hazard Hang it on the rear holder if possible 5 Insert the refrigerator into the cabinet so that the end of the hinge stand align to the front part of the cabinet Caution must be taken not to jam your hands between refrigerator and cabinet when inserting refrigerator into cabinet If there is any excess length on the power cord hang the excess up on a holder or hook so that it c...

Страница 43: ...ed work after inserting the refrigerator Front of cabinet ⓖ Front of refrigerator door Formounting therefrigeratordoor Formounting thefrontof thecabinet 3 5mm 4mm 3mm Frontofrefrigeratordoor Spanner Front of cabinet Figure 4 1 When the unit tilts backwards Adjust by turning the horizontal adjusting leg anti clockwise since the refrigerator leans backward 2 When the unit tilts forwards Adjust by tu...

Страница 44: ...nstant by using a ruler 8 Fix the top hinge and the bottom hinge by the hinge screws ⓕ four spots See Figure 5 Be careful when working on hinges as you may be injured by the hinge operation if the door moves cabinet Hinge Hinge base Front side of the cabinet Figure 6 Figure 5 f 6 Procedure to install 2 Cabinet related work after inserting the refrigerator ...

Страница 45: ...ints in the paper Jig on the integrated door panel See Figure 8 9 A 1595mm Figure 7 Reference line of paper jig for the right hinge Reference line of paper jig for the left hinge Figure 8 12 After removing the paper jig fix the top bracket of the integrated door panel by using the wood screw ⓑ 4 places with the top two holes lined up to the marked spots from the paper jig on the integrated door pa...

Страница 46: ...ting bracket is aligned with the hole of the refrigerator door Figure 11 and fix the depth adjusting bracket to the left right four spots of the integrated door panel with the wood screw ⓑ Figure 12 6 Procedure to install 4 Refrigerator door related work Figure 10 Figure 11 Figure 12 d 10 10 Be careful to align the top bracket holes onto the adjusting screws to prevent the integrated door panel fr...

Страница 47: ...the door 17 If the dimension is not correct loosen the height adjusting nuts ⓓ the door screw ⓐ and the wood screw ⓑ and repeat the work starting from Step 12 Forward Backward Top Down Adjust Left Right Figure 13 4mm g Figure 14 Cooling room Furniture door Parallel Parallel 6 Procedure to install 4 Refrigerator door related work d d g 10 18 Place the depth adjusting bracket as shown at the figure ...

Страница 48: ...ure 17 and secure the loosely fixed bracket screw ⓔ Figure 1 to fix the depth adjusting bracket 19 Move the integrated door panel in or out to adjust the depth gap to 4mm See Figure 14 and fix the depth adjusting bracket to both sides two spots of the refrigerator door with the door screw ⓐ Figure 16 21 Place the top bracket cover on the door top and place the depth adjusting bracket cover and on ...

Страница 49: ...wn in the figure Attach it to the opposite side from the hinge side If the gasket is to long cut it to the necessary length required 24 Insert the screw cap as shown at the figure 6 Procedure to install 5 Installation checkup and finishing work 1800mm Figure 19 18 18 18 6 6 15 15 17 After securing screws install screw cap ...

Страница 50: ...it to the door by turning the hinge by 180 Fix the hinge to the door with screws No 5 Align the door hinge with screws No on the case and push from left to right to lock in 6 Adjust the up down or the left right interval of the refrigerator door so that leaning should not occur to either side and then tighten screws 7 After fixing the hinge insert the screw caps two spots at the opposite holes of ...

Страница 51: ...19 When installing two pieces of furniture closely keep the gap between them 5mm or more 5mm 6 Procedure to install 7 Integrated door panel gap ...

Страница 52: ......

Страница 53: ...P No MFL58003406 ...

Отзывы: