background image

206-4124

16

FMA-LG101 Configuration (Cont.)

(Continued from previous page)

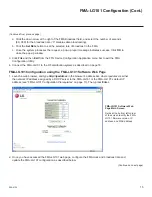
Set the Date and Time Configuration for the FMA-LG101

a.  Complete the following fields, as required:

•  Month: Click the down arrow at the right of the field, and select the appropriate month from the 

drop-down list of options.

•  Day of Month (1–31); Year (2009–2047); Hour (0–23); and Minutes (0–59): Type the appropriate 

values in these fields. Note that the Hour field is based on a 24-hour clock.

•  DST Enable?: Click the down arrow at the right of the field, and select the appropriate option. “Yes” 

(default) enables or “No” disables automatic US Daylight Saving Time observance.

b.  The Rate (0 or 60–999) field determines the interval, in seconds, at which to repeat the broadcast of 

the date & time, the FTG Channel Map, and the FTG Installer Menu profile(s). (FMA-LG101 factory 

default broadcast rate is 300 seconds.) Type the number of seconds (60–999) for the broadcast rate 

(“0” disables data broadcasting). Note that an error message will be displayed if the broadcast rate is 

set to any value from 1 to 59.   

c.  Click the 

Update Date & Time

 button.

Note: After you click the Update Date & Time button, the screen will begin to refresh/

reload. Wait for the screen to completely reload before proceeding. To refresh the date and 

time to the current settings, click the green Refresh button to the right of the Update Date 

& Time button. Do NOT use the web browser Refresh button! 

Update the FMA-LG101 Channel and TV Configuration (with an FMA Configuration File) 

a.  Click the 

Browse

 button at the right of the Config File to Update field.

b.  Browse to the desired FMA Configuration (.fma) file, select the file, and click the

 Open 

button.

c.  Confirm that the path shown in the Config File To Update field is correct for the FMA Configuration file 

selected, and then click the 

Update Config

 button to update the configuration on the FMA-LG101.

Note: 

After you click the Update Config button, the screen will begin to refresh/reload. This process 

may take a few seconds to completely transfer and save the file to memory. Wait for the screen to 

completely reload before proceeding. 

3.  Connect the FMA-LG101 to the RF distribution system as described below.

Connect the FMA-LG101 to the RF Distribution System

Note: The RF distribution system must support 50.5 MHz RF transmission (downstream) 

from the head end to the FTG device(s).

1.  Connect the FMA-LG101 RF OUT to the RF distribution system. 
 

Note:

 The 50 MHz low pass filter (6MLP-50) provided should be installed to protect RF channels 2 

and 3 from any potential RF interference produced by the FMA-LG101.

2.  Verify that the 50.5 MHz RF signal level is b3 dBmV and +10 dBmV at the FTG device(s). 

Note that additional equipment may be required to adjust the signal level. If the signal level is not  

within the recommended range, communications will be negatively affected, resulting in a partial or 

missing channel lineup and/or Installer Menu settings data.

Содержание FMA-LG101

Страница 1: ...Installation Configuration Guide Warranty Copyright 2012 LG Electronics U S A Inc Free To Guest Management Appliance FMA LG101 P N 206 4124 Rev B ...

Страница 2: ...not installed and used in accordance with the instruction manual may cause harmful interference to radio communications However there is no guarantee that interference will not occur in a particular installation If this equipment does cause harmful interference to radio or television reception which can be determined by turning the equipment off and on the user is encouraged to try to correct the ...

Страница 3: ...ype plug has two blades and a third grounding prong The wide blade or the third prong are pro vided for your safety If the provided plug does not fit into your outlet consult an electrician for replacement of the obsolete outlet 10 Protect the power cord from being walked on or pinched particularly at plugs convenience recepta cles and the point where it exits from the apparatus 11 Only use attach...

Страница 4: ... proper grounding of the mast and supporting struc ture grounding of the lead in wire to an antenna dis charge unit size of grounding conductors location of antenna discharge unit connection to grounding elec trodes and requirements for the grounding electrode 22 Servicing Do not attempt to service this product yourself as open ing or removing covers may expose you to dangerous voltage or other ha...

Страница 5: ...s for FMA LG101 Configuration 12 FMA LG101 Ethernet Connection Network Options 12 PC Network Connections 12 FMA LG101 Configuration 13 16 Overview 13 FMA LG101 Configuration using the FTG Device Configuration Application Software 14 FMA LG101 Configuration using the FMA LG101 Software Web Page 15 Connect the FMA LG101 to the RF Distribution System 16 FMA LG101 Troubleshooting 17 Specifications 18 ...

Страница 6: ...e FTG Device Configuration Application v5 0 0 or higher installed FTG Device Configuration Application software is available online at www LGsolutions com ftgsoftware At the Room __ An LG TV must be equipped with one of the following FTG devices EBL Embedded b LAN LMT7Z9 MPI card LMT7Z7 MPI card requires firmware update see note below Note Please contact the LG Sales team to obtain a Firmware Upda...

Страница 7: ...ility also enables you to set the FMA s date and time and broadcast rate FMA LG101 Date and Time When the FMA LG101 has been powered for at least 30 minutes its current date and time will be maintained during power loss for a minimum of nine hours If the DST US Daylight Saving Time option is enabled during configuration the FMA LG101 will automatically set the clock forward one hour at 2 00 AM on ...

Страница 8: ...p Editor in the FTG Channel Map Configuration Utility Up to 141 logical channels can be defined in the channel lineup to be broadcast by the FMA LG101 When you are ready to continue click Configure and then FMA from the FTG Device Configuration Application menu bar to return to the FMA Configuration Utility and then proceed to step 3 Note Existing FMA or FTG Configuration files should be appropria...

Страница 9: ...ist you will need to recopy the FTG Installer Menu settings to the FMA Configuration List 6 Click the Save button in the FMA File command section of the FMA Configuration Utility screen above the FMA Configuration List to save the FMA Configuration List contents to an FMA Configuration fma file on the PC s hard drive for later use Note To remove an individual item from the FMA Configuration List b...

Страница 10: ...ble DC Power Supply Rack Mount Bracket Rack Mount Bracket x x FMA LG101 Front View Refer to the following diagrams and install the FMA LG101 in the equipment rack as described on page 11 FMA LG101 Front Panel LEDs PWR Illuminates when power is applied to the unit RX Illuminates when stored configuration has been reset to default due to data corruption TX Flashes when data is being transmitted on t...

Страница 11: ...ut to the FMA LG101 5 Wait at least 30 seconds for the FMA LG101 to power ON and obtain network settings from a DHCP server or load its default network settings 6 Configure the FMA LG101 as described on the pages that follow FMA LG101 Rear and Front Panel Connections Port Name Connection Rear Panel RF OUT Connect the 50 MHz low pass filter and coaxial RF cable from the RF distribution system combi...

Страница 12: ...e network administrator for proper network settings Set the PC s network connections to provide access to the network and then proceed to configure the FMA LG101 If you are using a direct Ethernet connection between the FMA LG101 and the configuring PC you must complete the following procedure to set the PC network connections before you proceed to configure the FMA LG101 1 On the PC navigate to N...

Страница 13: ... a new or identify an existing FMA Configuration fma file to use for updating the FMA LG101 see Creating an FMA Configuration File on pages 8 and 9 as necessary FMA LG101 Configuration Quick Reference FTG Device Configuration Application Software 1 Launch the FTG Device Configuration Application v5 0 0 or higher and access the FMA Configuration Utility 2 Set the FMA Utility s IP address 3 Write th...

Страница 14: ...f the screen below the FMA Configuration List window to transfer the current contents of the FMA Configuration List to the FMA LG101 c Once the system processes the request a pop up report message indicates success Click OK to close the pop up window and continue Set the FMA Clock The facility for setting the FMA clock is located on the right side of the FMA Configuration Utility screen Date and t...

Страница 15: ...4 Connect the FMA LG101 to the RF distribution system as described on page 16 FMA LG101 Configuration using the FMA LG101 Software Web Page 1 Launch a web browser and type http ipaddress in the browser s address bar where ipaddress is either the network IP address assigned by a DHCP server to the FMA LG101 or the FMA LG101 s default IP address see FMA LG101 Configuration Prerequisites on page 13 T...

Страница 16: ...on Do NOT use the web browser Refresh button Update the FMA LG101 Channel and TV Configuration with an FMA Configuration File a Click the Browse button at the right of the Config File to Update field b Browse to the desired FMA Configuration fma file select the file and click the Open button c Confirm that the path shown in the Config File To Update field is correct for the FMA Configuration file ...

Страница 17: ... The date time of the TV s is incorrect Verify that the FMA LG101 is connected to a steady and reliable power source The FMA LG101 will retain the current date and time settings for at least nine hours after losing power Beyond nine hours of power loss the date and time settings may need to be reconfigured Verify that the DST US Daylight Saving Time option is set appropriately Set the FMA clock da...

Страница 18: ...erating Conditions Temperature 0 to 45 Celsius 32 to 113 Fahrenheit Humidity 10 to 90 RH non condensing Inputs Outputs Rear DC 12V 2 1 mm jack RF IN Type F female RF OUT Type F female Front Ethernet Port 10BaseT RJ 45 RF Output Modulation FSK Data Rate 62 5 Kbps Frequency for Data Low 49 5 MHz 50 kHz Frequency for Data High 50 5 MHz 50 kHz Impedance 75 ohms 5 RF Output Level 50 dBmV 2 dBmV Power S...

Страница 19: ...b page 4 Click the Browse button at the right of the Firmware File To Upload field in the Firmware File Upload section of the screen 5 Browse to the desired Firmware mot file select the file and click the Open button 6 Confirm that the path shown in the Firmware File To Upload field is correct for the Firmware file selected and then click the Upload File button to upload the file to the FMA LG101 ...

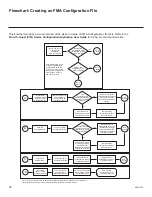
Страница 20: ...settings to desired values Go to Chart D Optional Edit FTG Channel Map and or FTG Installer Menu settings and or load default FTG Installer Menu settings for selected model s Optional Edit Installer Menu settings to desired values Up to 141 logical channels can be defined in the channel lineup to be broadcast by the FMA LG101 Optional Repeat this step to add FTG Installer Menu settings for additio...

Страница 21: ...lication and software web page updates Documentation is available online at www LGsolutions com products From the Products page select TVs Systems Solutions then Head End Systems then FMA Series click Show to view the list of products then FMA LG101 Click the Literature Downloads tab at the bottom of the FMA LG101 page and select the required document s from the Downloads list ...

Страница 22: ...ITATION ANY WARRANTY OF MERCHANTABILITY OR FITNESS FOR A PARTICULAR PURPOSE AND LG SHALL NOT BE LIABLE FOR ANY CONSEQUENTIAL INDIRECT OR INCIDENTAL DAMAGES OF ANY KIND INCLUDING LOST REVENUES OR PROFITS IN CONNECTION WITH THIS PRODUCT SOME STATES DO NOT ALLOW LIMITATIONS ON HOW LONG AN IMPLIED WARRANTY LASTS OR THE EXCLUSION OR LIMITATION OF INCIDENTAL OR CONSEQUENTIAL DAMAGES SO THE ABOVE LIMITAT...

Отзывы: