23
EXTERNAL EQUIPMENT SETUP
1
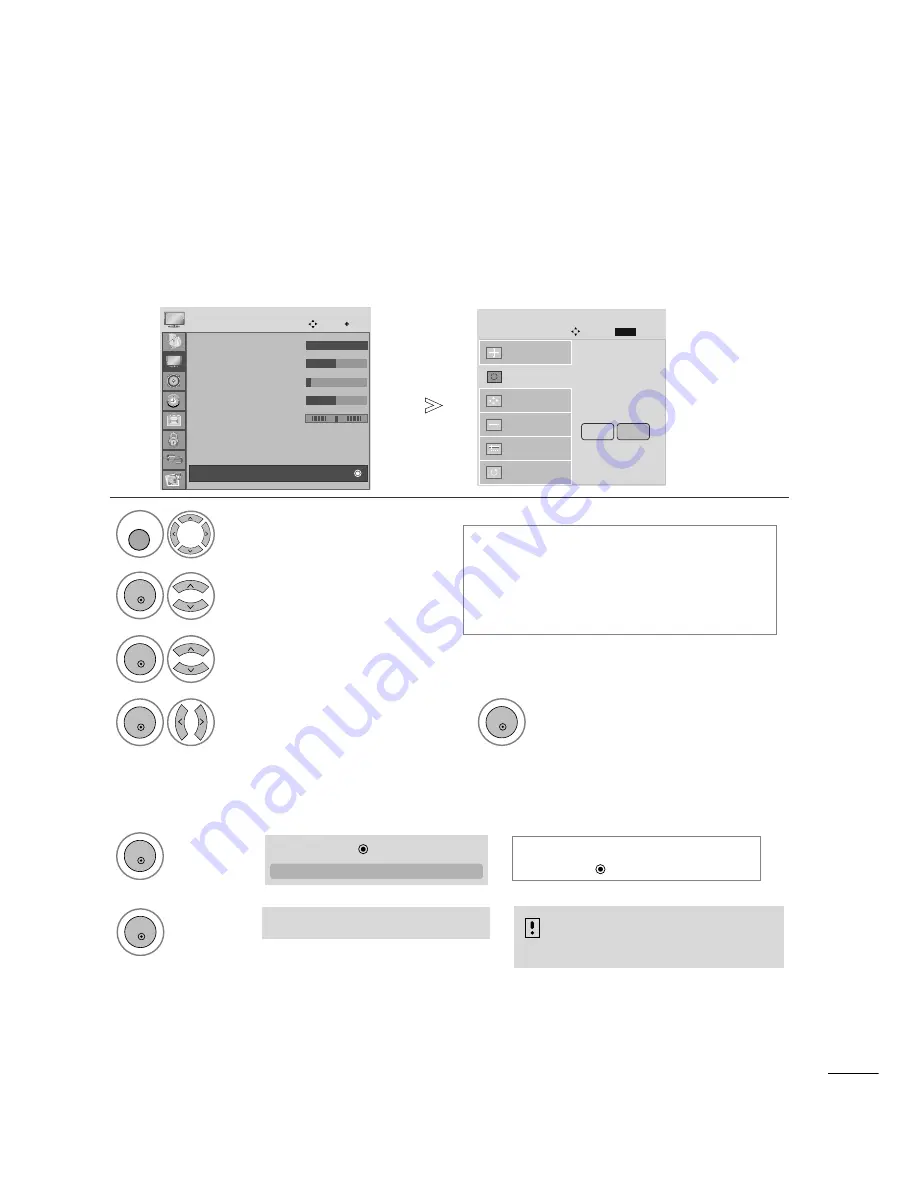
Automatically adjusts picture position and minimizes image instability. After adjustment, if the image is still
not correct, your set is functioning properly but needs further adjustment.
A
Au
utto
o cco
on
nffiig
gu
urre
e
This function is for automatic adjustment of the screen position, clock, and phase The displayed image will
be unstable for a few seconds while the auto configuration is in progress.
Auto Configure (RGB [PC] mode only)
•
If the position of the image is still not correct,
try Auto adjustment again.
•
If picture needs to be adjusted again after Auto
adjustment in RGB (PC), you can adjust the
P
Po
ossiittiio
on
n, S
S ii zz ee or P
P h
h aa ss ee.
•
If you don’t want Auto Configure, do
not press OK
Select
PICTURE.
1
1.. U
Ussiin
ng
g O
OS
SD
D
2
2.. U
Ussiin
ng
g O
OK
K((R
Reem
mo
occo
on
n o
orr cco
on
nttrro
oll kkeey
y))
2
Select
SCREEN.
3
Select
Auto Config.
A
Auutto
o iinn p
prro
oggrreessss
To Set
Auto Config.
G
SCREEN
Move
Resolution
Position
Size
Phase
Reset
MENU
OK
OK
1
Press
OK.
<<1
19
92
20
0 xx 1
10
08
80
0 R
Reesso
ollu
uttiio
on
n>>
<<O
Otth
heerrss R
Reesso
ollu
uttiio
on
n>>
OK
2
Press
OK.
OK
Prev.
RETURN
5
Run
Auto Config.
T
Th
hiiss ffu
un
nccttiio
on
n iiss aavvaaiillaab
bllee ffo
orr R
RG
GB
B ssiig
gn
naallss o
on
nlly
y..
OK
4
Select
Yes.
OK
Auto in progress
For optimal display
change resolution 1920 x 1080
Auto Config.
G
G
(OK)
• Contrast
100
• Brightness 50
• Sharpness 8
• Colour
50
• Tint
0
• Advanced Control
• Picture Reset
Screen
PICTURE
Move
OK
R
G
SSccrreeeenn
• Press the
MENU
or
EXIT
button to close the menu window.
• Press the
RETURN
button to move to the previous menu screen.
D
Yes
No


