background image

16

On Screen Display(OSD) Selection and Adjustment 
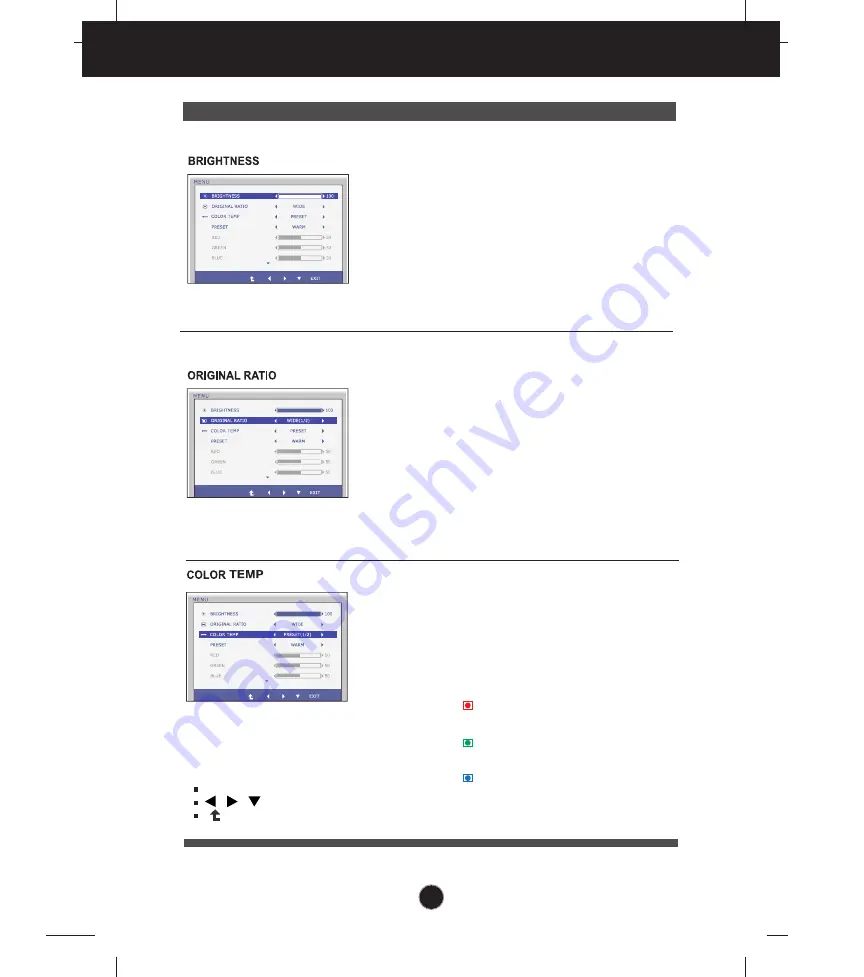
Main menu

Sub menu                Description

To adjust the brightness of the screen. 

Change the input image signal ratio to
original. 

WIDE

ORIGINAL

Switch to full screen mode according to
input image signal.  

* This function works only if input
resolution is lower than monitor ratio
(16:9).

Exit

: Exit

,      ,        : Move

: Select another sub-menu

PRESET

Select the screen color. 

•WARM : Set the screen to warm color    

temperature . 

• MEDIUM: Set the screen to medium  

color temperature.

• COOL: Set the screen to cool color

temperature.

RED

Set your own red color levels.

GREEN

Set your own green color levels.

BLUE

Set your own blue color levels.

USER

Содержание E1641C

Страница 1: ...www lg com OWNER S MANUAL LCD MONITOR LCD MONITOR MODEL E1641C E1941C E2041C E2241C Please read this manual carefully before operating your set and retain it for future reference ENGLISH ...

Страница 2: ...d Call your service technician for replacement As long as this unit is connected to the AC wall outlet it is not disconnected from the AC power source even if the unit is turned off Do not Open the Display There are no user serviceable components inside There are Dangerous High Voltages inside even when the power is OFF Contact your dealer if the display is not operating properly To Avoid Personal...

Страница 3: ...ay cause some afterimages Some dot defects may appear as Red Green or Blue spots on the screen However this will have no impact or effect on the display performance If possible use the recommended resolution to obtain the best image quality for your LCD display If used under any mode except the recommended resolution some scaled or processed images may appear on the screen However this is characte...

Страница 4: ...the product An electric shock may occur Do not use chemicals such as benzene paint thinners or alcohol Spray water onto a soft cloth 2 to 4 times and use it to clean the front frame wipe in one direction only Too much moisture may cause staining On Repacking Do not throw away the carton and packing materials They make an ideal container in which to transport the unit When shipping the unit to anot...

Страница 5: ... dealer User s Guide Cards Power Cord 15 pin D Sub Signal Cable Tosetitup thissignalcablemaybe attachedto thisproductbefore shippingout NOTE This accessories may look different from those shown here User must use shielded signal interface cables D sub 15 pin cable with ferrite cores core in the connector to maintain standard compliance for the product ...

Страница 6: ...3 Assemble the Stand Base Front Rear into the Stand Body in the correct direction 4 Use a coin on the back of the stand base and turn the screw clockwise to tighten 5 Once assembled take the monitor up carefully and face the front side Important This illustration depicts the general model of connection Your monitor may differ from the items shown in the picture Do not carry the product upside down...

Страница 7: ...ble the Stand Base Front Rear into the Stand Body in the correct direction 4 Use a coin on the back of the stand base and turn the screw clockwise to tighten 5 Once assembled take the monitor up carefully and face the front side Important This illustration depicts the general model of connection Your monitor may differ from the items shown in the picture Do not carry the product upside down holdin...

Страница 8: ...ace 3 Remove the Stand Body and Stand Base from product in correct direction as shown in the picture 2 Place the monitor face up on the cushion or soft cloth 4 Use a coin on the back of the Stand Base and turn the screw anticlock wise to loosen Connecting the Display E1641C ...

Страница 9: ...ve the Stand Body and Stand Base from product in correct direction as shown in the picture 2 Place the monitor face Down on the cushion or soft cloth 4 Use a coin on the back of the Stand Base and turn the screw anticlock wise to loosen Connecting the Display E1941C E2041C E2241C ...

Страница 10: ... of the panel in various ways for maximum comfort Tilt Range 5 to 18 ERGONOMIC It is recommended that in order to maintain an ergonomic and comfortable viewing position the forward tilt angle of the monitor should not exceed 5 degrees Do not touch or press the screen when adjusting the angle of the monitor When adjusting the angle of the screen do not put your finger s in between the head of the m...

Страница 11: ...ices is turned off 2 Connect signal input cable and power cord in order then tighten the screw of the signal cable Connecting with the PC 1 2 Wall outlet type Mac adapter For Apple Macintosh use a separate plug adapter is needed to change the 15 pin high density 3 row D sub VGA connector on the supplied cable to a 15 pin 2 row connector When using a D Sub signal input cable connector for Macintosh...

Страница 12: ...hed devices is turned off 2 Connect signal input cable and power cord in order then tighten the screw of the signal cable Connecting with the PC 1 2 Wall outlet type Mac adapter For Apple Macintosh use a separate plug adapter is needed to change the 15 pin high density 3 row D sub VGA connector on the supplied cable to a 15 pin 2 row connector When using a D Sub signal input cable connector for Ma...

Страница 13: ...you to lock the current control settings so that they cannot be inadvertently changed Press and hold the MENU button for several seconds The message OSD LOCKED should appear You can unlock the OSD controls at any time by pushing the MENU button for several seconds The message OSD UNLOCKED should appear ...

Страница 14: ...splay mode The best display mode is E1641C 1366 x 768 E1941C 1366 x 768 E2041C 1600 x 900 E2241C 1920 x 1080 Use this button to turn the display on or off The power indicator stays blue if the display is running properly On Mode If the display is in Sleep Mode the power indicator is blinking blue Power Button Power Indicator Exit the OSD On Screen Display EXIT Button SUPER ENERGY SAVING Button Use...

Страница 15: ...he use of the controls The following section is an outline of the available adjustments and selections you can make using the OSD To make adjustments in the On Screen Display follow these steps Press the discretionary Button then the main menu of the OSD appears To access a control use the corresponding Buttons Use the Buttons to adjust the image to the desired level Use the Button to select other...

Страница 16: ...To customize the color of the screen MENU To adjust the brightness of the screen NOTE The order of icons may differ depending on the model 15 20 DSUB To adjust the image size Main menu Sub menu Supported input Description BRIGHTNESS ORIGINAL RATIO COLOR TEMP PRESET USER CONTRAST LANGUAGE FACTORY RESET SUPER ENERGY SAVING Turn on the SUPER ENERGY SAVING function DSUB Turn off the SUPER ENERGY SAVIN...

Страница 17: ... input image signal This function works only if input resolution is lower than monitor ratio 16 9 Exit Exit Move Select another sub menu PRESET Select the screen color WARM Set the screen to warm color temperature MEDIUM Set the screen to medium color temperature COOL Set the screen to cool color temperature RED Set your own red color levels GREEN Set your own green color levels BLUE Set your own ...

Страница 18: ...ain menu Description To choose the language in which the control names are displayed Press the buttons to reset immediately Restore all factory default settings except LANGUAGE To adjust the contrast of the screen Exit Exit Move Select another sub menu ...

Страница 19: ...D system Listed below are the icons icon names and icon descriptions of the all items shown on the Menu Sub menus NOTE OSD On Screen Display menu languages on the monitor may differ from the manual Menu Name Icons Button Tip Press the SUPER ENERGY SAVING Button then the main menu of the OSD appears Exit Move Restart to select sub menu ...

Страница 20: ...the SUPER SAVING color is green Turn off the SUPER ENERGY SAVING function Now the monitor is LED SAVING function When current setting value is OFF the SUPER SAVING color is gray Clear the TOTAL POWER REDUCTION and TOTAL CO2 REDUCTION values OK Select TOTAL POWER REDUCTION How much power is saved during using the monitor TOTAL CO2 REDUCTION Change the TOTAL POWER REDUCTION to CO2 ON OFF RESET ...

Страница 21: ...s should be different from each panel and panel vendor LG accumulate those values using integrated function with 10 minutes broadcast video signal LED Saving means that how much power can be saved using WLED Panel instead of CCFL panel SUPER Saving means that how much power can be more saved using SUPER ENERGY SAVING function NOTE SAVING DATA W h 16 inch 3 9 ...

Страница 22: ...y moving the mouse or pressing any key on the keyboard to bring up the screen Try to turn on the PC This message appears when the signal from the PC video card is out of horizontal or vertical frequency range of the display See the Specifications section of this manual and configure your display again This message appears when the signal cable between your PC and your display is not connected Chec...

Страница 23: ...and adjust the display to the recommended resolution or adjust the display image to the ideal setting Set the color setting higher than 24 bits true color IMPORTANT Check Control Panel Display Settings and see if the frequency or the resolution were changed If yes readjust the video card to the recommend resolution If the recommended resolution optimal resolution is not selected letters may be blu...

Страница 24: ...bits true color at Control Panel Settings Check if the screen is set to interlace mode and if yes change it to the recommend resolution Do you see an Unrecognized monitor Plug Play VESA DDC monitor found message Have you installed the display driver Be sure to install the display driver from the display driver CD or diskette that comes with your display Or you can also download the driver from our...

Страница 25: ... W Typ Sleep Mode 0 3 W Off Mode 0 3 W Power Consumption Operating Conditions Temperature 10 C to 35 C Humidity 10 to 80 non Condensing Storage Conditions Temperature 20 C to 60 C Humidity 5 to 90 non Condensing Environment al Conditions With Stand Width 37 7 cm 14 84 inch Height 31 2 cm 12 28 inch Depth 15 1 cm 5 94 inch Weight excl packing 1 7 kg 3 74 lb Dimensions Weight Tilt 5 to 18 Range AC 1...

Страница 26: ...W Off Mode 0 3 W Power Consumption Operating Conditions Temperature 10 C to 35 C Humidity 10 to 80 non Condensing Storage Conditions Temperature 20 C to 60 C Humidity 5 to 90 non Condensing Environment al Conditions With Stand Width 44 3 cm 17 44 inch Height 35 0 cm 13 78 inch Depth 16 6 cm 6 54 inch Weight excl packing 2 7 kg 5 94 lb Dimensions Weight Tilt 5 to 18 Range AC 100 240 V 50 60 Hz 0 8 ...

Страница 27: ...8 W Typ Sleep Mode 0 3 W Off Mode 0 3 W Power Consumption Operating Conditions Temperature 10 C to 35 C Humidity 10 to 80 non Condensing Storage Conditions Temperature 20 C to 60 C Humidity 5 to 90 non Condensing Environment al Conditions With Stand Width 47 6 cm 18 74 inch Height 36 4 cm 14 33 inch Depth 16 6 cm 6 54 inch Weight excl packing 3 1 kg 6 82 lb Dimensions Weight Tilt 5 to 18 Range AC ...

Страница 28: ...4 W Typ Sleep Mode 0 3 W Off Mode 0 3 W Power Consumption Operating Conditions Temperature 10 C to 35 C Humidity 10 to 80 non Condensing Storage Conditions Temperature 20 C to 60 C Humidity 5 to 90 non Condensing Environment al Conditions With Stand Width 50 9 cm 19 80 inch Height 38 8 cm 15 27 inch Depth 16 6 cm 6 54 inch Weight excl packing 3 4 kg 7 48 lb Dimensions Weight Tilt 5 to 18 Range AC ...

Страница 29: ...Freq Hz Recommend Mode E1941C 1 2 3 4 5 6 7 8 720 x 400 640 x 480 640 x 480 800 x 600 800 x 600 832 x 624 1024 x 768 1366 x 768 31 468 31 469 37 500 37 879 46 875 49 725 48 363 47 712 70 60 75 60 75 75 60 60 Polarity H V Polarity H V Display Modes Resolution Horizontal Freq kHz Vertical Freq Hz Recommend Mode E1641C 1 2 3 4 5 6 640 x 480 800 x 600 800 x 600 1024 x 758 1280 x 720 1366 x 768 31 5 35...

Страница 30: ...q kHz Vertical Freq Hz Recommend Mode E2241C 1 2 3 4 5 6 7 8 9 10 11 12 720 x 400 640 x 480 640 x 480 800 x 600 800 x 600 1024 x 768 1024 x 768 1152 x 864 1280 x 1024 1280 x 1024 1680 x 1050 1920 x 1080 31 468 31 469 37 500 37 879 46 875 48 363 60 123 67 500 63 981 79 976 65 290 67 500 70 60 75 60 75 60 75 75 60 75 60 60 Polarity H V ...

Страница 31: ...ward on a soft cloth 2 Remove the Stand Body and Stand Base from product in correct direction as shown in the picture Installing the Wall mount plate E1641C This monitor satisfies the specifications of the Wall mount plate or the interchange device ...

Страница 32: ...n a soft cloth 2 Remove the Stand Body and Stand Base from product in correct direction as shown in the picture Installing the Wall mount plate E1941C E2041C E2241C This monitor satisfies the specifications of the Wall mount plate or the interchange device ...

Страница 33: ...that can be purchased separately at most computer stores Screw Mounting Interface Dimension Hole spacing A x B E1641C E1941C E2041C E2241C 75 mm x 75 mm 3 Install the Wall mount plate NOTE VESA compatible only with respect to screw mounting interface dimensions and mounting screw specifications Please use VESA standard as below 784 8 mm and under 30 9 inch Wall Mount Pad Thickness 2 6 mm Screw 4 0...

Страница 34: ...rial number of the SET is located on the back or one side of the SET Record it below should you ever need service MODEL SERIAL As an ENERGY STAR Partner LGE U S A Inc has determined that this product meets the ENERGY STAR guidelines for energy efficiency ENERGY STAR is a set of power saving guidelines issued by the U S Environmental Protection Agency EPA ...

Отзывы: