background image

11

Installation and Setup

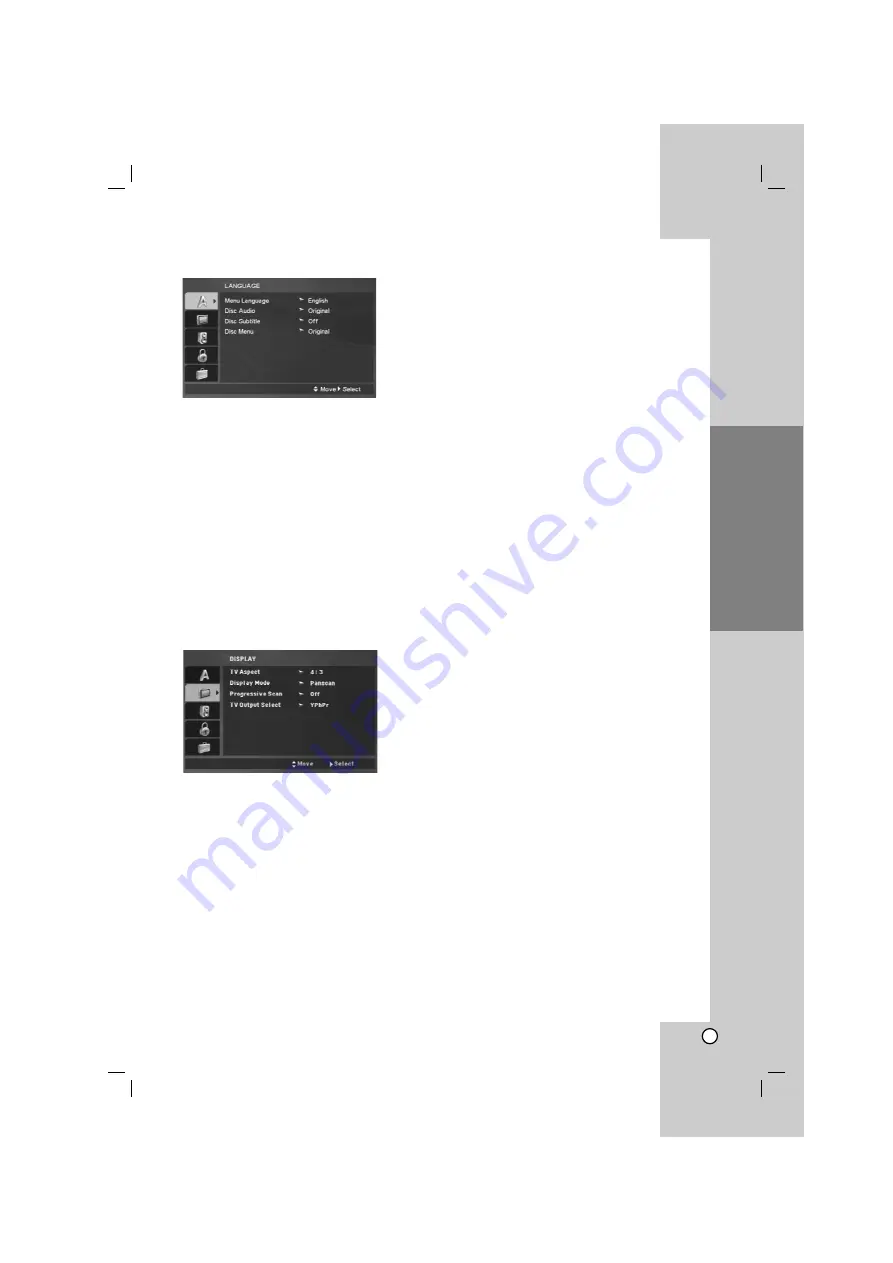
LANGUAGE

Menu Language

Select a language for the Setup menu and then on-
screen display.

Disc Audio / Subtitle / Menu

Select the language you prefer for the audio track
(disc audio), subtitles, and the disc menu.

Original 

– Refers to the original language in which

the disc was recorded.

Other 

– To select another language, press

numeric buttons and then ENTER to enter the
corresponding 4-digit number according to the
language code list on the page 21. If you enter the
wrong language code, press CLEAR.

DISPLAY

TV Aspect 

4:3 – 

Select when a standard 4:3 TV is connected.

16:9 – 

Select when a 16:9 wide TV is connected.

Display Mode

The Display Mode setting works only when the TV
Aspect mode is set to “4:3”.

Letterbox – 

Displays a wide picture with bands on

the upper and lower portions of the screen.

Panscan – 

Automatically displays the wide picture

on the entire screen and cuts off the portions that
do not fit.

Progressive Scan

Progressive Scan Video provides the highest quality
pictures with less flickering.
If you are using the Component Video jacks for
connection to a TV or a monitor that is compatible
with a progressive scan signal, set Progressive Scan
to On.

To Turn ON progressive scan:

Connect component video out of this unit to the input
of your TV or monitor, set your TV or monitor to
Component Input.

1. Select “Progressive Scan” on the DISPLAY menu

then press 

B

.

2. Select “On” using the 

v

/

V

buttons. 

3. Press ENTER to confirm your selection. 

The confirm menu will appear.

4. When the confirm menu appears on your screen

Cancel is highlighted as default. Use the 

b

/

B

buttons to highlight Enter.

5. Pressing ENTER will set the player to Progressive

scan mode.

Caution:

Once the setting for progressive scan output is
entered, an image will only be visible on a progressive
scan compatible TV or monitor. If you set Progressive
Scan to On in error, you must reset the unit. 
First, remove the disc in the DVD Player. 
Next, press STOP ( 

x

) and hold it for five seconds

before releasing it. The video output will be restored
to the standard setting, and a picture will once again
be visible on a conventional analog TV or monitor.

TV Output Select

Set the player’s TV Output Select options according to
the TV connection type. 

YPbPr – 

When your TV is connected with the

COMPONENT / PROGRESSIVE SCAN jacks on
this DVD player. 

RGB – 

When your TV is connected with the

SCART (RGB signal) jack.

Содержание DV276-E3M

Страница 1: ...DVD PLAYER OWNER S MANUAL MODEL DVX276 Before connecting operating or adjusting this product please read this instruction booklet carefully and completely DV276 E3M NA3GLLS_ENG ...

Страница 2: ...rcuit That is a single outlet circuit which powers only that appliance and has no additional outlets or branch circuits Check the specification page of this owner s manual to be certain Do not overload wall outlets Overloaded wall outlets loose or damaged wall outlets extension cords frayed power cords or damaged or cracked wire insulation are dangerous Any of these conditions could result in elec...

Страница 3: ...splay Mode 11 Progressive Scan 11 TV Output Select 11 AUDIO 12 Dolby Digital DTS MPEG 12 Sample Freq Frequency 12 Dynamic Range Control DRC 12 Vocal 12 LOCK Parental Control 12 Rating 12 Password 12 Area Code 13 OTHERS 13 PBC 13 B L E Black Level Expansion 13 DivX R VOD 13 Operation 14 19 General Features 14 Additional Features 15 Playing an Audio CD or MP3 WMA file 16 Programmed Playback 17 Repea...

Страница 4: ...stortion Before playing clean the disc with a clean cloth Wipe the disc from the center out Do not use strong solvents such as alcohol benzine thinner commercially available cleaners or anti static spray intended for older vinyl records Maintenance and Service Refer to the information in this chapter before contacting a service technician Handling the Unit When shipping the unit Please save the or...

Страница 5: ...V screen Notes on Copyrights It is forbidden by law to copy broadcast show broadcast via cable play in public or rent copyrighted material without permission This product features the copy protection function developed by Macrovision Copy protection signals are recorded on some discs When recording and playing the pictures of these discs picture noise will appear This product incorporates copyrigh...

Страница 6: ...s to the beginning of current chapter or track or go to the previous chapter or track SKIP Go to the next chapter or track c Disc Tray Insert a disc here d Display window Shows the current status of the unit e Remote Sensor Point the remote control here f Z OPEN CLOSE Opens or closes the disc tray a b c d e f ...

Страница 7: ...language or an audio channel SUBTITLE Selects a subtitle language ANGLE Selects a DVD camera angle if available SETUP Accesses or removes the Setup menu MARKER Marks any point during playback SEARCH Displays MARKER SEARCH menu PROGRAM Enter the program edit mode ZOOM Enlarges video image REPEAT Repeat chapter track title all A B Repeat sequence from point A to point B RANDOM Plays tracks in random...

Страница 8: ... the video cable V Audio Connect the left and right AUDIO OUT jacks of the DVD player to the audio left and right IN jacks on the TV using the audio cables A Do not connect the unit s AUDIO OUT jack to the phone in jack record deck of your audio system Component Video Connect the COMPONENT PROGRESSIVE SCAN jacks on the unit to the corresponding jacks on the TV using an Y PB PR cable C Progressive ...

Страница 9: ...l sound A digital multi channel connection provides the best sound quality For this you need a multi channel audio video receiver that supports one or more of the audio formats supported by your DVD player such as MPEG 2 Dolby Digital and DTS Check the receiver manual and the logos on the front of the receiver Notes If the audio format of the digital output does not match the capabilities of your ...

Страница 10: ...can make various adjustments to items such as picture and sound You can also set a language for the subtitles and the Setup menu among other things For details on each Setup menu item see the pages 11 to 13 To display and exit the Menu Press SETUP to display the menu A second press of SETUP will take you back to initial screen To go to the next level Press B on the remote control To go back to the...

Страница 11: ...r a monitor that is compatible with a progressive scan signal set Progressive Scan to On To Turn ON progressive scan Connect component video out of this unit to the input of your TV or monitor set your TV or monitor to Component Input 1 Select Progressive Scan on the DISPLAY menu then press B 2 Select On using the v V buttons 3 Press ENTER to confirm your selection The confirm menu will appear 4 W...

Страница 12: ...lower volume without losing clarity of sound Set DRC to On for this effect Vocal Set to On only when a multi channel karaoke DVD is playing The karaoke channels on the disc mix into normal stereo sound LOCK Parental Control Rating Blocks playback of rated DVDs based on their contents Not all discs are rated 1 Select Rating on the LOCK menu then press B 2 To access the LOCK options you must input t...

Страница 13: ...e PBC Off Video CDs with PBC are played in the same way as Audio CDs B L E Black Level Expansion To select the black level of playback pictures Set your preference and monitor s ability On Expanded grey scale 0 IRE cut off Off Standard grey scale 7 5 IRE cut off Note The B L E function works NTSC system only DivX R VOD We provide you the DivX VOD Video On Demand registration code that allows you t...

Страница 14: ...e A B button one at a time to select a point A and point B and repeats a sequence from point A Starting point to point B End point ZOOM During playback or pause mode press ZOOM to enlarge the video image 3 steps You can move through the zoomed picture using b B v V buttons Press CLEAR to exit RANDOM During playback or in stop mode press RANDOM for random playback TITLE If the current DVD title has...

Страница 15: ... at the desired point on the disc The Marker icon appears on the TV screen briefly Repeat to enter up to nine markers To Recall or Clear a Marked Scene 1 During disc playback press SEARCH The marker search menu appears on the screen 2 Within 9 seconds press b B to select a marker number that you want to recall or clear 3 Press ENTER and playback starts from the marked scene Or Press CLEAR and the ...

Страница 16: ... that has a file extension other than mp3 wma CD R physical format should be ISO 9660 If you record MP3 WMA files using software that cannot create a file system eg Direct CD it is impossible to playback MP3 WMA files We recommend that you use Easy CD Creator which creates an ISO 9660 file system File names should have a maximum of 8 letters and must incorporate an mp3 or wma extension They should...

Страница 17: ...epeat mode Track repeats the current track All repeats all the tracks on the Program list Off No display does not play repeatedly Note If you press once during Repeat Track playback the repeat playback cancels Erasing a Track from Program List 1 Use v V b B to select the track that you wish to erase from the Program list 2 Press CLEAR Repeat step 1 2 to erase additional tracks on the list Erasing ...

Страница 18: ...ress ZOOM to enlarge the video image 3 steps You can move through the zoomed picture using b B v V buttons Rotating the picture Press v V during showing a picture to rotate the picture clockwise or counter clockwise To listen to MP3 WMA music while watching picture 1 Insert the disc containing the two types of file in the player 2 Press TITLE to display the PHOTO menu 3 Press v V to select a photo...

Страница 19: ... language code until the subtitle is displayed properly 3 Press ENTER to continue playback Note The DivX subtitle file name has to be identified with the DivX file name to display by this unit DivX disc compatibility with this player is limited as follows Available resolution size of the DivX file is under 720x576 W x H pixel The file name of the DivX subtitle is available by 56 characters If ther...

Страница 20: ...y be reset to the default setting Set the appropriate code number again Video Mode Setting With certain discs the playback picture may be flickering or Dot Crawl is shown on straight lines That means Vertical interpolation or De interlace is not perfectly matched with the disc In this case the picture quality may be improved by changing the video mode To change the video mode press and hold DISPLA...

Страница 21: ...89 Byelorussian 6669 Cambodian 7577 Catalan 6765 Chinese 9072 Corsican 6779 Croatian 7282 Czech 6783 Danish 6865 Dutch 7876 English 6978 Esperanto 6979 Estonian 6984 Faroese 7079 Language Code Fiji 7074 Finnish 7073 French 7082 Frisian 7089 Galician 7176 Georgian 7565 German 6869 Greek 6976 Greenlandic 7576 Guarani 7178 Gujarati 7185 Hausa 7265 Hebrew 7387 Hindi 7273 Hungarian 7285 Icelandic 7383 ...

Страница 22: ...rrect position then turn on the DVD player again by pressing POWER Insert a playable disc Check the disc type and regional code Change the rating level Point the remote control at the remote sensor of the DVD player Operate the remote control closer to the DVD player Troubleshooting Specifications General Power requirements AC 200 240 V 50 60 Hz Power consumption 8W Dimensions Approx 430 x 35 x 20...

Страница 23: ...VD SPIELER Bedienungsanleitung MODELL DVX276 Lesen Sie diese Anleitung bitte vor dem Anschluss der Inbetriebnahme oder der Einstellung des Produktes sorgfältig und vollständig durch DV276 E3M NA3GLLS_DEU ...

Страница 24: ...is angeschlossen werden D h eine separate Steckdose ohne weitere Anschlüsse oder Zweigleitungen über die ausschließlich dieses Gerät mit Strom versorgt wird Beachten Sie hierzu die technischen Daten des Gerätes in diesem Benutzerhandbuch Steckdosen niemals überlasten Bei überlasteten lockeren oder beschädigten Steckdosen Verlängerungskabeln bei abgenutzten Kabeln oder beschädigter Isolierung beste...

Страница 25: ...1 Bildformat 11 Anzeigemodus 11 Progressive Scan 11 Video Ausgang 11 AUDIO 12 Dolby Digital DTS MPEG 12 Samplingfrequenz Erkannt 12 Steuerung des Dynamikbereichs DRC 12 Vocal 12 BLOCK Kindersicherung 12 Einstufung 12 Kennwort 12 Orts Code 13 ANDERE 13 PBC 13 B L E Schwarzpegelverstärkung 13 DivX R VOD 13 Betrieb 14 19 Allgemeine Funktionen 14 Weitere Funktionen 15 Wiedergabe einer Audio CD oder MP...

Страница 26: ...ng von Discs Fingerabdrücke und Staub auf der Disc können die Bild und Tonqualität beeinträchtigen Reinigen Sie die Disc vor der Wiedergabe mit einem sauberen Tuch Wischen Sie die Disc von der Mitte zum Rand hin ab Verwenden Sie keine starken Lösungsmittel wie Alkohol Benzin Verdünner handelsübliche Reiniger oder für Schallplatten bestimmte Antistatik Sprays Wartung und Pflege Lesen Sie die Inform...

Страница 27: ...ildschirm des Fernsehgerätes angezeigt Hinweise zum Copyright Es ist gesetzlich verboten urheberrechtlich geschütztes Material ohne Genehmigung zu kopieren auszustrahlen vorzuführen über Kabel zu senden öffentlich wiederzugeben oder zu verleihen Dieses Gerät ist mit der von Macrovision entwickelten Kopierschutzfunktion ausgestattet Auf einigen Discs sind Kopierschutzsignale aufgezeichnet Wenn Sie ...

Страница 28: ...itels oder Tracks bzw zurück zum vorherigen Kapitel oder Track SKIP Weiter zum nächsten Kapitel oder Track c Disc Fach Legen Sie die Disc hier ein d Anzeigefenster Der derzeitige Betriebsmodus des Players e Empfangssensor für das Fernbedienungssignal Richten Sie die Fernbedienung auf diesen Punkt f Z OPEN CLOSE Öffnet und schließt das Disc Fach a b c d e f ...

Страница 29: ... Wählt eine Untertitelsprache aus ANGLE Taste Wählt einen DVD Kamerawinkel aus sofern vorhanden SETUP Taste Blendet das Setup Menü ein bzw aus MARKER Taste Markiert einen Punkt während der Wiedergabe SEARCH Taste Zeigt das Menü MARKIERUNGSSUCHE ein PROGRAM Taste Aufrufen des Programmierungsmodus ZOOM Taste Vergrößert das Videobild REPEAT Taste Kapitel Track Titel alle wiederholen A B Abschnitt von...

Страница 30: ...ngangsbuchse das Fernsehgerätes Audio Verbinden Sie die linke und die rechte AUDIO OUT Buchse des DVD Players über die Audiokabel mit der linken und rechten Eingangsbuchse am Fernsehgerät A Verbinden Sie die AUDIO OUT Buchse des DVD Players nicht mit der Phone Eingangsbuchse Aufnahmeteil Ihres Audiosystems Component Video Verbinden Sie die COMPONENT PROGRESSIVE SCAN Buchsen des Gerätes über ein Y ...

Страница 31: ...er Mehrkanal Anschluss bietet die beste Tonqualität Sie benötigen dafür einen Mehrkanal Audio Video Empfänger der eines oder mehrere der von Ihrem DVD Player unterstützten Audioformate z B MPEG 2 Dolby Digital und DTS unterstützt Hinweise finden Sie in der Begleitdokumentation des Receivers und auf den Logos auf seiner Vorderseite Hinweise Wenn das Audioformat der digitalen Ausgabe nicht den Fähig...

Страница 32: ... Außerdem können Sie eine Sprache für die Untertitel und das Setup Menü einstellen Einzelheiten über die einzelnen Optionen des Setup Menüs finden Sie auf den Seiten 11 bis 13 So blenden Sie das Menü ein und aus Drücken Sie SETUP um das Menü anzuzeigen Wenn Sie SETUP erneut drücken kehren Sie zum ersten Bildschirm zurück So gehen Sie zur nächsten Ebene Drücken Sie B auf der Fernbedienung So kehren...

Страница 33: ... Scan kompatibles TV oder Monitor Gerät verwendet werden ist Progressive Scan eingestellt So schalten Sie Progressive Scan ein Verbinden Sie den Component Video Out Ausgang des Players mit dem Eingang des Fernsehers Monitors und stellen Sie den Fernseher bzw Monitor auf Component Eingang 1 Wählen Sie Progressive Scan im Menü ANZEIGE und drücken Sie B 2 Wählen Sie mit den Tasten v V die Option Ein ...

Страница 34: ...en Sie zu diesem Zweck die Funktion DRC auf Ein Vocal Schalten Sie die Gesangsoption auf Ein wenn Sie eine Mehrkanal Karaoke DVD abspielen möchten Die Karaoke Kanäle auf der Disc werden in normalen Stereoton umgewandelt BLOCK Kindersicherung Einstufung Verhindert die Wiedergabe von nicht jugendfreien DVDs Es sind jedoch nicht alle DVDs eingestuft 1 Wählen Sie im BLOCK Menü Einstufung aus und drück...

Страница 35: ...en in gleicher Weise wie Audio CDs abgespielt B L E Schwarzpegelverstärkung Auswahl des Schwarzpegels des Wiedergabebildes Bevorzugte und für den Monitor erforderliche Einstellungen Ein Verstärkte Graustufe 0 IRE cut off Aus Standard Graustufe 7 5 IRE cut off Hinweis Die B L E Funktion ist nur für die NTSC Norm verfügbar DivX R VOD Sie erhalten von uns einen DivX VOD Registrierungscode Video On De...

Страница 36: ...bschnittswiederholung nacheinander die Taste A B um den Abschnitt mehrmals wiederzugeben ZOOM Drücken Sie während der Wiedergabe oder Pause auf ZOOM um das Videobild zu vergrößern 3 Stufen Mit den Tasten b B v V können Sie das vergrößerte Bild verschieben Drücken Sie zum Beenden auf CLEAR RANDOM ZUFÄLLIG Drücken Sie zur Zufallswiedergabe während der Wiedergabe oder im Stop Modus auf RANDOM TITLE F...

Страница 37: ...c MARKER drücken Auf dem Fernsehbildschirm wird kurz das Markierungssymbol angezeigt Wiederholen Sie diese Schritte um bis zu neun Markierungen einzugeben So rufen Sie eine markierte Szene ab oder löschen Sie 1 Drücken Sie während der Disc Wiedergabe auf SEARCH Das Menü für die Markierungssuche wird auf dem Bildschirm angezeigt 2 Drücken Sie innerhalb von 9 Sekunden b B um eine Markierungsnummer a...

Страница 38: ...lische Format der CD R sollte ISO 9660 entsprechen Bei der Aufnahme von MP3 WMA Dateien mit einer Software die kein Dateisystem erstellen kann z B Direct CD ist die Wiedergabe von MP3 WMA Dateien nicht möglich Wir empfehlen die Verwendung von Easy CD Creator Diese Software erstellt ein Dateisystem das ISO 9660 entspricht Dateinamen dürfen maximal acht Buchstaben lang sein und müssen die Erweiterun...

Страница 39: ...smodus zu wählen Track Wiederholt den aktuellen Track Alle Wiederholt alle Tracks der Programmliste Aus Keine Anzeige Keine Wiederholung Hinweis Wenn Sie während der wiederholten Wiedergabe einmal drücken wird die wiederholte Wiedergabe beendet Track aus der Programmliste löschen 1 Markieren Sie mit v V b B den Track der von der Programmliste entfernt werden soll 2 Drücken Sie auf CLEAR Wiederhole...

Страница 40: ...zw vorherigen Datei zu springen Zoom Drücken Sie während der Wiedergabe auf ZOOM um das Videobild zu vergrößern 3 Stufen Mit den Tasten b B v V können Sie das vergrößerte Bild verschieben Bild drehen Drücken Sie v V während der Bildanzeige um es im bzw entgegen dem Uhrzeigersinn zu drehen MP3 WMA Musik während der Bildanzeige spielen 1 Legen Sie die Disc mit diesen beiden Dateitypen in den Player ...

Страница 41: ...mit b B einen anderen Sprachcode aus bis die Untertitel richtig angezeigt werden 3 Drücken Sie zum Fortsetzen der Wiedergabe auf ENTER Hinweis Der Name der DivX Untertiteldatei muss mit dem auf diesem Gerät angezeigten DivX Dateinamen übereinstimmen Die Kompatibilität dieses DVD Players mit DivX Discs unterliegt folgenden Einschränkungen Die Auflösung einer DivX Datei muss unterhalb von 720 x 576 ...

Страница 42: ...etzt Geben Sie die entsprechende Codenummer erneut ein Videomodus Einstellung Bei bestimmten Discs kann das Wiedergabe Bild flimmern oder auf geraden Linien werden schimmernde Muster angezeigt Dies bedeutet dass die vertikale Interpolation oder De interlace nicht perfekt auf die Disc abgestimmt ist In diesem Fall können Sie die Bildqualität verbessern indem Sie den Videomodus ändern Um in den Vide...

Страница 43: ...bodschanisch 7577 Katalanisch 6765 Chinesisch 9072 Korsisch 6779 Kroatisch 7282 Tschechisch 6783 Dänisch 6865 Niederländisch 7876 Englisch 6978 Esperanto 6979 Estisch 6984 Färöisch 7079 Sprache Code Fidschi 7074 Finnisch 7073 Französisch 7082 Friesisch 7089 Galizisch 7176 Georgisch 7565 Deutsch 6869 Griechisch 6976 Grönländisch 7576 Guarani 7178 Gujarati 7185 Hausa 7265 Hebräisch 7387 Hindi 7273 U...

Страница 44: ...Kein Ton Wiedergabe nicht möglich Die Fernbedienung funktioniert nicht richtig Mögliche Ursache Netzkabel nicht eingesteckt Keine Disc eingelegt Fernseher nicht auf DVD Betrieb umgeschaltet Das Videokabel wurde nicht richtig angeschlossen Das angeschlossene Audio Equipment ist nicht auf DVD Wiedergabe umgeschaltet Das angeschlossene Audio Equipment ist ausgeschaltet Die AUDIO Optionen sind falsch ...

Отзывы: