background image

STACKING KIT INSTALLATION 

(cont.)

3

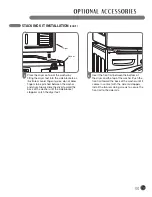
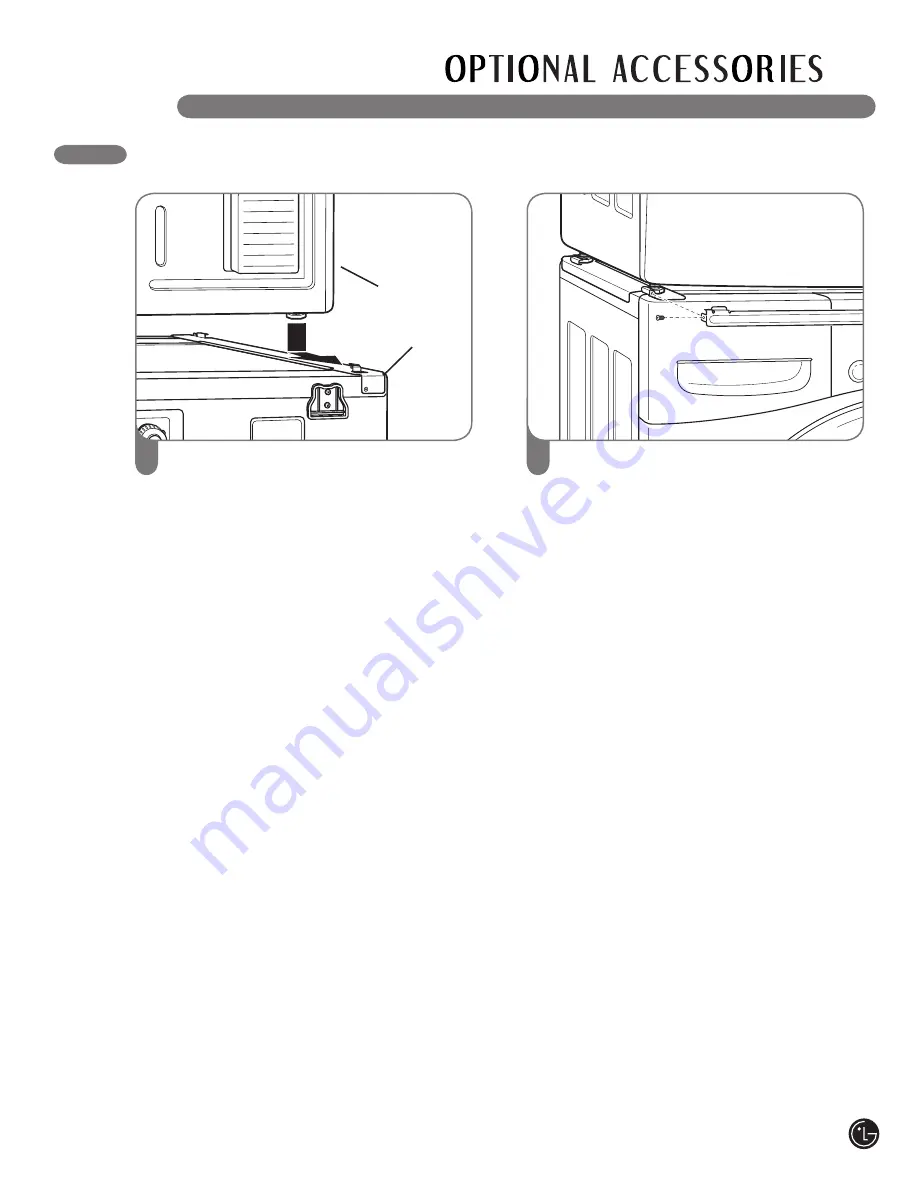
Place the dryer on top of the washer by  

fitting the dryer feet into the side brackets as 

illustrated. Avoid finger injuries; do not allow 

fingers to be pinched between the washer 

and dryer. Slowly slide the dryer toward the 

back of the washer until the side bracket 

stoppers catch the dryer feet.

4

Insert the front rail between the bottom of 

the dryer and the top of the washer. Push the 

front rail toward the back of the washer until it 

comes in contact with the side rail stoppers. 
Install the two remaining screws to secure the 
front rail to the side rails.

Washer

Dryer

Содержание DLE3733D

Страница 1: ...heuse lisez attentivement ces instructions Cela simplifiera votre installation et assurera que la sécheuse est installée correctement et en toute sécurité Conservez ces instructions à proximité de la sécheuse après son installation pour référence future To contact LG Electronics 24 hours a day 7 days a week 1 888 LGCANADA Or visit us on the Web at ca lge com Pour contacter LG Electronics 24 heures...

Страница 2: ...E Sorting Loads 19 Loading the Dryer 19 Check the Lint Filter Before Every Load 19 Control Panel Features 20 Cycle Guide 21 The LED Display 22 Operating the Dryer 23 Cycle Setting Buttons 24 Custom Program 24 Cycle Option Buttons 25 TROUBLESHOOTING Before Calling for Service 27 28 USER MAINTENANCE INSTRUCTIONS Regular Cleaning 26 SPECIFICATIONS OPTIONAL ACCESSORIES Key Dimensions and Specification...

Страница 3: ...dry cleaning solvents or other flammable or explosive substances as they give off vapors that could ignite or explode Do not reach into the dryer if the drum or any other part is moving Do not repair or replace any part of the dryer or attempt any servicing unless specifically recommended in this Use and Care Guide or in published user repair instructions that you understand and have the skills to...

Страница 4: ... to minimize the risk of fire or explosion electric shock or to prevent property damage personal injury or loss of life 1 Do not try to light a match or cigarette or turn on any gas or electrical appliance 2 Do not touch any electrical switches Do not use any phone in your building 3 Clear the room building or area of all occupants 4 Immediately call your gas supplier from a neighbor s phone Follo...

Страница 5: ...ly grounded Before use the dryer must be properly installed as described in this manual Electrical shock can result if the dryer is not properly grounded Install and store the dryer where it will not be exposed to temperatures below freezing or exposed to the weather All repairs and servicing must be performed by an authorized servicer unless specifically recommended in this Owner s Guide Use only...

Страница 6: ...provided with the dryer and you should obtain the necessary ductwork locally The end cap should have hinged dampers to prevent backdraft when the dryer is not in use Failure to follow these instructions can result in fire or death The exhaust duct must be 4 in 10 cm in diameter with no obstructions The exhaust duct should be kept as short as possible Make sure to clean any old ducts before install...

Страница 7: ...age rating that matches the rating plate This provides the best performance and also prevents overloading house wiring circuits which could cause a fire hazard from overheated wires Never unplug your dryer by pulling on the power cord Always grip plug firmly and pull straight out from the outlet The power cord can be damaged resulting in a risk of fire and electrical shock Repair or replace immedi...

Страница 8: ...Gas Connection Location Gas Models Exhaust Duct Outlet KEY PARTS AND COMPONENTS 1 3 1 Easy to USE Control Panel Rotate the Cycle Selector Knob to select the desired dry cycle Add cycle options or adjust settings with the touch of a button 2 LED Display The easy to read LED display shows cycle options and information and provides status messages during operation 2 3 EASY ACCESS REVERSIBLE DOOR Wide...

Страница 9: ...installation instructions completely before installing and operating your dryer It is important that you review this entire manual before installing and using your dryer Detailed instructions concerning electrical connections gas connections and exhaust requirements are provided on the following pages Properly ground dryer to conform with all governing codes and ordinances To reduce the risk of el...

Страница 10: ...this manual or to the instructions for your pedestal or stacking kit before proceeding with the installation Required Dimensions for Installation With Pedestal Required Dimensions for Installation With Stacking Kit OPTIONAL ACCESSORIES For these and other LG products contact your local LG dealer or visit our Web site at ca lge com Pedestal sold separately Stacking Kit sold separately 10 ...

Страница 11: ...he dryer door Using a Phillips screwdriver remove the 2 screws that secure the door hinge to the dryer door opening Remove the 4 screws from the latch side of the dryer door opening and remove the door latch Turn the door around so the hinge is reversed and reattach the door using the 2 screws previously removed Reinstall the door latch and the 4 screws Test the door swing to make sure the door mo...

Страница 12: ...WAY from the dryer Insert the elbow duct assembly through the side opening and press it onto the adapter duct Secure in place with duct tape Be sure that the male end of the duct protrudes 1 in 3 8 cm to connect the remaining ductwork Attach cover plate to the back of the dryer with included screw 11 2 3 8 cm 3 Elbow Cover Plate 1 Rear Exhaust Duct Retaining Screw OPTION 1 Side Venting Press the a...

Страница 13: ...t duct must be 4 in 10 cm in diameter with no obstructions The exhaust duct should be kept as short as possible Make sure to clean any old ducts before installing your new dryer Failure to follow these instructions can result in fire or death Rigid or semirigid metal ducting is recommended for use between the dryer and the wall In special installations when it is impossible to make a connection wi...

Страница 14: ...tion and lint buildup on duct surfaces IMPORTANT Failure to exhaust the dryer correctly will void the dryer s warranty VENTING THE DRYER cont Correct Venting Incorrect Venting Number of Max Length of 4 In Dia Max Length of 4 In Dia Wall Cap Type 90 Elbows Rigid Metal Duct Flexible Metal Duct 0 65 ft 19 8 m 45 ft 13 7 m 1 55 ft 16 8 m 35 ft 10 7 m 2 47 ft 13 7 m 30 ft 9 1 m 3 36 ft 11 0 m 25 ft 7 6...

Страница 15: ...fluid Failure to do so can result in fire explosion or death Use only a new AGA or CSA certified gas supply line with flexible stainless steel connectors Failure to do so can result in fire explosion or death Securely tighten all gas connections Failure to do so can result in fire explosion or death Use Teflon tape or a pipe joint compound that is insoluble in Liquefied Petroleum LP gas on all pip...

Страница 16: ...ly Shutoff Valve Connecting the Gas Supply Make sure that the gas supply to the laundry room is turned OFF Confirm that the type of gas available in your laundry room is appropriate for the dryer The dryer is prepared for Natural Gas with a 3 8 in NPT gas connection Remove the shipping cap from the gas connection at the back of the dryer Be careful not to damage the threads of the gas connector wh...

Страница 17: ...yer Type of pigtail and gauge of wire must conform to local codes and with instructions on the following pages Failure to follow these instructions can result in fire explosion or death A 4 wire connection is required for all mobile and manufactured home installations as well as all new construction after January 1 1996 A 4 wire connection must be used where local codes do not permit grounding thr...

Страница 18: ...cal codes and ordinances If you are uncertain whether your proposed installation will comply with these standards please contact a service and installation professional for assistance A gas dryer must be permanently attached to the floor The electrical connection for an electric dryer must be a 4 wire connection More detailed information concerning the electrical connection is provided in the sect...

Страница 19: ...ed with the same drying cycle Different fabrics have different care requirements and some fabrics will dry more quickly than others Fabric Care Labels Heat setting High Medium Low No heat air CHECK THE LINT FILTER BEFORE EVERY LOAD Always make sure the lint filter is clean before starting a new load a clogged lint filter will increase drying times To clean pull the lint filter straight up and roll...

Страница 20: ... cycle without losing the current settings NOTE If you do not press the START PAUSE button to resume a cycle within 4 minutes the dryer automatically turns off 3 MORE TIME LESS TIME BUTTONS Use these buttons with MANUAL DRY and TIME DRY cycles to adjust the drying time Press the MORE TIME button to increase the selected manual cycle time by a minute press LESS TIME to decrease the cycle time by a ...

Страница 21: ...ed the ESTIMATED TIME REMAINING display shows the actual time remaining in your cycle You can change the actual time in the cycle by pressing MORE TIME or LESS TIME Damp Dry Wrinkle Care More Time Less Time Time in Min Dry Level Type Cycle Fabric Type Temperature COTTON TOWELS NORMAL PERM PRESS DELICATES Denims towels heavy cottons Work clothes corduroys etc Permanent press synthetic items Lingeri...

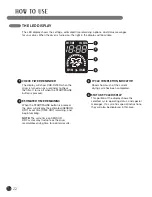
Страница 22: ...is pressed 1 2 Status Cycle Display This portion of the display shows the selected cycle operating status and special messages If a cycle has special instructions they will also be displayed in this area 3 4 1 Estimated Time Remaining When the START PAUSE button is pressed the dryer will display the estimated SENSOR DRY or set time TIME DRY remaining and begin tumbling NOTE The cycle time on SENSO...

Страница 23: ... the START PAUSE button to begin the cycle The display will change and the dryer will display the estimated SENSOR DRY or set time MANUAL DRY remaining and start tumbling To pause the cycle at any time open the dryer door or press PAUSE To resume the cycle where it was stopped press START PAUSE again NOTE If the dryer has been stopped for more than 8 minutes the dryer will turn off automatically 5...

Страница 24: ...e cycle Press the DRY LEVEL button repeatedly to scroll through available settings This option is only available with SENSOR DRY cycles The dryer will automatically adjust the cycle time Selecting VERY DRY or MORE DRY will increase the cycle time while LESS DRY or DAMP DRY will decrease the cycle time Use a LESS DRY or DAMP DRY setting for items that you wish to iron DRY LEVEL CUSTOM PROGRAM If yo...

Страница 25: ...selected cycle or until the door is opened This is helpful in preventing wrinkles when you are unable to immediately remove items from the dryer DAMP DRY BEEP With this option the dryer will beep when the load is approximately 80 dry This allows you to remove faster drying lightweight items or items that you would like to iron or hang while still slightly damp CHILD LOCK WRINKLE CARE DAMP DRY BEEP...

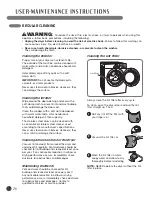
Страница 26: ...ed at least once per year If any noticeable reduction in airflow or drying performance occurs immediately check ductwork for obstructions and blockages Maintaining Ductwork Vent ductwork should be checked for lint buildup and cleaned at least once per year If any noticeable reduction in airflow or drying performance occurs immediately check ductwork for obstructions and blockages Contact a qualifi...

Страница 27: ...n items because dirty items can soil clean clothes placed in the same or subsequent loads Stains on dried clothes are actually stains that weren t removed during the washing process Make sure that clothes are being completely cleaned according to the instructions for your washer and detergent Display shows error code tE1 or tE2 Thermistor is malfunctioning Turn off the dryer and call for service L...

Страница 28: ...ery load With some loads that produce high amounts of lint it may be necessary to clean the filter during the cycle Confirm that the exhaust ductwork is properly configured and free of debris lint and obstructions Make sure that outside wall dampers can open properly and are not blocked jammed or damaged Reset circuit breaker or replace fuse Do not increase fuse capacity If the problem is a circui...

Страница 29: ...pearance and specifications listed in this guide may vary due to constant product improvements Refer to the rating plate on your dryer OPTIONAL ACCESSORIES For these and other LG products contact your local LG dealer or visit our Web site at ca lge com Pedestal Give your LG washer and dryer a boost with matching 14 inch high pedestals They feature a storage drawer for added convenience 14 Pedestal...

Страница 30: ...n cause serious accidents The appliances are heavy Two or more people are required when installing the pedestal There is a risk of serious back injury or other injuries Do not allow children to play in or on the drawer There is a risk of suffocation or injury Do not step on the handle There is a risk of serious injury If appliances are already installed disconnect them from all power water or gas ...

Страница 31: ... the pedestal align with the holes in the retainers then install 4 screws at each corner to securely attach the appliance to the pedestal NOTE If the screws are not installed properly noise and vibration may result Move the appliance to the desired location Securely tighten all locknuts by hand NOTE Noise and vibration may result if locknuts are not tightened Be sure to connect the appliances to a...

Страница 32: ...hillips head screwdriver wWARNING Incorrect installation can cause serious accidents The weight of the dryer and the height of installation make this stacking procedure too risky for one person Two or more people are required when installing the stacking kit There is a risk of serious back injury or other injuries Do not use the stacking kit with a gas dryer in potentially unstable conditions such...

Страница 33: ...e washer and dryer Slowly slide the dryer toward the back of the washer until the side bracket stoppers catch the dryer feet 4 Insert the front rail between the bottom of the dryer and the top of the washer Push the front rail toward the back of the washer until it comes in contact with the side rail stoppers Install the two remaining screws to secure the front rail to the side rails 33 Washer Dry...

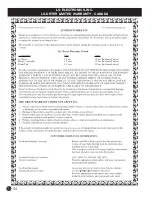
Страница 34: ...LG ELECTRONICS INC LG DRYER LIMITED WARRANTY CANADA All Parts Motor Controller Drum Tub 1 Year 3 Years 5 Years 1 Year In Home Service 1 Year In Home Service 1 Year In Home Service 34 ...

Страница 35: ...35 ...

Страница 36: ... piédestal 64 65 Installation de la trousse d empilage 66 67 GARANTIE 68 INSTRUCTIONS D INSTALLATION Choisir le bon emplacement 43 Dégagements 43 Installations avec piédestal ou trousse d empilage en option 44 Mise à niveau de la sécheuse 45 Inversion de l oscillation de la porte 45 Modification de l emplacement de la sortie d air 46 Ventilation de la sécheuse 47 48 Raccordement des sécheuses à ga...

Страница 37: ...age à sec ou toute autre substance inflammable ou explosive non plus que tout article qui présenterait des taches de ces substances car les vapeurs qui s en dégagent pourraient s enflammer ou exploser Ne placez pas d articles exposés à des huiles y compris de l huile de cuisson dans votre sécheuse Des vêtements contaminés aux huiles peuvent entraîner une réaction chimique qui pourrait faire enflam...

Страница 38: ...nisseur de gaz appelez le service d incendie Ne rangez et n utilisez pas d essence ou autres vapeurs et liquides inflam mables près de cet appareil ou de tout autre appareil électroménager L installation et l entretien doivent être effectués par un installateur qualifié une agence de service ou le fournisseur de gaz CE QU IL FAUT FAIRE SI VOUS DÉTECTEZ UNE ODEUR DE GAZ 38 LISEZ TOUTES LES DIRECTIV...

Страница 39: ...use n est pas bien mise à la terre cela peut entraîner une électrocution Faites la mise à la terre de la sécheuse conformément à tous les codes et réglementation adéquats Suivez les directives d installation détaillées Si votre sécheuse n est pas bien mise à la terre cela peut entraîner une électrocution Avant de l utiliser la sécheuse doit être installée correctement conformément aux directives d...

Страница 40: ... la mort Le conduit d évacuation d air doit mesurer 4 po 10 cm de diamètres sans obstructions On doit le maintenir aussi court que possible Assurez vous de nettoyer tout vieux conduit avant d installer votre nouvelle sécheuse Tout non respect de ces instructions peut entraîner un incendie ou la mort Des conduits métalliques rigides ou semi rigides sont recommandés entre le mur et la sécheuse Lors ...

Страница 41: ...uit électrique domestique ce qui pourrait entraîner un risque d incendie en raison de la surchauffe des fils électriques Ne débranchez jamais la sécheuse en tirant sur le cordon d alimentation Tenez toujours fermement la fiche électrique et retirez directement de la prise Le cordon d alimentation peut être endommagé ce qui peut entraîner un danger d électrocution ou d incendie Réparez ou remplacez...

Страница 42: ...ment et déchargement de l appareil Il est possible d inverser l ouverture de la porte en fonction de l emplacement de l appareil 4 Porte d accès au bloc de jonction modèles électriques Dos de la sécheuse Emplacement du raccord à la canalisation de gaz modèles à gaz Sortie du conduit d évacuation d air Pieds de nivellement Quatre pieds de nivellement deux à l avant et deux à l arrière sont réglable...

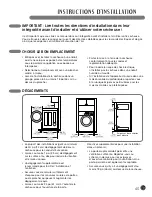
Страница 43: ...irectives d installation dans leur intégralité avant d installer et d utiliser votre sécheuse Il est important que vous lisiez ce manuel dans son intégralité avant d installer et d utiliser votre sécheuse Vous retrouverez dans les pages qui suivent des directives détaillées pour les raccords électriques et de gaz ainsi que les exigences en matière d évacuation de l air Faites la mise à la terre de...

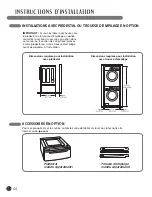
Страница 44: ... des directives relatives à votre piédestal ou à votre trousse d empilage avant de procéder à l installation Dimensions requises pour installation avec piédestal Dimensions requises pour installation avec trousse d empilage Piédestal vendu séparément Trousse d empilage vendu séparément ACCESSOIRES EN OPTION Pour ces produits LG et les autres contactez votre détaillant LG local ou visitez notre sit...

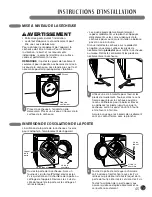
Страница 45: ...e nivellement de la sécheuse Placez la sécheuse à l endroit où elle demeurera Placez un niveau en travers de la surface de la sécheuse 1 Pieds de nivellement Utilisez une clé à molette pour tourner les pieds de nivellement Tournez dans le sens horaire pour élever la sécheuse ou dans le sens antihoraire pour l abaisser Élevez ou abaissez les pieds jusqu à ce que la sécheuse soit à niveau d un côté ...

Страница 46: ...du coude fait face à L OPPOSÉ de la sécheuse Insérez l ensemble coude conduit dans l ouverture latérale et enfoncez le dans le conduit adaptateur Fixez solidement en position avec du ruban à conduit Assurez vous que l extrémité mâle du conduit dépasse d environ 1 po 3 8 cm pour le raccorder au système de conduits Fixez la plaque protectrice au dos de la sécheuse avec la vis fournie 11 2 3 8 cm 3 C...

Страница 47: ...ort Le conduit d évacuation d air doit mesurer 4 po 10 cm de diamètres sans obstructions On doit le maintenir aussi court que possible Assurez vous de nettoyer tout vieux conduit avant d installer votre nouvelle sécheuse Tout non respect de ces instructions peut entraîner un incendie ou la mort Des conduits métalliques rigides ou semi rigides sont recommandés entre le mur et la sécheuse Lors d ins...

Страница 48: ...on et l accumulation de charpies sur les surfaces des conduits IMPORTANT Une évacuation d air incorrecte de la sécheuse annulera la garantie de la sécheuse VENTILATION DE LA SÉCHEUSE suite Ventilation correcte Ventilation incorrecte Longueur max de Longueur max de Type de sortie Nombre de 4 po 10 cm de diamètre 4 po 10 cm de diamètre murale externe coudes de 90 conduit métallique rigide conduit mé...

Страница 49: ...orrosion Tout non respect de ces instructions peut entraîner un incendie une explosion ou la mort Utilisez uniquement un nouveau tuyau d alimentation en gaz homologué AGA ou CSA avec des raccords en acier inoxydable Tout non respect de ces instructions peut entraîner un incendie une explosion ou la mort Serrez solidement tous les raccords de gaz Tout non respect de ces instructions peut entraîner ...

Страница 50: ...e l alimentation en gaz Raccordement de l alimentation en gaz Assurez vous que l alimentation en gaz vers la salle de lavage soit bien COUPÉE Confirmez que le type de gaz acheminé vers votre salle de lavage soit adéquat pour la sécheuse L appareil est prêt à fonctionner au gaz naturel avec un raccord NPT de 3 8 po 9 5 mm Retirez le capuchon d expédition du raccord de gaz au dos de la sécheuse Soye...

Страница 51: ...isez un fil no 8 AWG uniquement en cuivre homologué par les ULC Laboratoires des assureurs du Canada ou conformes aux exigences des codes locaux Laissez suffisamment de jeu pour permettre de déplacer la sécheuse au besoin Tout non respect de ces instructions peut entraîner un incendie une explosion ou la mort La queue de cochon pour la connexion du cordon d alimentation entre le réceptacle mural e...

Страница 52: ...nadienne CAN CSA0Z240 MH ainsi qu aux codes et règlements locaux En cas de doutes relatifs à la conformité de l installation par rapport à ces normes communiquez avec un professionnel en service et installation pour du soutien technique Une sécheuse à gaz doit être définitivement fixée au plancher La connexion électrique pour une sécheuse électrique doit comporter une connexion à 4 fils Pour des r...

Страница 53: ...uant risquerait d endommager la sécheuse et les articles dans la sécheuse Filtre à charpie Voici les instructions de mise en marche et d utilisation de votre nouvelle sécheuse Veuillez consulter des sections particulières de ce manuel pour de plus amples informations Avertissement important Pour réduire le risque d incendie d électrocution ou de blessure lisez tout le manuel y compris les Instruct...

Страница 54: ...les paramètres actuels REMARQUE Si vous n appuyez pas de nouveau sur le bouton de pour poursuivre le cycle de séchage en moins de 4 minutes la sécheuse se mettra automatiquement hors tension 3 BOUTONS MORE TIME LESS TIME augmentation réduction du temps Utilisez ces boutons lors des cycles MANUAL DRY réglage manuel et TIME DRY temps de séchage pour régler le temps de séchage Appuyez sur le bouton M...

Страница 55: ...r ESTIMATED TIME REMAINING temps restant estimé indique le temps réel restant pour votre cycle Appuyez sur les boutons MORE TIME augmentation du temps or LESS TIME réduction du temps pour modifier le temps réel du cycle Type Cycle Sorte de tissu Niveau de séchage Températura Durée en minutes Plus moins de temps Entretien du froissement Chaleur humide Coton serviettes Denims serviettes cotons lourd...

Страница 56: ...e le bouton MARCHE PAUSE est enfoncé la sécheuse affichera le temps estimé réglage automatique ou le temps réglé réglage manuel restant et débutera le culbutage REMARQUE Le temps des cycles SENSOR DRY capteur d humidité pourrait varier En effet la sécheuse recalcule le temps de séchage restant pour optimiser les résultats 3 Indicateur de cycle terminé Illustre la portion du cycle de séchage actuel...

Страница 57: ...s Retirez immédiatement les articles de la sécheuse aussitôt le cycle complété pour prévenir le froissage 6 Si vous désirez les modifier pour ce cycle appuyez sur le ou les boutons d options afin d afficher des paramètres supplémentaires pour ces options Appuyez de nouveau pour faire le tour des paramètres jusqu à ce que le paramètre désiré soit mis en surbrillance REMARQUE Pour protéger vos vêtem...

Страница 58: ...TEMP CONTROL contrôle de la température à répétition pour défiler à travers les paramètres disponibles BOUTON TIME DRY temps de séchage Ce bouton vous permet de sélectionner manuellement le temps de séchage de 20 à 60 minutes par incréments de 10 minutes Utilisez cette fonction pour les petites brassées ou pour défroisser Utilisez les boutons MORE TIME LESS TIME augmentation réduction du temps pou...

Страница 59: ...la fin d un cycle ou jusqu à l ouverture de la porte C est une fonction pratique qui aide à prévenir la formation de plis lorsque vous êtes dans l impossibilité de retirer immédiatement les articles de la sécheuse BOUTON DAMP DRY BEEP sonnerie vêtements humides Avec cette option la sécheuse émettra une alarme sonore lorsque la brassée sera environ 80 sèche Elle vous permet de retirer les articles ...

Страница 60: ...on du débit d air ou une chute du rendement de la sécheuse vérifiez immédiatement le système de conduits pour toute obstruction et blocage Entretien du système de conduits Au moins une fois par année vérifiez le système de conduits contrôlez pour toute accumulation de charpie et nettoyez les Si vous remarquez une réduction du débit d air ou une chute du rendement de la sécheuse vérifiez immédiatem...

Страница 61: ...bséquente Les taches sur des vêtements secs sont en réalité des taches que le lavage n a pu retirer correctement Assurez vous que les vêtements sont complètement propres en conformité avec les directives de votre machine à laver et votre détergent L afficheur montre le code d erreur tE1 ou tE2 La thermistance est défectueuse Éteignez la sécheuse et appelez le service Présence de charpie sur les vê...

Страница 62: ...ie il sera peut être nécessaire de nettoyer le filtre en cours de cycle Confirmez la bonne configuration du système de conduits et qu il est exempt de débris charpie et d obstructions Assurez vous que la grille à registre ou le clapet s ouvre correctement et qu il elle ne soit pas bloqué e bourré e ou endommagé e Réinitialisez le disjoncteur ou remplacez le fusible N augmentez pas la capacité du f...

Страница 63: ...ans ce guide peuvent varier à cause des améliorations constantes apportées au produit Reportez vous à la plaque signalétique de votre sécheuse ACCESSOIRES EN OPTION Pour ces produits LG et les autres contactez votre détaillant LG local ou visitez notre site Internet au ca lge com Piédestal Donnez à votre machine à laver et sécheuse LG un coup de pouce grâce aux piédestaux de 14 po Ils offrent un t...

Страница 64: ...out non respect de ces instructions peut entraîner une électrocution un incendie une explosion ou la mort Portez des gants durant I installation Pour vous assurer que l installation est sécuritaire et sûre conformez vous aux directives suivantes Outils requis pour l installation Tournevis à tête cruciforme Phillips Clé fournie Pour mettre la sécheuse à la même hauteur que la machine à laver rétrac...

Страница 65: ...gnés avec les trous des souteneurs Insérez et serrez 2 vis à chaque coin pour fi xer solidement l appareil au piédestal REMARQUE Si les supports ne sont pas correctement installés vous pourriez entendre du bruit et sentir des vibrations Placez l appareil à l endroit désiré 6 Serrez solidement à la main tous les contreécrous REMARQUE Si les contre écrous ne sont pas serrés vous pourriez entendre du...

Страница 66: ...déjà installés débranchez tous les conduits d alimentation électrique d eau ou de gaz de même que les connexions de vidange ou de ventilation Tout non respect de ces instructions peut entraîner une électrocution un incendie une explosion ou la mort La trousse d empilage comprend Deux 2 rails latéraux Un 1 rail avant Quatre 4 vis Pour vous assurer que l installation est sécuritaire et sûre conforme...

Страница 67: ...ssez lentement la sécheuse vers l arrière de la machine à laver jusqu à ce que les butées des rails latéraux coincent les pieds de la sécheuse 4 Insérez le rail avant entre le bas de la sécheuse et le haut de la machine à laver Poussez le rail avant vers l arrière de la machine à laver jusqu à ce qu il entre en contact avec les butées du rail latéral Installez les deux vis restantes pour solidemen...

Страница 68: ...LG ELECTRONICS INC GARANTIE LIMITÉE APPLICABLE AUX SÉCHEUSES LG CANADA 1 an 1 an 1 an 1 an ...

Отзывы: